How to Annotate Video for YOLO Object Detection and Tracking (2026 Guide)
Learn how to annotate video for YOLO object detection and tracking, from bounding boxes and tracking IDs to AI-assisted labeling and exporting into a YOLO training-ready dataset.

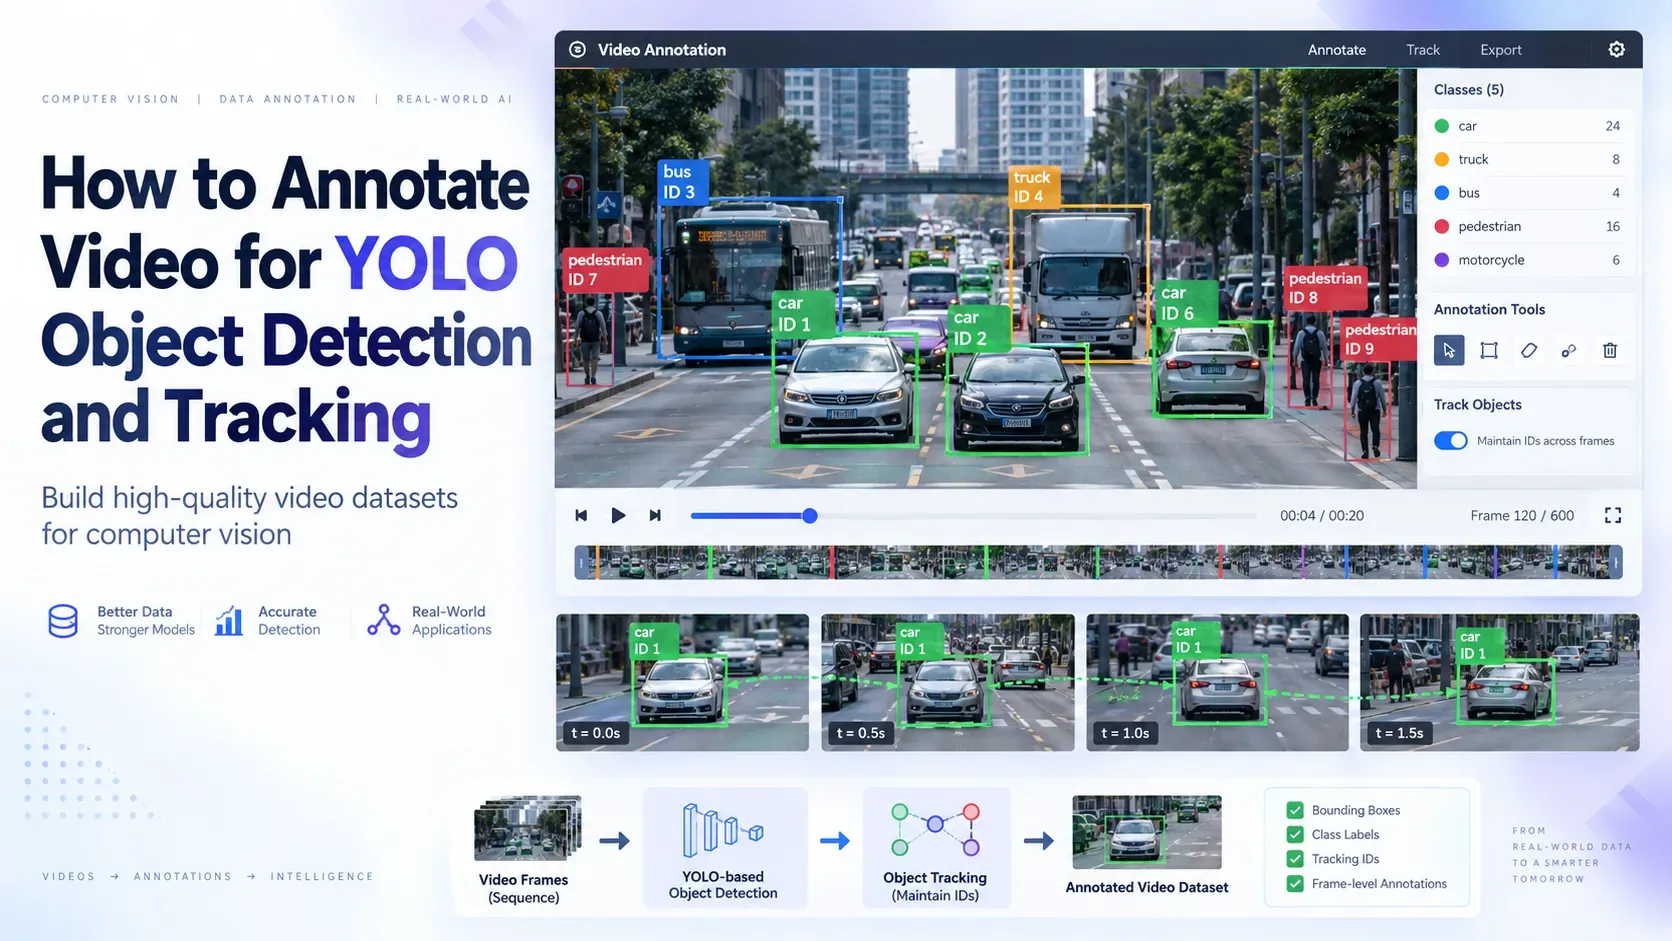
YOLO (You Only Look Once) has become the go-to architecture for real-time object detection and tracking, powering everything from warehouse robotics and traffic monitoring to sports analytics and retail loss prevention. But no matter how advanced the latest YOLO version is YOLOv8, YOLOv11, or YOLOv12, its accuracy depends entirely on one thing: the quality of the annotated video data it's trained on.
Video annotation for YOLO is fundamentally different from labeling static images. A video is a sequence of hundreds or thousands of frames, and objects move, rotate, get occluded, and re-appear across that sequence. Annotating it well means not just drawing accurate boxes, but keeping object identities consistent across time so your model can learn to detect and track.
This guide walks through exactly how to annotate video for YOLO object detection and tracking, the formats, the workflow, the pitfalls, and how modern annotation platforms like Labellerr make the process dramatically faster.
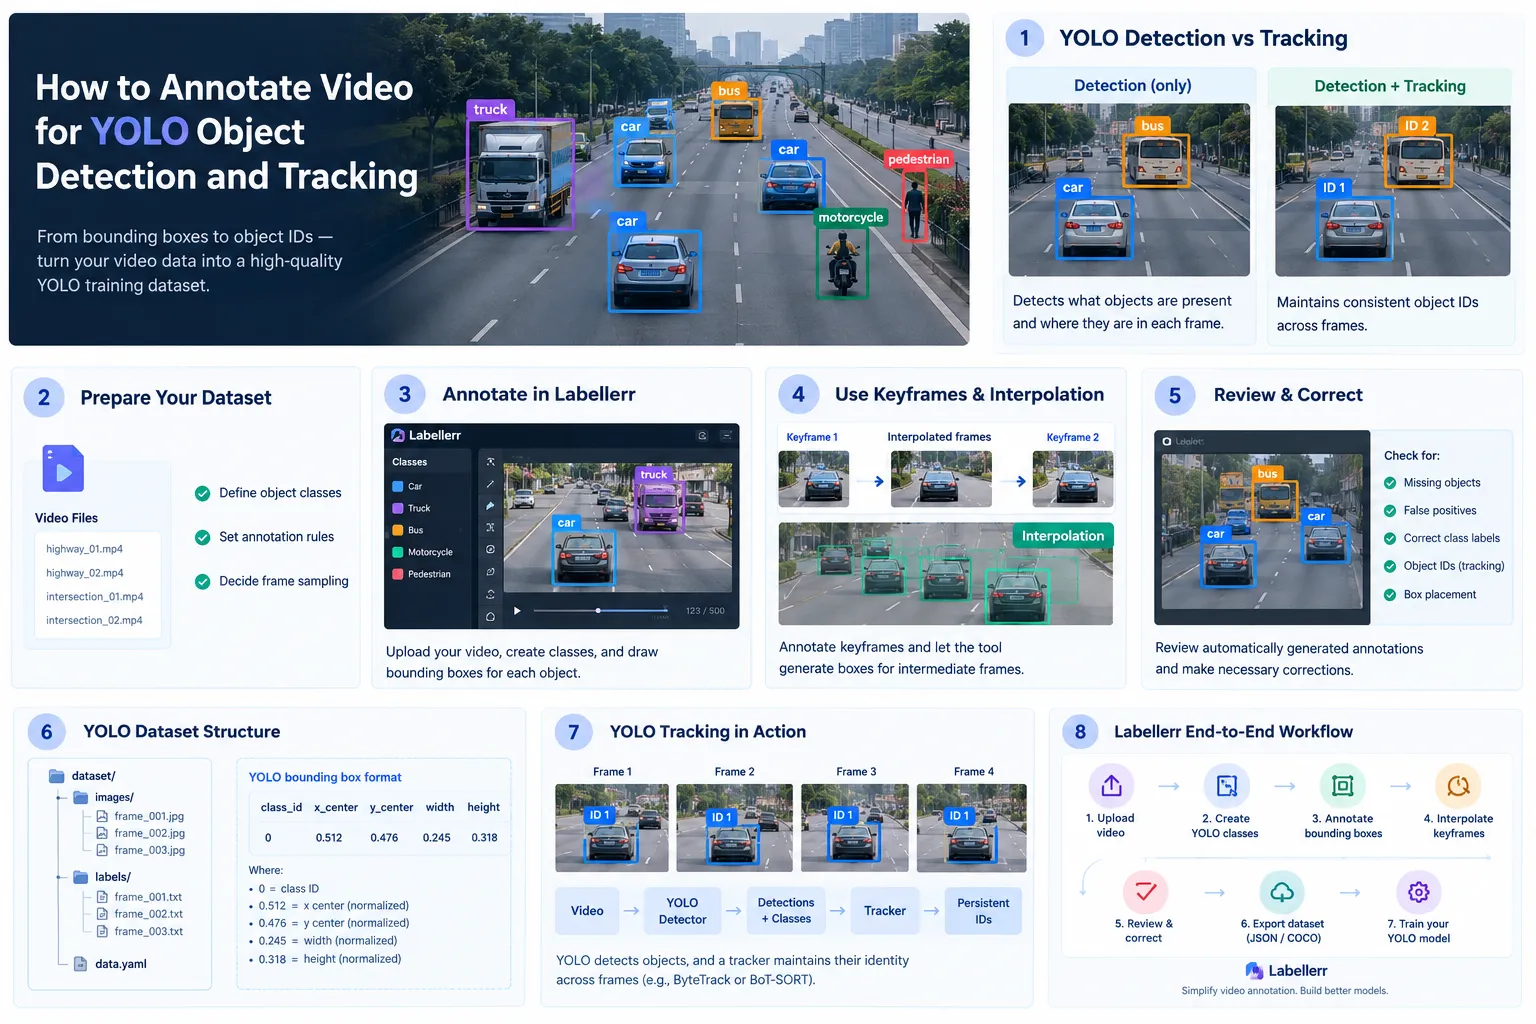
Labellerr's Workflow for YOLO Model Training
What Is YOLO Object Detection and Tracking?
YOLO is a single-stage deep learning model that detects objects and predicts their bounding boxes and class labels in one forward pass, making it fast enough for real-time video applications. When YOLO detection is combined with a tracking algorithm (such as ByteTrack, DeepSORT, BoT-SORT, or OC-SORT), each detected object is assigned a persistent ID that follows it across frames, this is what enables use cases like counting people crossing a line, following a vehicle through an intersection, or monitoring a specific product on a conveyor belt.
To train a model capable of this, your training data needs two things:
- Accurate per-frame bounding boxes or masks for every object of interest.
- Consistent object identities across frames (so the model or the downstream tracker can learn what "the same object" looks like as it moves).
Why Video Annotation Is Harder Than Image Annotation
Annotating a single image is straightforward: draw a box, assign a label, done. Video introduces several extra layers of complexity:
- Volume: A 30-second clip at 30 FPS contains 900 frames. Annotating each one manually is unrealistic without automation.
- Object continuity: The same object must retain the same ID and label across all frames it appears in.
- Occlusion and re-entry: Objects leave the frame, get blocked by other objects, and return annotations must account for this without breaking the tracking ID.
- Motion blur and lighting changes: Fast-moving objects or changing lighting can make boundaries harder to define precisely.
- Temporal consistency: Small labeling inconsistencies between frames (jittery boxes, flickering labels) directly translate into a noisy, harder-to-train model.
This is why most professional workflows don't annotate every single frame by hand, they annotate keyframes and use interpolation or AI-assisted tracking to propagate labels across the rest.
Types of Annotations Used for YOLO Video Datasets
Depending on your use case, you may need one or more of the following annotation types:
- Bounding boxes – the standard YOLO annotation format; a rectangle around each object.
- Oriented bounding boxes (OBB) – rotated rectangles, useful for aerial imagery or angled objects.
- Polygons / instance segmentation – pixel-accurate outlines, used when exact shape matters (e.g., medical imaging, defect detection).
- Semantic segmentation masks – every pixel labeled by class, useful for scene understanding tasks.
- Keypoints / pose annotation – for human pose estimation or skeletal tracking.
- Tracking IDs – a unique identifier attached to each object instance, maintained across frames.
For most YOLO object detection and tracking projects, you'll primarily work with bounding boxes plus tracking IDs, exported in YOLO's native .txt label format.
Understanding the YOLO Annotation Format
Each YOLO label file is a plain text file with one line per object, formatted as:
class_id x_center y_center width height
All coordinates are normalized between 0 and 1, relative to the image width and height. For video datasets used in tracking, many pipelines extend this with a frame index and tracking ID (as used by formats like MOT or YOLO-based tracking exports), so each annotation can be traced across the full sequence.
How to Use Labellerr for YOLO Video Annotation
Manually annotating thousands of video frames is one of the biggest bottlenecks in building a YOLO model, this is exactly the problem AI-assisted annotation platforms like Labellerr are built to solve. Here's how a typical YOLO video annotation workflow looks on Labellerr:
Step 1: Create a Video Annotation Project
Log in to Labellerr and start a new video annotation project. Upload your raw video files directly, there's no need to manually extract frames beforehand, since the platform handles frame breakdown internally.
Step 2: Define Your Object Classes
Set up your target classes (for example, "vehicle," "person," "pill," or "product") along with any labeling instructions your annotation team should follow.
Step 3: Annotate the First Frame with AI Assistance
Rather than drawing every box by hand, use Labellerr's SAM-based "Magic Wand" tool to segment and label objects in the first frame with a single click per object. This gives you a precise starting annotation without manual box-drawing.
Step 4: Auto-Propagate with SAM2 Tracking
Once the first frame is labeled, trigger Labellerr's SAM2-powered tracking, which automatically detects and annotates the same objects across all remaining frames in the video, maintaining consistent tracking IDs as objects move, overlap, or become temporarily occluded.
Step 5: Review and Correct
Use the platform's review interface to scan through the auto-tracked frames, correcting any drifted boxes, missed detections, or ID switches. Because most of the heavy lifting is automated, this review pass is significantly faster than manual annotation.
Step 6: Collaborate and Run QC
Labellerr supports real-time collaboration, so multiple annotators or reviewers can work on the same project, with built-in quality-control workflows to catch labeling errors before export.
Step 7: Export in YOLO Format
Once annotation and review are complete, export your labeled dataset directly in YOLO-compatible format (or COCO/JSON), ready to feed straight into your YOLO training pipeline, turning a handful of raw videos into a large, high-quality, model-ready image dataset.
Why teams use Labellerr for this: the SAM/SAM2-assisted workflow turns what would normally be days of frame-by-frame manual labeling into a process of annotating one frame and letting the platform propagate it, while still keeping humans in the loop for quality control, collaboration, and dataset versioning.
Step 8: Export in YOLO Format and Split Your Dataset
Export your annotations into YOLO's .txt format (or YOLO-compatible formats like COCO, which can be converted). Then split the dataset into training, validation, and test sets, a common split is 70/20/10 or 80/10/10 making sure each split contains a representative mix of scenes, lighting conditions, and object classes.
Step 9: Convert the Export into YOLO's Training Directory Structure
A raw export of images and .txt label files isn't enough YOLO's training scripts (Ultralytics YOLOv5/v8/v11/v12 and most YOLO forks) expect a specific folder layout and a data.yaml configuration file pointing to it. Once your annotations are exported, organize them like this:
yolo_dataset/
├── images/
│   ├── train/
│   │   ├── frame_0001.jpg
│   │   ├── frame_0002.jpg
│   │   └── ...
│   ├── val/
│   │   ├── frame_0500.jpg
│   │   └── ...
│   └── test/
│       ├── frame_0800.jpg
│       └── ...
├── labels/
│   ├── train/
│   │   ├── frame_0001.txt
│   │   ├── frame_0002.txt
│   │   └── ...
│   ├── val/
│   │   ├── frame_0500.txt
│   │   └── ...
│   └── test/
│       ├── frame_0800.txt
│       └── ...
└── data.yaml
Key rules for this structure:
- Every image in
images/<split>/must have a matching.txtfile with the same filename inlabels/<split>/(e.g.,frame_0001.jpg→frame_0001.txt). - Frames with no objects present still need an empty (but existing)
.txtfile, not a missing one, otherwise some training scripts will throw errors or silently skip the image. - Keep the class order in your labels consistent with the order defined in
data.yaml, since YOLO mapsclass_iddirectly to the list index.
Next, create the data.yaml file that tells YOLO where the data lives and what the classes are:
train: yolo_dataset/images/train
val: yolo_dataset/images/val
test: yolo_dataset/images/test

nc: 3
names: ['person', 'vehicle', 'forklift']train/val/test- paths to the image folders (labels are auto-located via the matchinglabels/folder by convention).nc- number of classes.names- class names in the exact order matching theirclass_idin every label file.
Step 10: Sanity-Check the Dataset Before Training
Before kicking off training, verify the structure is correct:
- Pair check: confirm every image has a corresponding label file and there are no orphaned files on either side.
- Visual spot-check: render a handful of boxes back onto their frames to confirm coordinates weren't flipped or mis-normalized during export/conversion.
- Class distribution check: count label occurrences per class to catch severe imbalance before you spend GPU hours training on it.
- Split integrity: make sure frames from the same video clip aren't split across train and val, near-duplicate frames leaking into validation will inflate your metrics artificially.
Step 11: Kick Off Training
With the structure and data.yaml in place, training with Ultralytics YOLO is a single command:
yolo detect train data=yolo_dataset/data.yaml model=yolov8n.pt epochs=100 imgsz=640For tracking-focused deployments, this trained detection model is then paired at inference time with a tracker (ByteTrack, BoT-SORT, DeepSORT, etc.), the tracker itself doesn't need to be "trained" on your annotated tracking IDs directly, but consistent IDs in your validation data are still essential for evaluating tracking quality (metrics like MOTA/IDF1) once detection and tracking are combined.
Best Practices for Annotating Video for YOLO
- Prioritize keyframe + AI-assisted propagation over full manual annotation, it cuts labeling time by 10x or more on longer videos.
- Keep tracking IDs stable. A dataset with frequent ID switches will teach your tracker bad habits.
- Annotate a diverse range of conditions: different lighting, angles, occlusion levels, and backgrounds, so your model generalizes.
- Use tight, consistent bounding boxes. Loose or inconsistent box sizing across frames introduces noise that hurts mAP scores.
- Build in a QC/review step. Even a light second pass catches a large share of ID and boundary errors.
- Balance your classes. If one object class dominates your video dataset, your model will be biased toward detecting it well and everything else poorly.
- Version your dataset. As you add more annotated video, keep track of dataset versions so you can trace model performance changes back to data changes.
Common Challenges in Video Annotation for YOLO (and How to Solve Them)
| Challenge | Solution |
|---|---|
| Too many frames to label manually | Use keyframe annotation with AI-assisted interpolation/tracking |
| Objects lost during occlusion | Mark occlusion explicitly; re-link the same ID on re-entry instead of creating a new one |
| Inconsistent labeling across annotators | Maintain a written annotation guideline and run inter-annotator agreement checks |
| Small or fast-moving objects | Increase frame sampling rate for those segments; use tighter QC |
| Class imbalance | Actively source more footage containing underrepresented classes |
| Slow turnaround on large datasets | Use a platform with automated, model-assisted labeling rather than fully manual tools |
Conclusion
Annotating video for YOLO object detection and tracking comes down to a simple principle: annotate once, propagate intelligently, and verify consistently. Manual, frame-by-frame labeling doesn't scale but a keyframe-plus-AI-assisted-tracking workflow does. Whether you build your own pipeline with open-source tools or use a platform like Labellerr that bundles SAM-based auto-tracking, collaboration, and QC into one workflow, the goal is the same: clean, consistent, temporally-stable annotations that let your YOLO model learn to detect and track objects reliably in the real world.
FAQs
Q1. Can YOLO be trained using video data?
Yes. Video can be converted into frames, annotated with bounding boxes and class labels, and then prepared in the YOLO dataset format for model training.
Q2. Do I need to annotate every frame in a video for YOLO?
No. You can annotate selected keyframes and use interpolation or tracking to generate annotations across intermediate frames, followed by manual review.
Q3. What is the difference between YOLO object detection and tracking?
Object detection identifies objects and their locations in each frame, while tracking maintains a consistent identity for the same object across multiple frames.

Simplify Your Data Annotation Workflow With Proven Strategies
.png)