

Annotate Your Egocentric Video With MediaPipe
Annotate egocentric videos using MediaPipe hand tracking. Learn how to detect, stabilize, and export hand landmarks with preprocessing, smoothing, and JSON output for real-world applications like gesture recognition and action analysis.

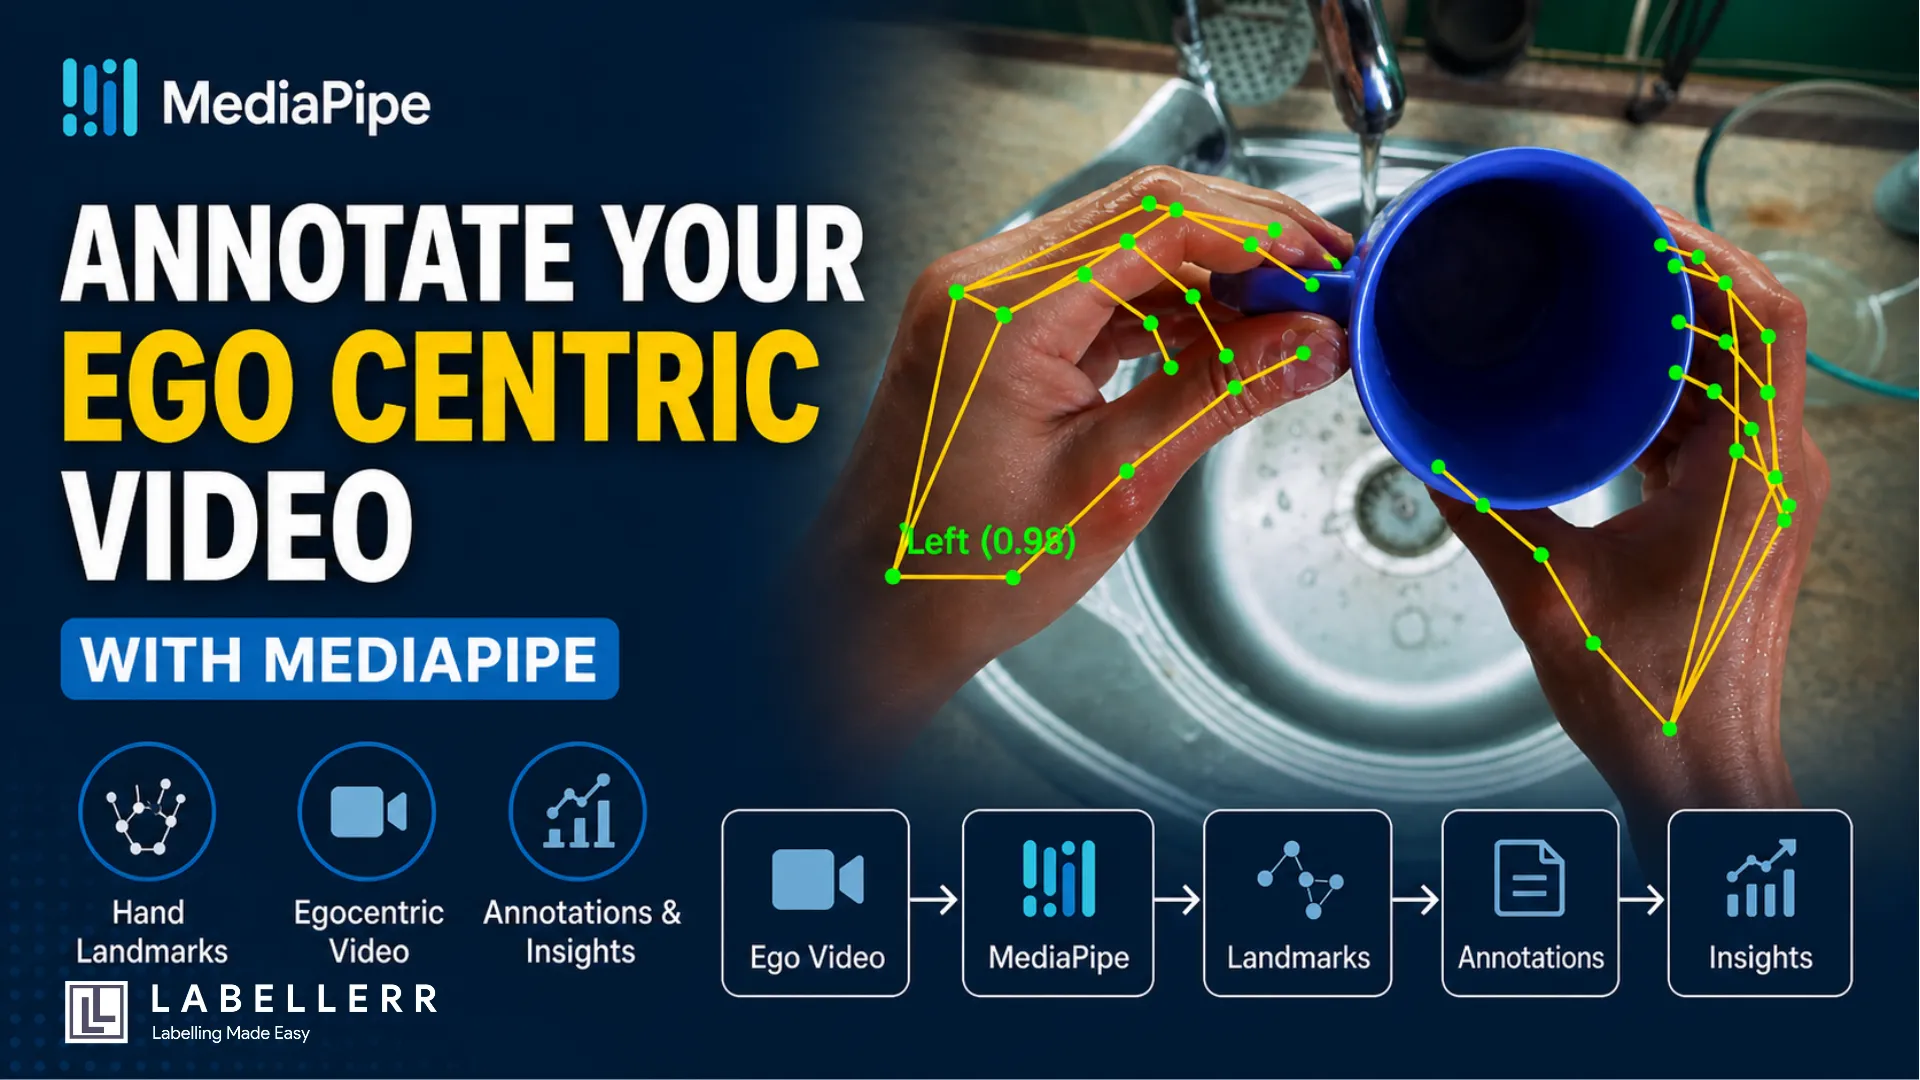
Your hands are washing dishes. The camera watches from above. And a model traces every knuckle, every fingertip, every wrist movement, in real time, on every frame. That is egocentric hand detection. And it is more useful than it sounds.
Researchers use it for action recognition. Surgeons use it for skill assessment. AR developers use it for gesture control. If you have a first-person video and want to know exactly where hands are at every moment, MediaPipe is where you start.
What Is MediaPipe?
MediaPipe is Google's open-source ML framework for perception tasks. It runs on-device, needs no GPU, and ships pre-trained models for faces, poses, and hands.
The HandLandmarker model detects up to two hands per frame. For each hand it returns 21 landmarks, points mapped to every joint and fingertip. Two hands give you 42 points total. Each point carries three values: x, y, and z. X and Y are normalized between 0 and 1 relative to frame size. Z is depth relative to the wrist, negative means closer to the camera.
That is your raw signal. Everything else is built on top of it.
Why Egocentric Video Is Harder
Standard hand detection assumes a fixed background and a hand entering frame from the side. Egocentric video breaks both assumptions.
The camera is mounted on the body or placed overhead. Hands dominate the frame. They overlap. They move fast. Water, soap, and reflections scatter light unpredictably. Motion blur is constant. Detection fails more often, and when it does, the skeleton vanishes for several frames.
This matters because missed frames break downstream analysis. If you are counting wash cycles or classifying gestures, a flickering skeleton is noise. You need to engineer around it.
The Pipeline : From Video to Annotated Output
The full system has four stages: load, detect, draw, save. Here is the logic.

Pipeline Overview
Stage 1: Load the video with OpenCV
OpenCV reads the video frame by frame. You extract FPS, width, and height upfront. These three values control everything downstream, timestamps for MediaPipe, dimensions for the video writer, and pixel conversion for landmarks.
Stage 2: Detect with HandLandmarker
MediaPipe's new Tasks API replaced the old mp.solutions.hands. You now load a .task model file and configure a HandLandmarkerOptions object. Two modes matter here.
IMAGE mode processes each frame independently. VIDEO mode tracks across frames using timestamps. VIDEO mode is more stable, it uses temporal context to keep the skeleton alive between frames. The timestamp must be strictly increasing in milliseconds. Calculate it as (frame_index / fps) * 1000.
Stage 3: Draw the skeleton
For each detected hand, convert normalized x and y to pixel coordinates by multiplying by frame width and height. Draw lines between connected landmark pairs. Draw circles at each of the 21 points. Label the hand as Left or Right with its confidence score.
MediaPipe labels hands from the camera's perspective, not the subject's. In egocentric video this often means the labels are flipped. Keep that in mind.
Stage 4: Write the output
OpenCV's VideoWriter saves the annotated frames. Use XVID codec with .avi for maximum compatibility. After processing, run FFmpeg to convert to H.264 .mp4 for browser playback.
The Core Detection Code
options = HandLandmarkerOptions(
    base_options=mp_python.BaseOptions(model_asset_path="hand_landmarker.task"),
    running_mode=RunningMode.VIDEO,
    num_hands=2,
    min_hand_detection_confidence=0.3,
    min_hand_presence_confidence=0.3,
    min_tracking_confidence=0.3,
)

with HandLandmarker.create_from_options(options) as detector:
    while cap.isOpened():
        ret, frame = cap.read()
        if not ret: break

        rgb = cv2.cvtColor(frame, cv2.COLOR_BGR2RGB)
        mp_image = mp.Image(image_format=mp.ImageFormat.SRGB, data=rgb)
        timestamp_ms = int((frame_idx / fps) * 1000)
        result = detector.detect_for_video(mp_image, timestamp_ms)
Confidence thresholds at 0.3 instead of the default 0.5 catches more detections in difficult lighting. Lower thresholds mean more false positives, but in a controlled egocentric setup, that tradeoff favors recall over precision.
Before vs After What Preprocessing Does
Raw egocentric frames are often dark, wet, and blurry. Two preprocessing steps fix most of it.
Sharpening applies a 3x3 convolution kernel that amplifies edge contrast. This partially reverses motion blur and makes finger boundaries cleaner for the detector.
CLAHE : Contrast Limited Adaptive Histogram Equalization normalizes brightness across small regions of the frame. Wet surfaces create bright hotspots. CLAHE compresses those while lifting dark areas. The detector sees a more uniform image.
Run preprocessing on the frame before passing it to MediaPipe. Draw the skeleton on the original frame not the processed one. This keeps the output visually clean.
Smoothing the Skeleton
VIDEO mode helps with temporal consistency. But the skeleton still jitters — landmarks jump a few pixels between frames even when the hand barely moves.
A 5-frame rolling average fixes this. For each of the 21 landmarks on each hand, store the last 5 pixel positions in a deque. Replace the current position with the average. The skeleton becomes stable without introducing visible lag.
from collections import deque
smooth_buf = {
    "Left":  [deque(maxlen=5) for _ in range(21)],
    "Right": [deque(maxlen=5) for _ in range(21)]
}
This one addition makes the output look professional rather than noisy.
Saving Landmarks as JSON
The video is the visual output. The JSON is the data output. Every frame gets an entry with its index, timestamp, and the full x, y, z coordinates for all detected landmarks.
json
{
  "frame": 42,
  "timestamp_ms": 1400,
  "hands": {
    "Left": [
      {"landmark_id": 0, "landmark_name": "WRIST",
       "x": 0.512, "y": 0.743, "z": -0.012,
       "pixel_x": 614, "pixel_y": 892}
    ],
    "Right": null
  }
}
Null means the hand was not detected that frame. This structure is queryable — load it into pandas, filter by frame range, plot joint trajectories, or feed it into a classifier. The JSON turns a video annotation task into a structured dataset.
Conclusion
MediaPipe makes hand landmark detection accessible. But accessible does not mean trivial. Egocentric video introduces real challenges, motion blur, reflections, occlusion, and label flipping, that default settings do not handle well.
The pipeline described here addresses all of them. Preprocessing cleans the input. Lower thresholds catch more detections. VIDEO mode adds temporal stability. Smoothing removes jitter. JSON export turns annotations into a usable dataset.
The result is a system that takes a raw egocentric video and produces two outputs: a fully annotated video with color-coded skeletons, and a structured JSON file with 42 landmark coordinates per frame. That is the foundation for anything built on top, gesture recognition, action classification, skill assessment, or augmented reality.
FAQs
Q1. Why does hand detection fail in egocentric videos?
Egocentric videos involve motion blur, occlusions, reflections (water/soap), and fast hand movement. These factors reduce detection stability and cause landmark flickering across frames.
Q2. How can I improve MediaPipe hand tracking accuracy in egocentric setups?
Apply preprocessing (sharpening + CLAHE), lower confidence thresholds, use VIDEO mode for temporal consistency, and apply smoothing (rolling average) to reduce jitter.
Q3. Why should I export landmarks as JSON along with the video?
JSON provides structured data (x, y, z coordinates per frame), enabling analysis, gesture classification, trajectory tracking, and integration with ML pipelines.

Simplify Your Data Annotation Workflow With Proven Strategies
.png)
