

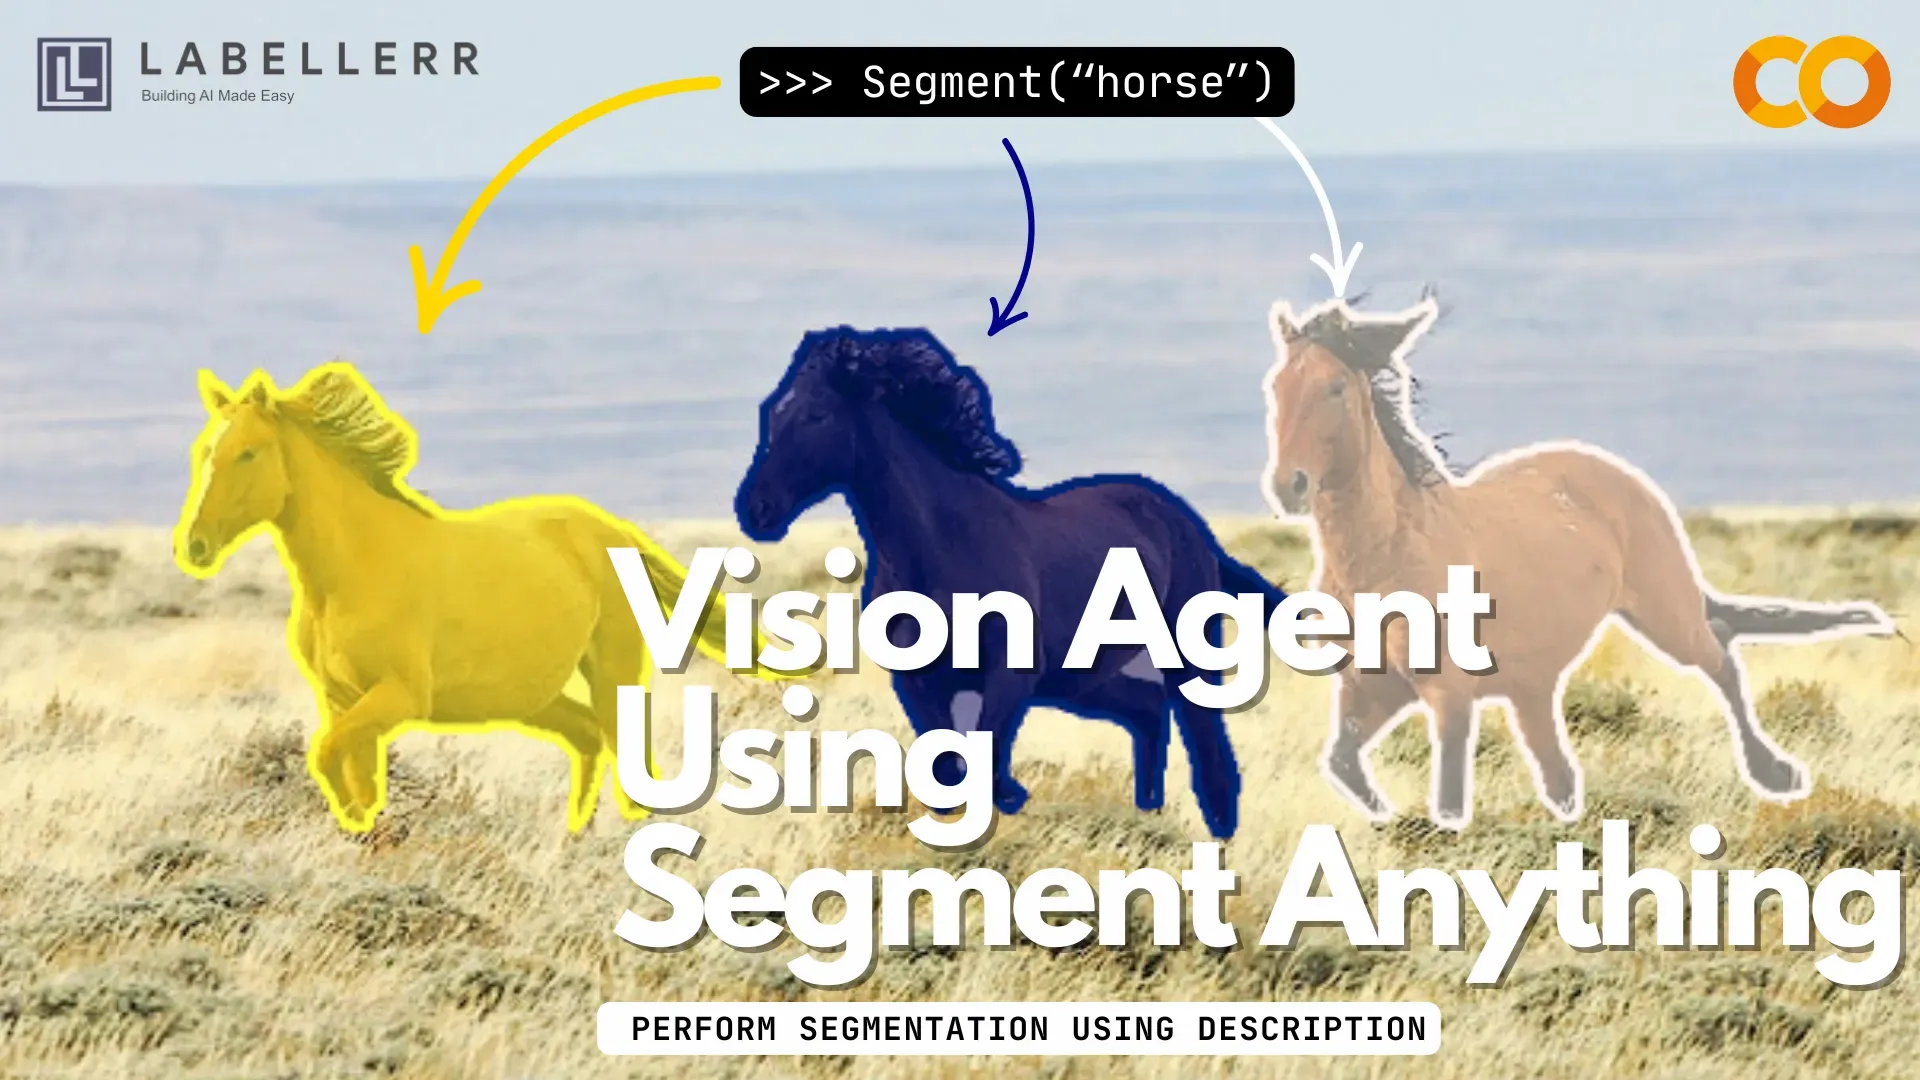
Vision Agent Using SAM-Description-Based Object Segmentation Agent
Build Vision Agents using Segment Anything (SAM)! Learn how to combine text descriptions (like with Grounding DINO) and SAM for powerful, zero-shot object segmentation, bypassing traditional training needs. Understand and build your own description-based vision agent.

Introduction
Want to build AI that can find and outline specific objects in images just by reading a text description?
Imagine telling your AI, "outline the black horse" and having it do just that, even if it's never been specifically trained on a horse before.
How can we build such a smart system?
Training standard AI to find objects is hard work. It often means carefully labeling thousands, sometimes millions, of images for each thing you want it to find.
Did you know, labeling data can take up 80% of the time spent on an AI vision project?
Wouldn't it be great to avoid a lot of that effort, especially for new or unusual objects?
We have the answer: combine two powerful AI models!
We use Grounding DINO to find objects based on your text descriptions, and the Segment Anything Model (SAM) to draw precise outlines around them.
Together, they create smart "Vision Agents". These agents understand language and see accurately, letting them outline objects just from descriptions, without needing tons of pre-labeled examples.
We'll show you step-by-step how to connect Grounding DINO and SAM to create AI that segments objects based on simple text commands. Let's build something powerful!
Vision Agent Using Description
Understanding Vision Agent
So, what do we mean by a "Vision Agent" in this guide? Think of it like a smart helper that can see the world through images and act on what it sees based on instructions.
Specifically, we're talking about agents designed for image segmentation.
Their job is to precisely find and outline specific objects within a picture. Instead of just saying "there's a cat," these agents can draw a perfect line around the cat's shape.
The Big Challenges with Old-School Segmentation
Before we build our new agent, let's understand why the traditional ways of doing image segmentation can be tough:
- It Needs SO Much Labeled Data: Usually, to teach AI to outline objects (like cats, cars, or chairs), you first need to show it thousands of examples. Someone has to manually draw exact outlines around every single object in those example images. This takes a huge amount of time and effort, and it costs a lot!
- It Takes Special Skills: Building and training these traditional segmentation models isn't easy. You often need experts who really understand AI and coding.
- Models Get Stuck on What They Know: If you train a model only on cats and dogs, it won't know how to find a bird or a bicycle later. Adding new objects means going back, getting more labeled data, and retraining the model, which is slow and expensive.
- Doesn't Adapt Well: Sometimes, a model trained in one setting (like sunny days) doesn't work well in another (like rainy nights or different camera angles) without even more specific training data.
Why We Need an Agent That Understands Descriptions
Because the old way has these problems, we need a smarter, more flexible approach.
This is where a Description-Based Object Segmentation Agent comes in! Imagine you could just tell the agent what to find using plain English.
Here's why this is so powerful:
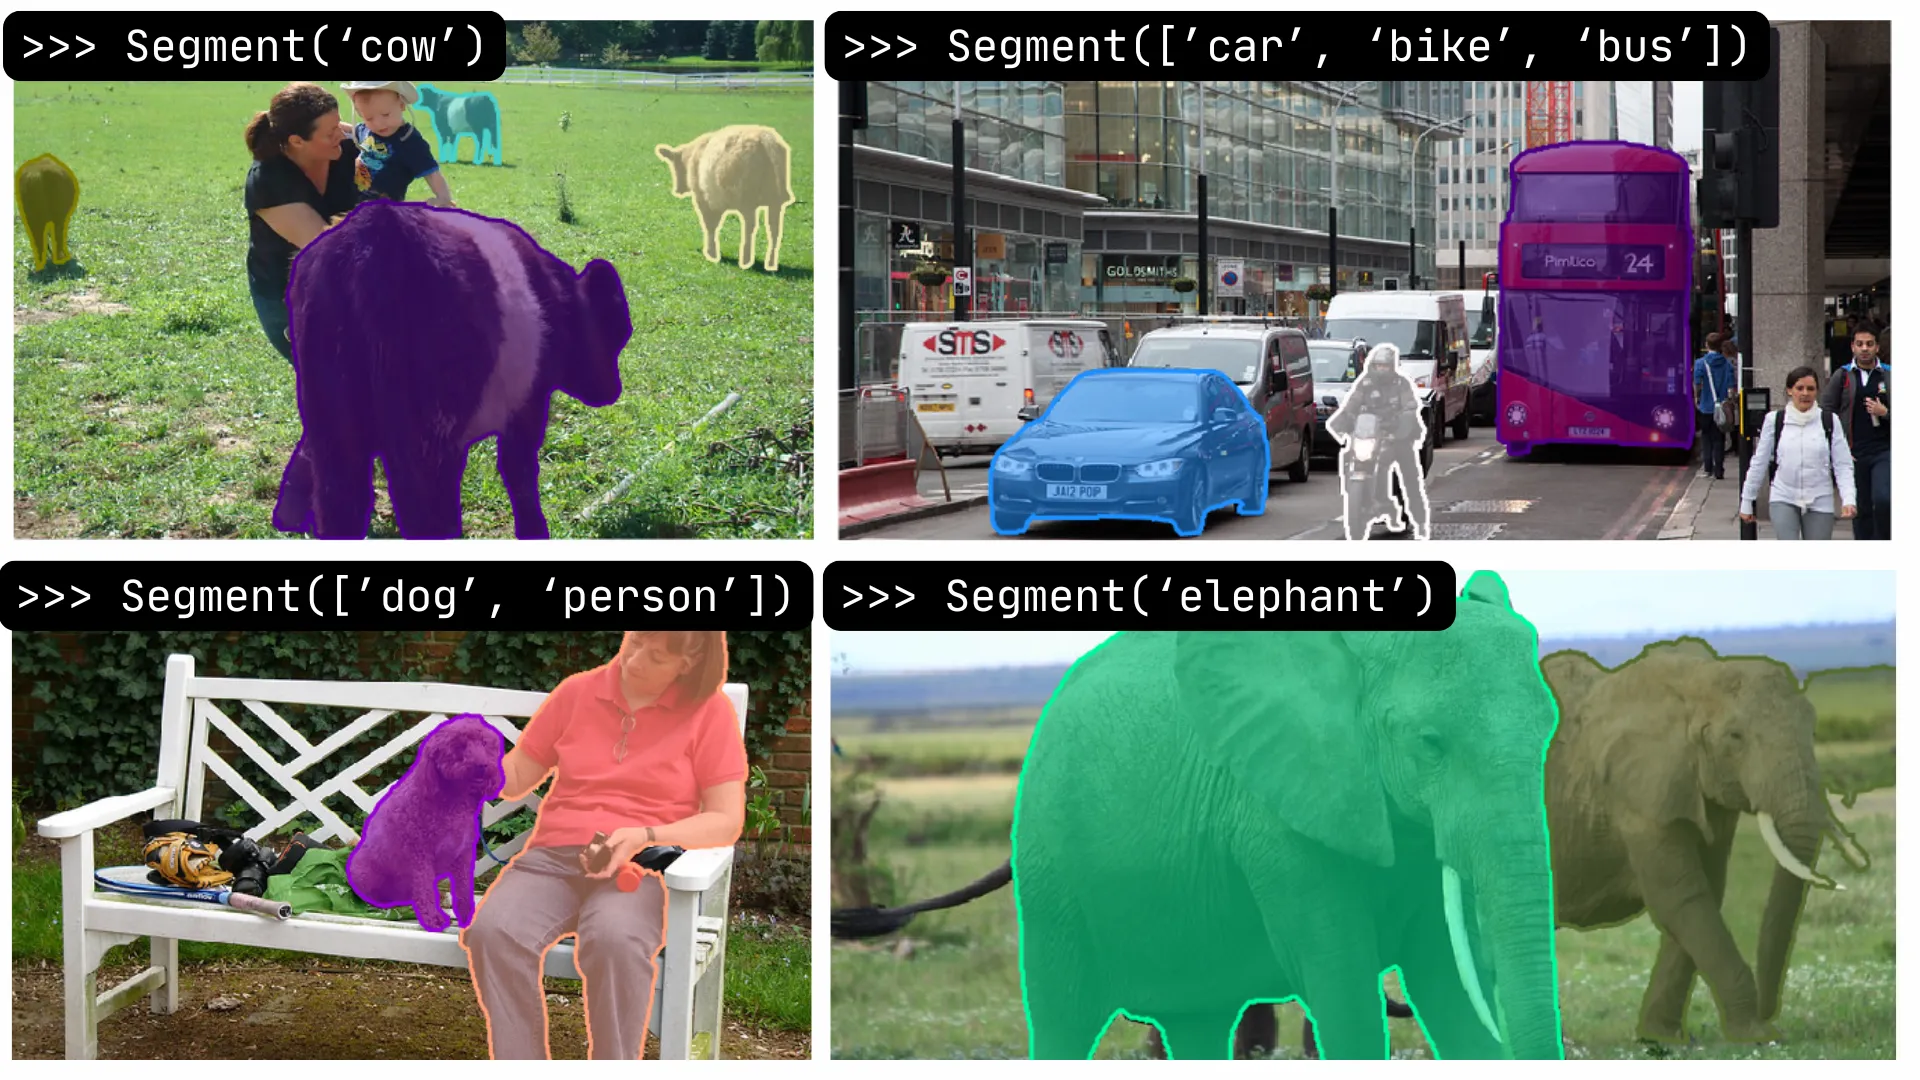
- Find Anything, Anytime: Instead of being limited to pre-trained object types, you can ask it to find "the red apple on the table," "the person waving," or "the fluffy white cloud." The agent uses the description to find the object, even if it's never seen that exact thing labeled before.
- Skip the Massive Labeling: You avoid the most time-consuming part of traditional segmentation. No need to manually outline thousands of examples for every possible object you might want to find later.
- Easy to Use: Talking or typing instructions is much simpler than complex programming or retraining models for every new task.
- Fast and Flexible: Need to find a new type of object tomorrow? Just describe it! This makes building and adapting vision applications much quicker.
This new type of Vision Agent, one that combines understanding language with seeing precisely, is what we're going to build using amazing tools like Grounding DINO and SAM.
It overcomes the big hurdles of traditional methods and opens up exciting new possibilities.
Building Vision Agent
In this guide, we are going to implement multiple models on top of each other to create our vision agent.
Vision Agent Architecture
Our Agent architecture diagram is simple. We will provide Grounding DINO with a Description and image.
Using its zero-shot capabilities, we will extract our target object's bounding box coordinates.
Then we will provide our Bounding Box coordinates to the SAM model, which will provide a segmentation mask of our target object.
Using these results, we will visualize them in our image.
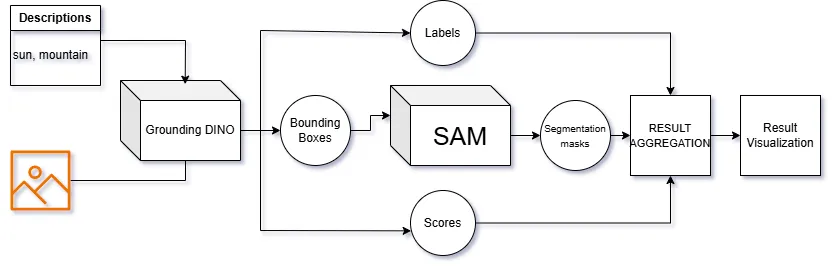
Vision Agent Diagram
Set-up environment
We have started by installing the necessary module.
!pip install transformers opencv-python pillow requests matplotlib
!pip install torch torchvision --index-url https://download.pytorch.org/whl/cu121
Importing Python Libraries
import random
from dataclasses import dataclass
from typing import Any, List, Dict, Optional, Union, Tuple
import cv2
import torch
import requests
import numpy as np
from PIL import Image
import plotly.express as px
import matplotlib.pyplot as plt
import plotly.graph_objects as go
from transformers import AutoModelForMaskGeneration, AutoProcessor, pipeline
We'll store the detection results of Grounding DINO in a dedicated Python data class.
@dataclass
class BoundingBox:
    xmin: int
    ymin: int
    xmax: int
    ymax: int

    @property
    def xyxy(self) -> List[float]:
        return [self.xmin, self.ymin, self.xmax, self.ymax]

@dataclass
class DetectionResult:
    score: float
    label: str
    box: BoundingBox
    mask: Optional[np.array] = None

    @classmethod
    def from_dict(cls, detection_dict: Dict) -> 'DetectionResult':
        return cls(score=detection_dict['score'],
                   label=detection_dict['label'],
                   box=BoundingBox(xmin=detection_dict['box']['xmin'],
                                   ymin=detection_dict['box']['ymin'],
                                   xmax=detection_dict['box']['xmax'],
                                   ymax=detection_dict['box']['ymax']))
Utility Functions
Below, some utility functions are defined as we'll draw the detection results of Grounding DINO on top of the image.
def annotate(image: Union[Image.Image, np.ndarray], detection_results: List[DetectionResult]) -> np.ndarray:
    # Convert PIL Image to OpenCV format
    image_cv2 = np.array(image) if isinstance(image, Image.Image) else image
    image_cv2 = cv2.cvtColor(image_cv2, cv2.COLOR_RGB2BGR)

    # Iterate over detections and add bounding boxes and masks
    for detection in detection_results:
        label = detection.label
        score = detection.score
        box = detection.box
        mask = detection.mask

        # Sample a random color for each detection
        color = np.random.randint(0, 256, size=3)

        # Draw bounding box
        cv2.rectangle(image_cv2, (box.xmin, box.ymin), (box.xmax, box.ymax), color.tolist(), 2)
        cv2.putText(image_cv2, f'{label}: {score:.2f}', (box.xmin, box.ymin - 10), cv2.FONT_HERSHEY_SIMPLEX, 0.5, color.tolist(), 2)

        # If mask is available, apply it
        if mask is not None:
            # Convert mask to uint8
            mask_uint8 = (mask * 255).astype(np.uint8)
            contours, _ = cv2.findContours(mask_uint8, cv2.RETR_EXTERNAL, cv2.CHAIN_APPROX_SIMPLE)
            cv2.drawContours(image_cv2, contours, -1, color.tolist(), 2)
def plot_detections(
    image: Union[Image.Image, np.ndarray],
    detections: List[DetectionResult],
    save_name: Optional[str] = None
) -> None:
    annotated_image = annotate(image, detections)
    plt.imshow(annotated_image)
    plt.axis('off')
    if save_name:
        plt.savefig(save_name, bbox_inches='tight')
    plt.show()
def random_named_css_colors(num_colors: int) -> List[str]:
    """
    Returns a list of randomly selected named CSS colors.

    Args:
    - num_colors (int): Number of random colors to generate.

    Returns:
    - list: List of randomly selected named CSS colors.
    """
    # List of named CSS colors
    named_css_colors = ['yellow', 'violet', 'white', 'navy','navy', 'black', 'darkcyan','gray', 'green', 'greenyellow', 'grey','lightblue', 'lightcoral', 'lightcyan']

    # Sample random named CSS colors
    return random.sample(named_css_colors, min(num_colors, len(named_css_colors)))
def mask_to_polygon(mask: np.ndarray) -> List[List[int]]:
    # Find contours in the binary mask
    contours, _ = cv2.findContours(mask.astype(np.uint8), cv2.RETR_EXTERNAL, cv2.CHAIN_APPROX_SIMPLE)

    # Find the contour with the largest area
    largest_contour = max(contours, key=cv2.contourArea)

    # Extract the vertices of the contour
    polygon = largest_contour.reshape(-1, 2).tolist()

    return polygon

def polygon_to_mask(polygon: List[Tuple[int, int]], image_shape: Tuple[int, int]) -> np.ndarray:
    """
    Convert a polygon to a segmentation mask.

    Args:
    - polygon (list): List of (x, y) coordinates representing the vertices of the polygon.
    - image_shape (tuple): Shape of the image (height, width) for the mask.

    Returns:
    - np.ndarray: Segmentation mask with the polygon filled.
    """
    # Create an empty mask
    mask = np.zeros(image_shape, dtype=np.uint8)

    # Convert polygon to an array of points
    pts = np.array(polygon, dtype=np.int32)

    # Fill the polygon with white color (255)
    cv2.fillPoly(mask, [pts], color=(255,))

    return mask

def load_image(image_str: str) -> Image.Image:
    if image_str.startswith("http"):
        image = Image.open(requests.get(image_str, stream=True).raw).convert("RGB")
    else:
        image = Image.open(image_str).convert("RGB")

    return image

def get_boxes(results: DetectionResult) -> List[List[List[float]]]:
    boxes = []
    for result in results:
        xyxy = result.box.xyxy
        boxes.append(xyxy)

    return [boxes]

def refine_masks(masks: torch.BoolTensor, polygon_refinement: bool = False) -> List[np.ndarray]:
    masks = masks.cpu().float()
    masks = masks.permute(0, 2, 3, 1)
    masks = masks.mean(axis=-1)
    masks = (masks > 0).int()
    masks = masks.numpy().astype(np.uint8)
    masks = list(masks)

    if polygon_refinement:
        for idx, mask in enumerate(masks):
            shape = mask.shape
            polygon = mask_to_polygon(mask)
            mask = polygon_to_mask(polygon, shape)
            masks[idx] = mask

    return masks
def plot_detections_plotly(
    image: np.ndarray,
    detections: List[DetectionResult],
    class_colors: Optional[Dict[str, str]] = None
) -> None:
    # If class_colors is not provided, generate random colors for each class
    if class_colors is None:
        num_detections = len(detections)
        colors = random_named_css_colors(num_detections)
        class_colors = {}
        for i in range(num_detections):
            class_colors[i] = colors[i]


    fig = px.imshow(image)

    # Add bounding boxes
    shapes = []
    annotations = []
    for idx, detection in enumerate(detections):
        label = detection.label
        box = detection.box
        score = detection.score
        mask = detection.mask

        polygon = mask_to_polygon(mask)

        fig.add_trace(go.Scatter(
            x=[point[0] for point in polygon] + [polygon[0][0]],
            y=[point[1] for point in polygon] + [polygon[0][1]],
            mode='lines',
            line=dict(color=class_colors[idx], width=2),
            fill='toself',
            name=f"{label}: {score:.2f}"
        ))

        xmin, ymin, xmax, ymax = box.xyxy
        shape = [
            dict(
                type="rect",
                xref="x", yref="y",
                x0=xmin, y0=ymin,
                x1=xmax, y1=ymax,
                line=dict(color=class_colors[idx])
            )
        ]
        annotation = [
            dict(
                x=(xmin+xmax) // 2, y=(ymin+ymax) // 2,
                xref="x", yref="y",
                text=f"{label}: {score:.2f}",
            )
        ]

        shapes.append(shape)
        annotations.append(annotation)

    # Update layout
    button_shapes = [dict(label="None",method="relayout",args=["shapes", []])]
    button_shapes = button_shapes + [
        dict(label=f"Detection {idx+1}",method="relayout",args=["shapes", shape]) for idx, shape in enumerate(shapes)
    ]
    button_shapes = button_shapes + [dict(label="All", method="relayout", args=["shapes", sum(shapes, [])])]

    fig.update_layout(
        xaxis=dict(visible=False),
        yaxis=dict(visible=False),
        # margin=dict(l=0, r=0, t=0, b=0),
        showlegend=True,
        updatemenus=[
            dict(
                type="buttons",
                direction="up",
                buttons=button_shapes
            )
        ],
        legend=dict(
            orientation="h",
            yanchor="bottom",
            y=1.02,
            xanchor="right",
            x=1
        )
    )

    # Show plot
    fig.show()
Grounded Segment Anything (SAM)
Now it's time to define the Grounded SAM approach!
The approach is very simple:
- Use Grounding DINO to detect a given set of texts in the image. The output is a set of bounding boxes.
- Prompt Segment Anything (SAM) with the bounding boxes, for which the model will output segmentation masks.
def detect(
    image: Image.Image,
    labels: List[str],
    threshold: float = 0.3,
    detector_id: Optional[str] = None
) -> List[Dict[str, Any]]:
    """
    Use Grounding DINO to detect a set of labels in an image in a zero-shot fashion.
    """
    device = "cuda" if torch.cuda.is_available() else "cpu"
    detector_id = detector_id if detector_id is not None else "IDEA-Research/grounding-dino-tiny"
    object_detector = pipeline(model=detector_id, task="zero-shot-object-detection", device=device)

    labels = [label if label.endswith(".") else label+"." for label in labels]

    results = object_detector(image,  candidate_labels=labels, threshold=threshold)
    results = [DetectionResult.from_dict(result) for result in results]

    return results
def segment(
    image: Image.Image,
    detection_results: List[Dict[str, Any]],
    polygon_refinement: bool = False,
    segmenter_id: Optional[str] = None
) -> List[DetectionResult]:
    """
    Use Segment Anything (SAM) to generate masks given an image + a set of bounding boxes.
    """
    device = "cuda" if torch.cuda.is_available() else "cpu"
    segmenter_id = segmenter_id if segmenter_id is not None else "facebook/sam-vit-base"

    segmentator = AutoModelForMaskGeneration.from_pretrained(segmenter_id).to(device)
    processor = AutoProcessor.from_pretrained(segmenter_id)

    boxes = get_boxes(detection_results)
    inputs = processor(images=image, input_boxes=boxes, return_tensors="pt").to(device)

    outputs = segmentator(**inputs)
    masks = processor.post_process_masks(
        masks=outputs.pred_masks,
        original_sizes=inputs.original_sizes,
        reshaped_input_sizes=inputs.reshaped_input_sizes
    )[0]

    masks = refine_masks(masks, polygon_refinement)

    for detection_result, mask in zip(detection_results, masks):
        detection_result.mask = mask

    return detection_results
def grounded_segmentation(
    image: Union[Image.Image, str],
    labels: List[str],
    threshold: float = 0.3,
    polygon_refinement: bool = False,
    detector_id: Optional[str] = None,
    segmenter_id: Optional[str] = None
) -> Tuple[np.ndarray, List[DetectionResult]]:
    if isinstance(image, str):
        image = load_image(image)

    detections = detect(image, labels, threshold, detector_id)
    detections = segment(image, detections, polygon_refinement, segmenter_id)

    return np.array(image), detections
Inference
Let's test our model on a sample image for the COCO dataset.
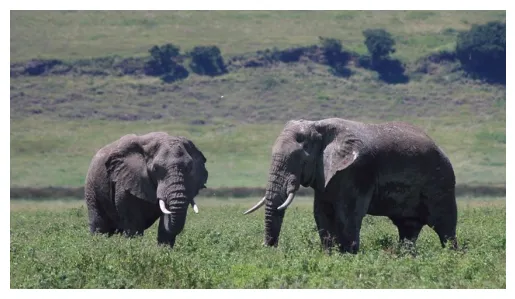
Sample Image of Elephants
image_url = "http://farm8.staticflickr.com/7193/6956100130_8bfc1afaa1_z.jpg"
labels = ["elephants"]
threshold = 0.3

detector_id = "IDEA-Research/grounding-dino-tiny"
segmenter_id = "facebook/sam-vit-base"
image_array, detections = grounded_segmentation(
    image=image_url,
    labels=labels,
    threshold=threshold,
    polygon_refinement=True,
    detector_id=detector_id,
    segmenter_id=segmenter_id
)
Let's visualize the results:
plot_detections(image_array, detections)
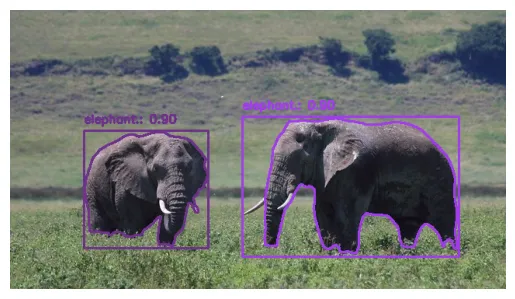
Grounding DINO + SAM
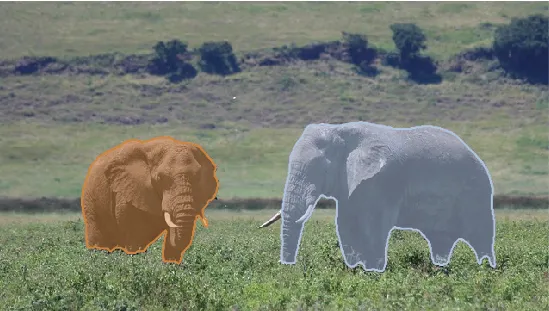
Segmentation Mask Result
More Inference Results
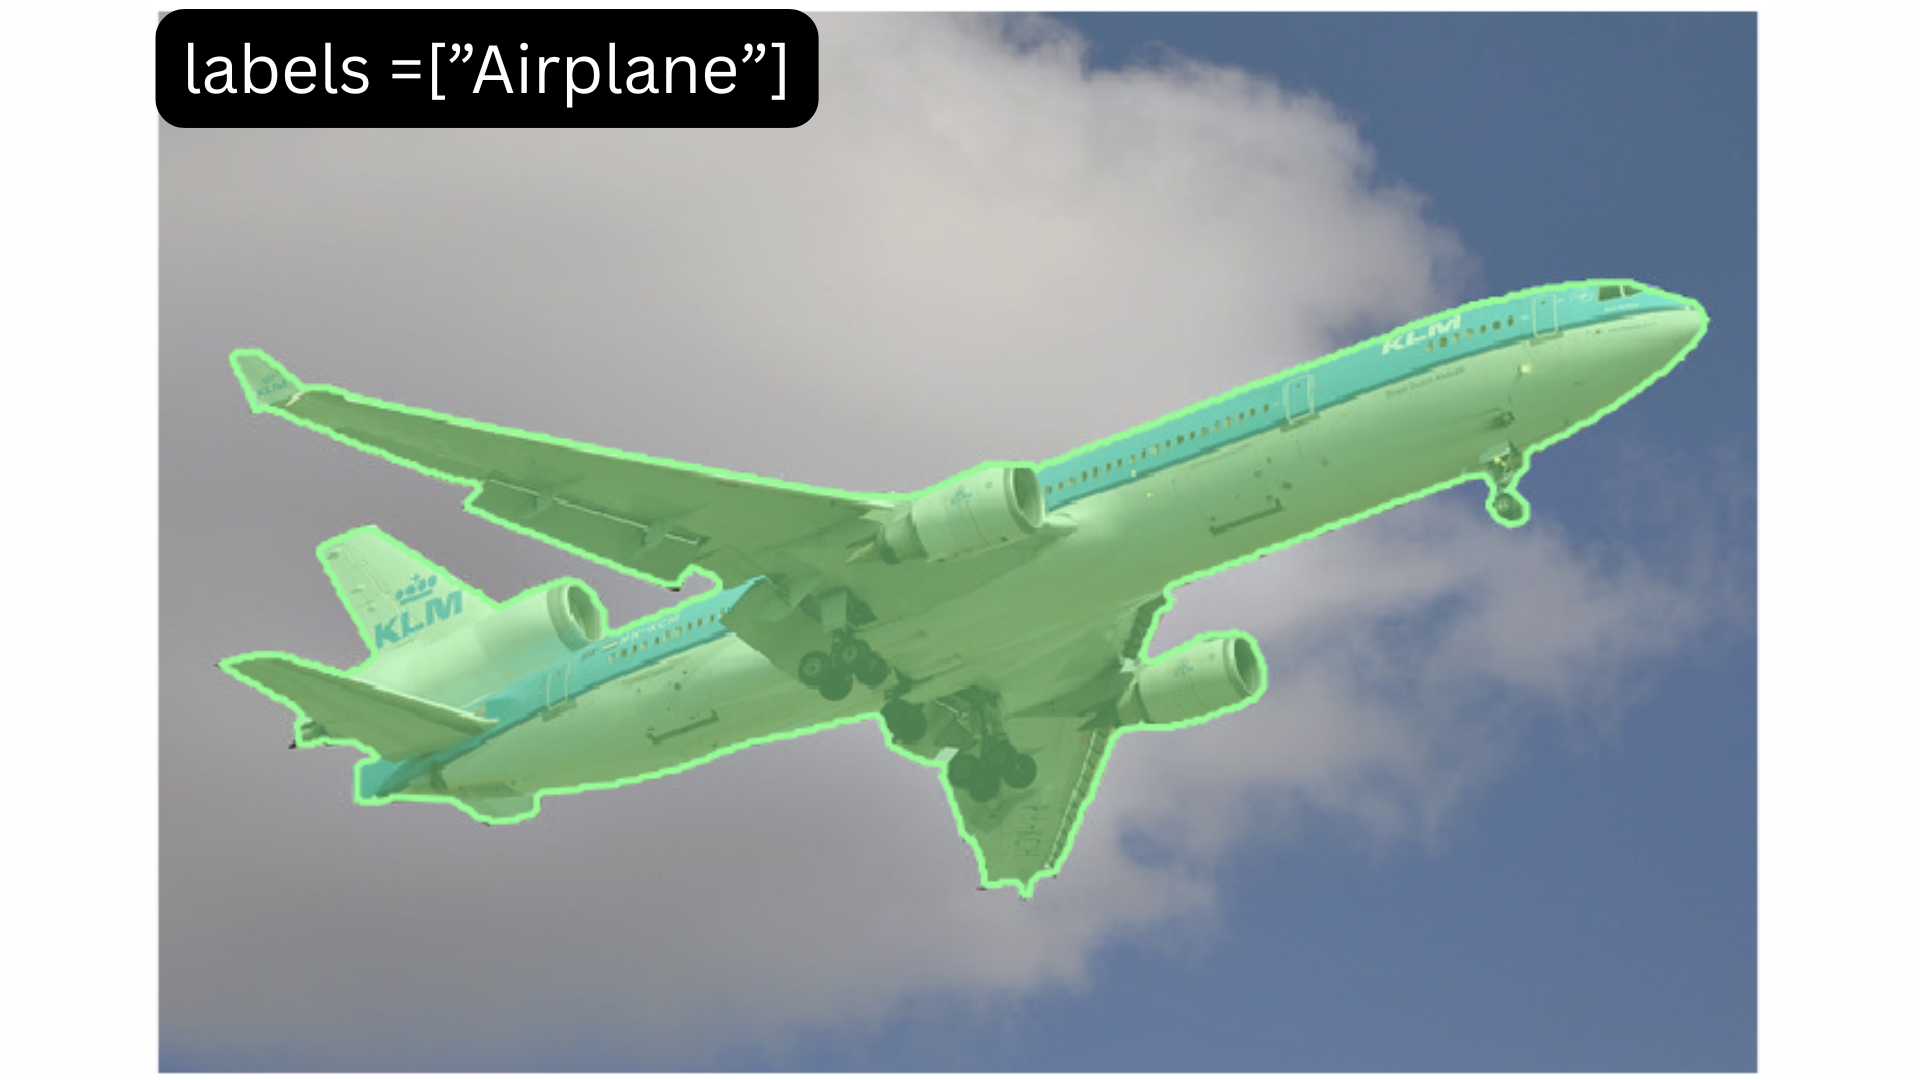
Segmentation of Airplane
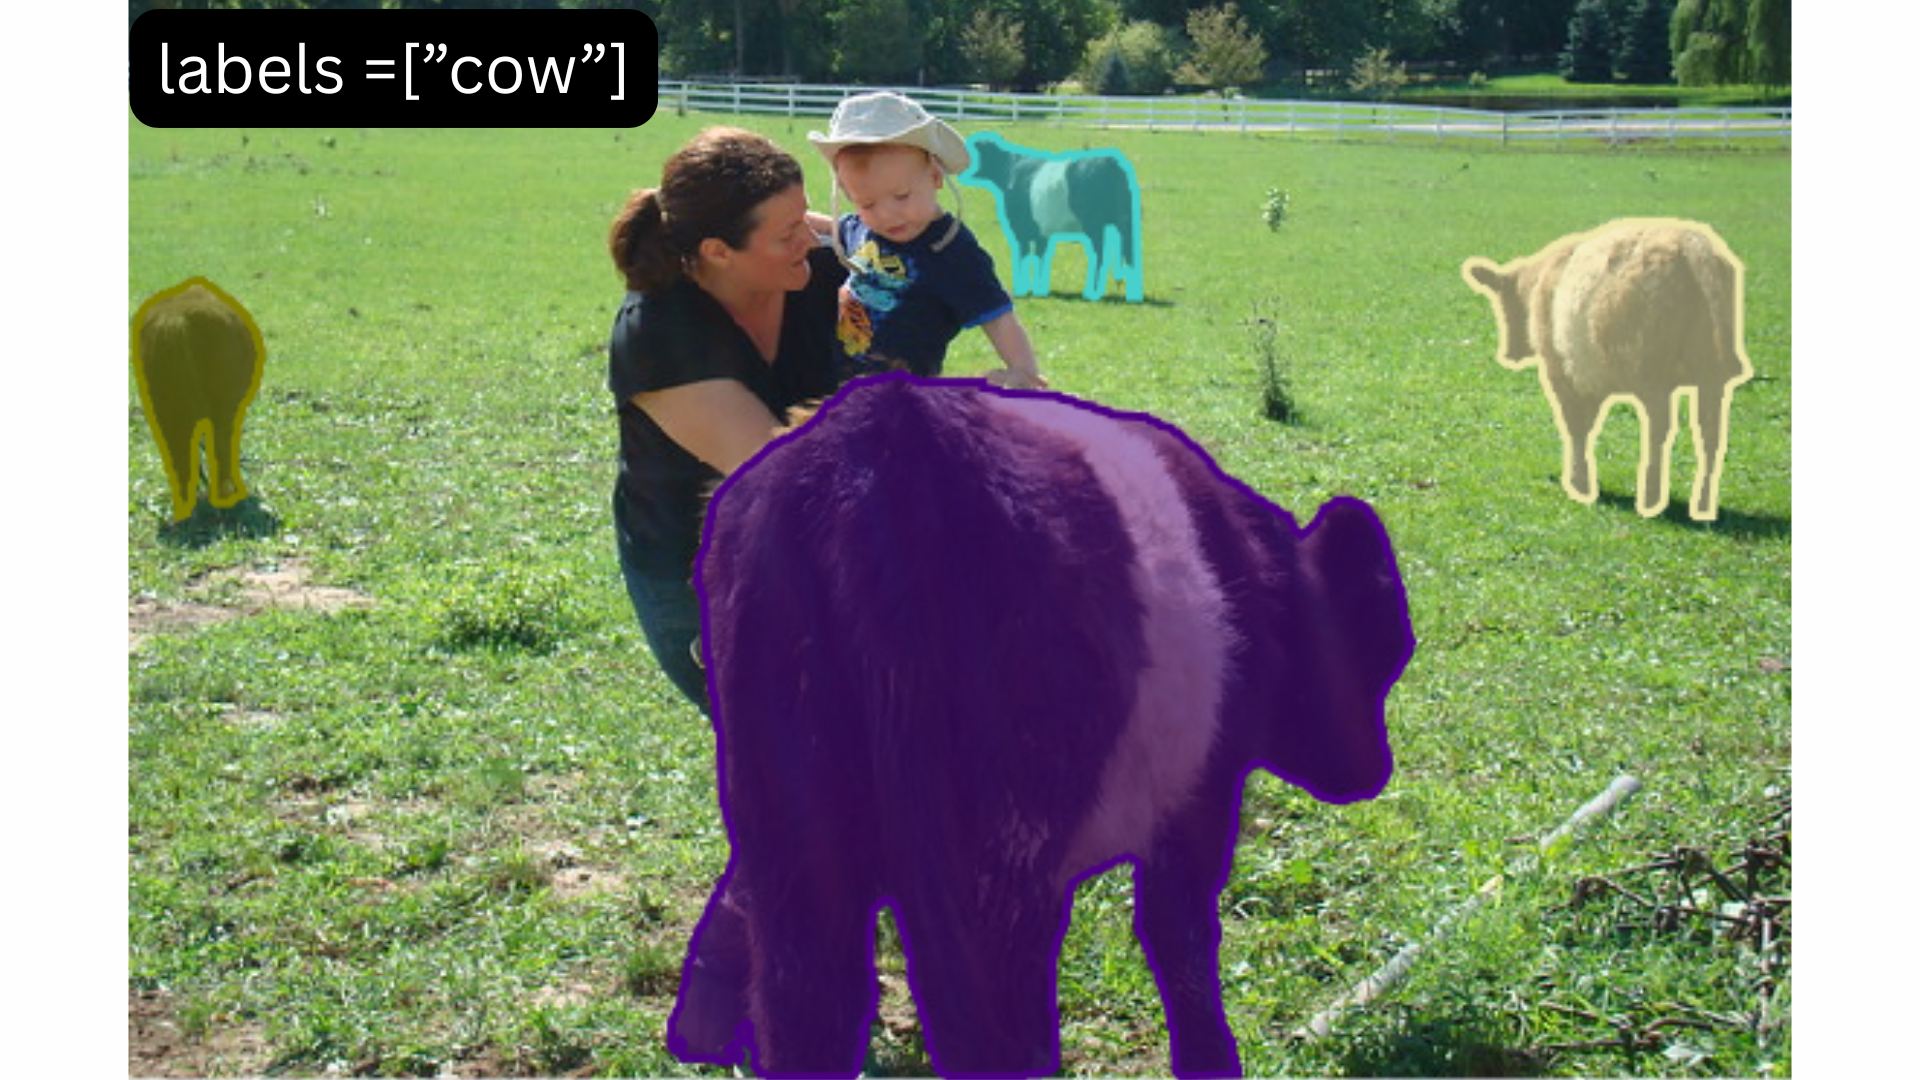
Segmentation of Cow
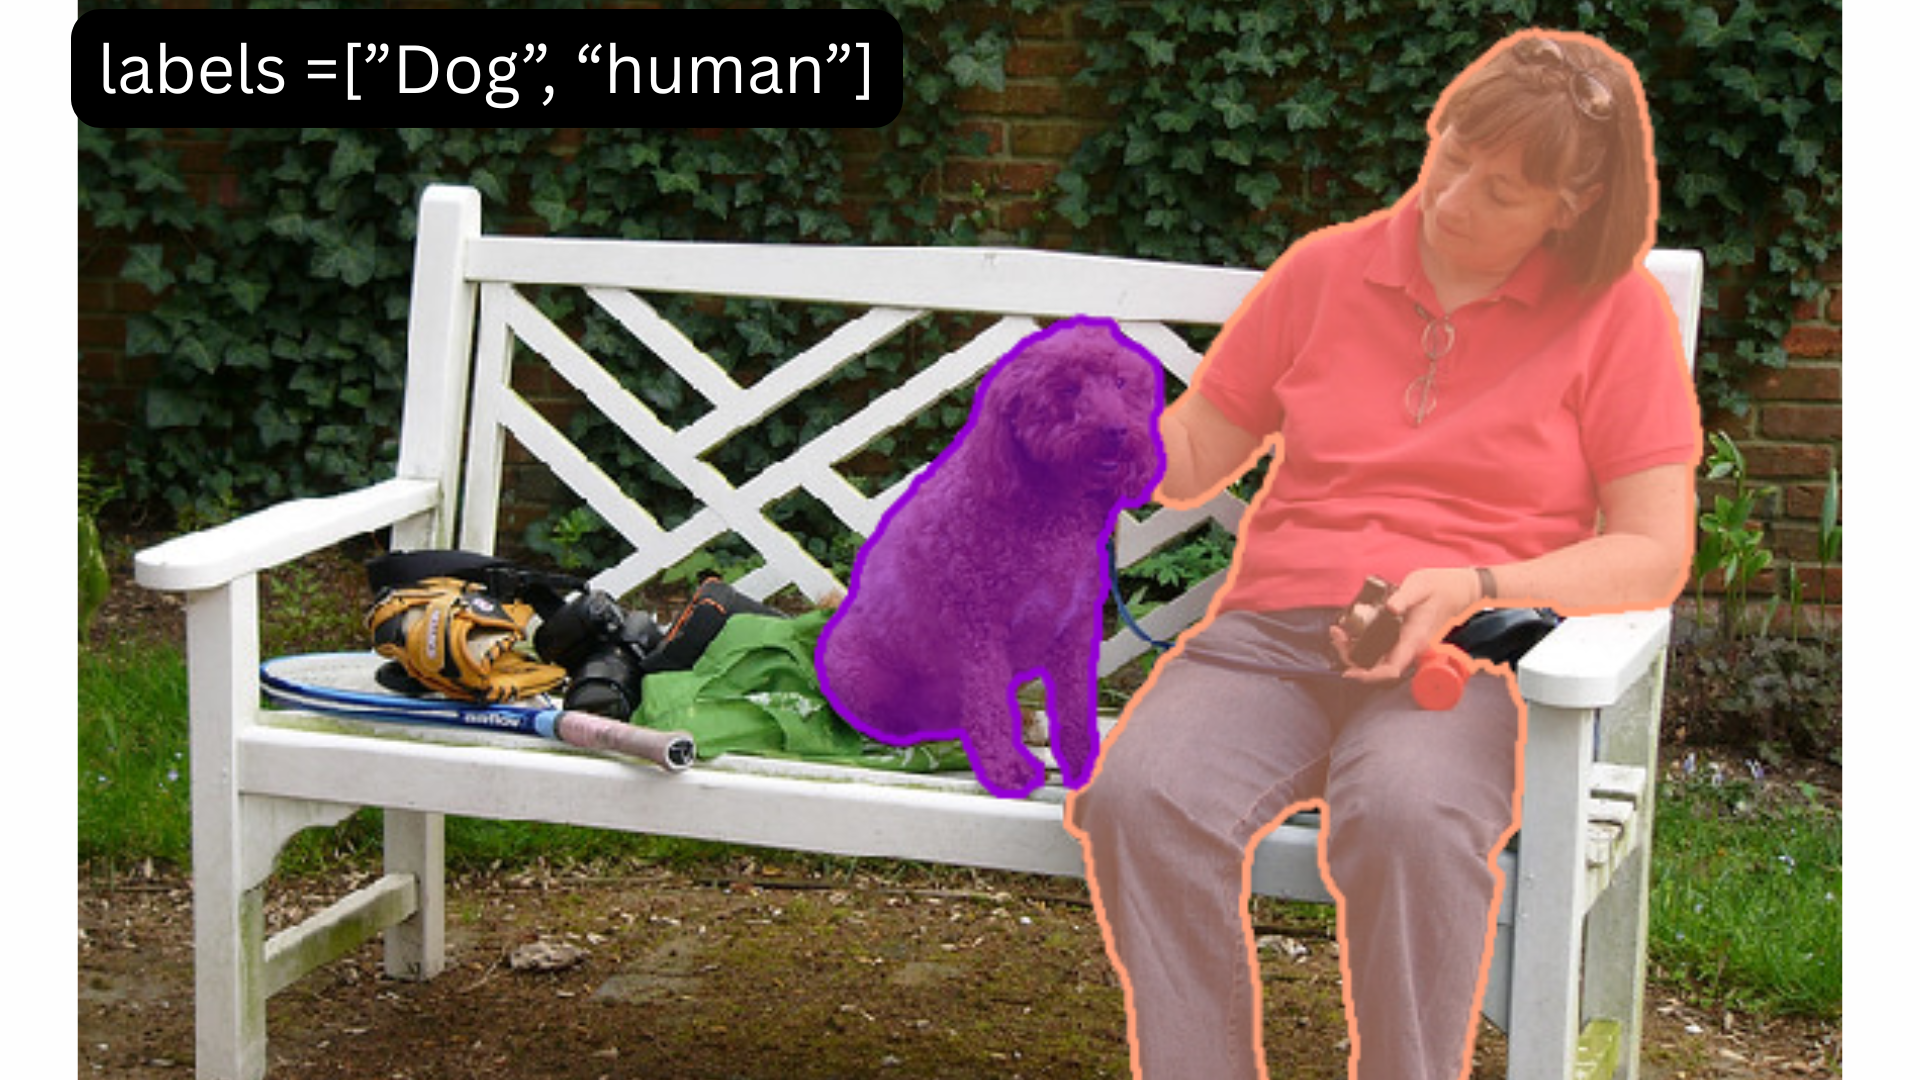
Segmentation of Dog and Human
Conclusion
And there you have it! By following the steps in this guide, you've successfully built a functional Vision Agent capable of performing object segmentation based purely on text descriptions.
You've seen firsthand how to use both Grounding DINO's zero-shot object detection and the Segment Anything Model's (SAM) incredible segmentation capabilities.
We started by understanding the limitations of traditional segmentation methods, the heavy reliance on labeled data, and the lack of flexibility.
Now, you possess the foundational knowledge and code to create systems that bridge the gap between natural language understanding and precise visual identification. This agent can:
- Identify and outline objects that it wasn't explicitly trained on.
- Respond dynamically to natural language prompts.
- Significantly reduce the need for manual data annotation for many segmentation tasks.
The code and concepts presented here are more than just an academic exercise; they are practical building blocks for the next generation of intelligent visual applications.
Whether you're looking to build smarter image editing tools, enhance robotic perception, create more intuitive content analysis systems, or explore entirely new interactive AI experiences, the principles remain the same.
This is just the beginning. We encourage you to experiment further: try different prompts, explore various confidence thresholds, integrate this agent into larger projects, or even investigate combining it with other AI models.
FAQ
What is a Vision Agent using Segment Anything (SAM)?
It's an AI system that combines a language understanding component (like Grounding DINO or CLIP) with SAM's segmentation ability.
It allows you to provide a text description (e.g., "the red car") and the agent automatically finds and precisely outlines that object in an image, even without being pre-trained on "red cars.
How does this agent segment objects from text without specific training?
It uses a two-step, zero-shot approach. First, a model like Grounding DINO interprets the text description and predicts a bounding box for the object in the image. Then, SAM takes this bounding box as a prompt and generates a highly accurate segmentation mask for the object within that box, leveraging its vast pre-training.
What's the main advantage of using SAM in a description-based Vision Agent?
The primary advantage is flexibility. You can segment virtually any object you can describe, without needing a dataset or training specifically for that object class. SAM's ability to generate masks from simple prompts (like boxes) makes it ideal for coupling with description-based detectors.
Reference

Simplify Your Data Annotation Workflow With Proven Strategies
.png)
