

Retail Store Planogram Compliance Model Building Tutorial

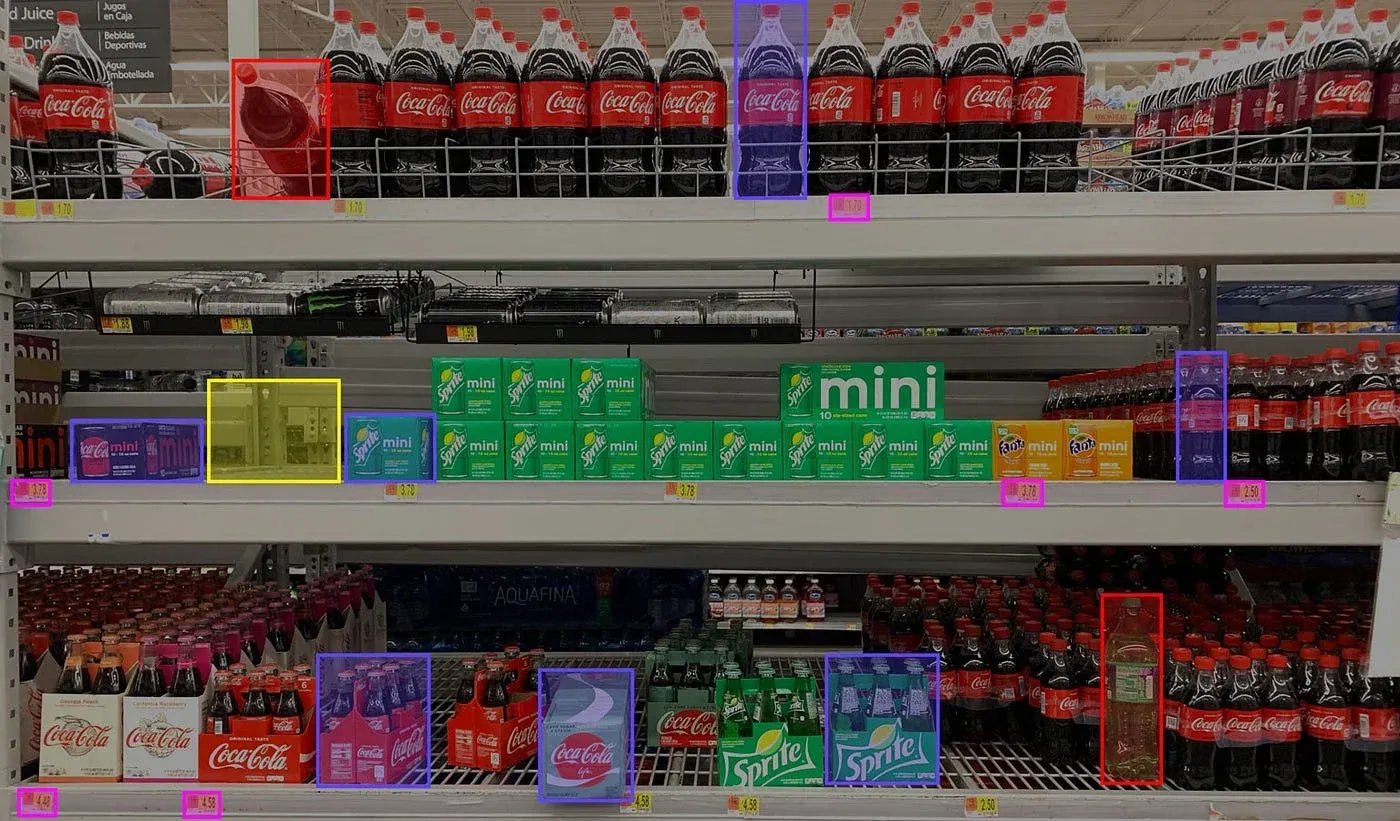
Table of Contents
Introduction
Advanced solutions have been made possible by the combination of deep learning and computer vision in today's quickly changing retail environment. One particularly noteworthy transformational use among them is the detection of product locations on store shelves. Imagine an automated system that can track and identify products on shelves, improving overall shopping experience and simplifying inventory management.
This blog post takes us on a deep learning adventure as we examine how Convolutional Neural Networks (CNNs) are used for just this kind of application. We'll break down the main ideas and techniques, covering everything from dataset exploration to ResNet design and model training, to give readers a thorough grasp of the technology underlying this ground-breaking approach.
This tutorial is for ML researchers, product managers and data scientist who want to build a Recognition for Goods Locations on Shelf.
Create AI-powered shelf recognition to boost inventory efficiency and enhance shopping. Try it today
About Dataset
The dataset is loaded and organized into DataFrames for shelves and products. Shelves are split into training and validation sets to ensure a balanced distribution of classes.
shelf_images = "../input/grocery-dataset/grocerydataset/ShelfImages/"
product_images = "../input/grocery-dataset/grocerydataset/ProductImagesFromShelves/"
ShelfImages: Contains JPG files named according to the format C3_P06_N3_S3_1.JPG, representing different shelves.
C3_P06 - shelf id
N3_S3_1 - planogram id
ProductImagesFromShelves: Contains PNG files named in the format C1_P01_N1_S2_1.JPG_1008_1552_252_376.png, representing products on shelves with their coordinates.
C1_P01_N1_S2_1.JPG - shelf photo file
1008 - x
1552 - y
252 - w
376 - h
Hands-on Tutorial
Here are steps that we'll follow to build our model from scratch.
Outline
1.Dataset loading and directory information
2.Loading and Organizing Data
3.Data Splitting
4.Data Visualization
5.Displaying Shelf Photos
6.ResNet CNN Implementation
7.Data Preprocessing
8.Training the Model
1.Dataset loading and directory information
This set of imports covers a range of functionalities, from data manipulation with Numpy and Pandas to image processing with OpenCV, and deep learning model building and training with Keras. The %matplotlib inline magic command is used for inline plotting in Jupyter notebooks.
import warnings
warnings.filterwarnings("ignore")

import numpy as np
import pandas as pd
import matplotlib.pyplot as plt
import cv2
import itertools

from sklearn.metrics import confusion_matrix

import keras
from keras.preprocessing.image import ImageDataGenerator
from keras.models import Sequential
from keras.models import Model
from keras.layers import Dense, Dropout, Flatten, Input, Activation
from keras.layers import Conv2D, MaxPooling2D, AveragePooling2D
from keras.layers import BatchNormalization

from keras.regularizers import l2
from keras.optimizers import Adam
from keras.callbacks import LearningRateScheduler
from keras import backend as K

%matplotlib inline
2.Loading and Organizing Data
Exploring the dataset folders, and creating DataFrames for shelf and product information,collecting and organizing the dataset.
Assigning file paths to variables for the locations of shelf images and product images in the provided grocery dataset
shelf_images = "../input/grocery-dataset/grocerydataset/ShelfImages/"
product_images = "../input/grocery-dataset/grocerydataset/ProductImagesFromShelves/"
Organize and represent the metadata associated with each shelf photo file, making it easier to manage and analyze the data.
# lets get shelves photo data from shelf_images

jpg_files = [ f for f in os.listdir(f'{shelf_images}') if f.endswith('JPG') ]
photos_df = pd.DataFrame([[f, f[:6], f[7:14]] for f in jpg_files],
columns=['file', 'shelf_id', 'planogram_id'])
print(len(jpg_files))
print(jpg_files[:5])
photos_df.head(5)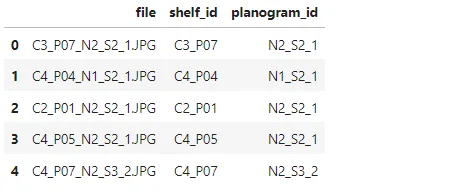
# let's get products on shelves photo from ProductImagesFromShelves

products_df = pd.DataFrame([[f[:18], f[:6], f[7:14], i,
*map(int, f[19:-4].split('_'))]
                           for i in range(11)
                           for f in os.listdir(f'{product_images}{i}') if f.endswith('png')],
                          columns = ['file', 'shelf_id', 'planogram_id',
                          'category', 'xmin', 'ymin', 'w', 'h'])

# convert from width, height to xmax, ymax

products_df['xmax'] = products_df['xmin'] + products_df['w']
products_df['ymax'] = products_df['ymin'] + products_df['h']
print(products_df.shape)
(products_df.head(5))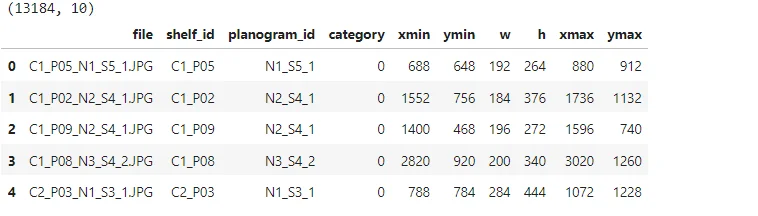
3.Data Splitting
Distinct shelves are identified, and a train/test split is performed to ensure balanced distribution across classes.
# our data contains many photos of each shelf. In order not to full ourselves,
# we need to split not by products nor planograms, but by shelves.

# get distinct shelves
shelves = list(set(photos_df['shelf_id'].values))
print(len(shelves))
print(shelves)
# train/test split
shelves_train, shelves_validation, _, _ = train_test_split(shelves, shelves,
test_size=0.3, random_state=42)
.
This approach is crucial in preventing the same shelf from appearing in both the training and validation sets. It helps to ensure that the model generalizes well to unseen data, and there is no inadvertent memorization of specific shelves during training.
4.Data Visualization
A bar plot is generated to visualize the distribution of training and testing data for each product category.
# mark all records in dataframes with is_train flag

def is_train(shelf_id):
    return shelf_id in shelves_train

photos_df['is_train'] = photos_df['shelf_id'].apply(is_train)
products_df['is_train'] = products_df['shelf_id'].apply(is_train)
photos_df.head(5)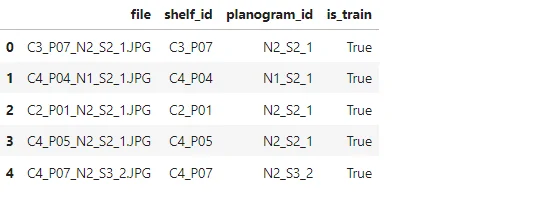
products_df.head(5)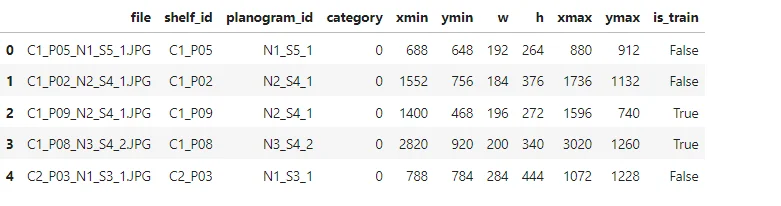
df = products_df[products_df.category != 0].groupby(['category', 'is_train'])
['category'].count().unstack('is_train').fillna(0)

df.plot(kind='barh', stacked=True)
plt.show()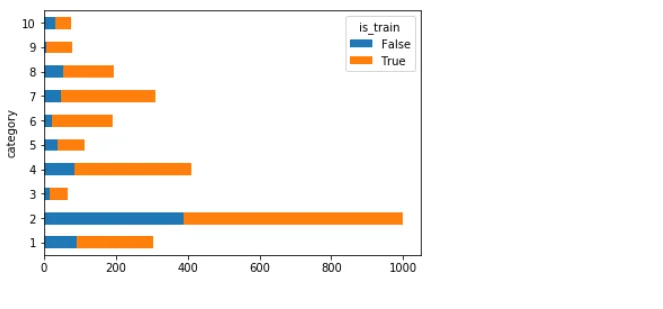
5.Displaying Shelf Photos
A function is defined to display shelf photos with rectangles indicating the positions of products.
# fuction to display shelf photos with rectangle product

def draw_shelf_photo(file):
    file_products_df = products_df[products_df.file == file]
    coordinates = file_products_df[['xmin','ymin','xmax','ymax']].values
    im = cv2.imread(f'{shelf_images}{file}')
    im = cv2.cvtColor(im, cv2.COLOR_BGR2RGB)
    for xmin,ymin,xmax,ymax in coordinates:
        cv2.rectangle(im, (xmin,ymin), (xmax,ymax), (0,255,0), 5)
    plt.imshow(im)
# draw one photo to check our data
fig = plt.gcf()
fig.set_size_inches(12, 6)
draw_shelf_photo('C1_P03_N1_S2_1.JPG')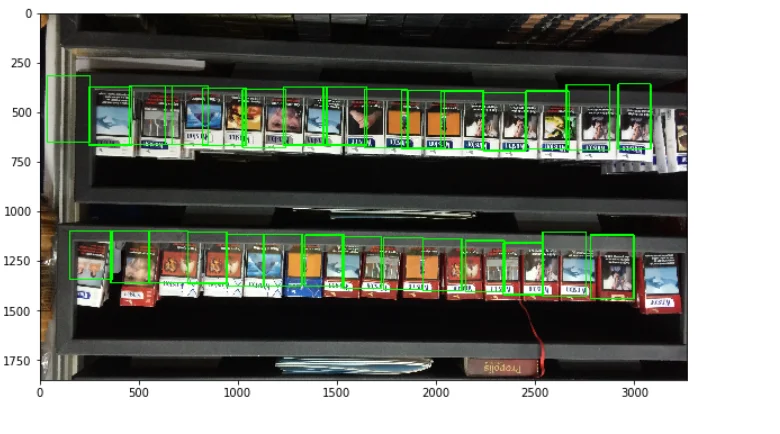
from IPython.display import Image
Image('../input/grocery-dataset-extra-images/brands.png', width=500)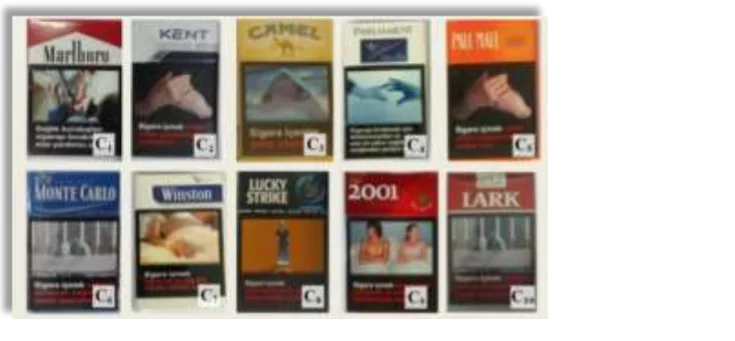
# They proposed approach to brands recognition as a combination of following algorithms.
Image('../input/grocery-dataset-extra-images/brand_recognition.png', width=500)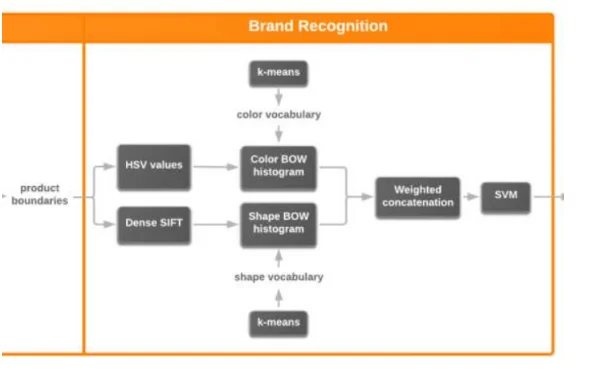
# this approach accuracy is below
Image('../input/grocery-dataset-extra-images/brand_recognition_accuracy.png', width=500)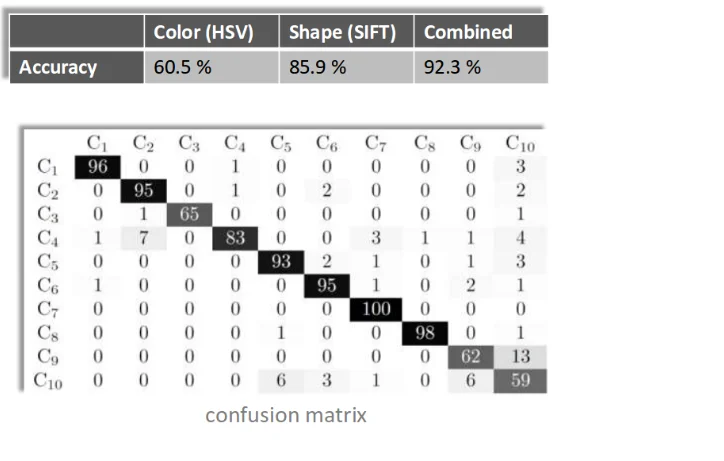
6.ResNet CNN Implementation
Preparing the image data, resizes it to a fixed size, and organizes it into training and validation sets for further use in training a neural network.
Data Preprocessing and Resizing
# we already have photos_df and products_df ready

# neural networks work with input of fixed size, so we need to resize our
# packs images to the chosen size. The size is some kind of metaparameter and
# you should try different variants. Logically, the bigger size you select,
# the better performace you'll have. Unfortunatelly it is not true, because
# of over fitting. The more parameters your neural network have, the easier it
# became over fitted

num_classes = 10
SHAPE_WIDTH = 80
SHAPE_HEIGHT = 120
Resizing and Organizing Data
# resize pack to fixed size SHAPE_WIDTH*SHAPE_HEIGHT

def resize_pack(pack):
    fx_ratio = SHAPE_WIDTH / pack.shape[1]
    fy_ratio = SHAPE_HEIGHT / pack.shape[0]
    pack = cv2.resize(pack, (0,0), fx=fx_ratio, fy=fy_ratio)
    return pack[0:SHAPE_HEIGHT, 0:SHAPE_WIDTH]
Displaying Resized Pack Image
print(photos_df.columns)
print(products_df.columns)
Train/Validation Split and Normalization
x, y, f = [], [], []

for file, is_train in photos_df[['file','is_train']].values:
    photos_rects = products_df[products_df['file'] == file]
    rects_data = photos_rects[['category','xmin','ymin','xmax','ymax']]
    im = cv2.imread(f'{shelf_images}{file}')
    im = cv2.cvtColor(im, cv2.COLOR_BGR2RGB)
    for category, xmin, ymin, xmax, ymax in rects_data.values:
        if category == 0:
            continue
        pack = resize_pack(np.array(im[ymin:ymax, xmin:xmax]))
        x.append(pack)
        f.append(is_train)
        y.append(category - 1)
# display one SHAPE_WIDTH x SHAPE_HEIGHT resized pack image,
# it is hard to recognize category with our eyes, let's see
# how neural network will do the job
plt.imshow(x[60])
plt.show()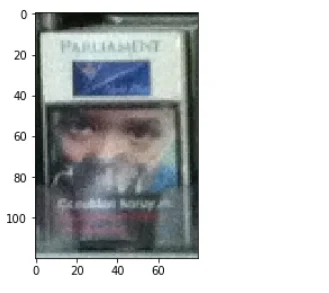
# lets split the data into train/validation dataset based on is_train flag
x,y,f = np.array(x), np.array(y), np.array(f)
x_train, x_validation, y_train, y_validation = x[f], x[~f], y[f], y[~f]

# save validation images
x_validation_images = x_validation
x_train.shape, x_validation.shape, y_train.shape, y_validation.shape
# convert y_train and y_validation into one hot arrays
y_train = keras.utils.to_categorical(y_train, num_classes)
y_validation = keras.utils.to_categorical(y_validation, num_classes)
y_train.shape, y_validation.shape
# normalize x_train and x_validation
x_train, x_validation = x_train.astype('float32'), x_validation.astype('float32')
x_train /= 255
x_validation /= 255
# let's see what do we have
print('x_train shape:', x_train.shape)
print('y_train shape:', y_train.shape)
print(x_train.shape[0], 'train samples')
print(x_validation.shape[0], 'validation samples')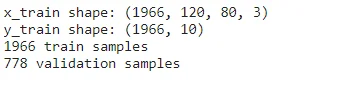
Lets build ResNet CNN
ResNet (Residual Neural Network) model using the Keras library for image classification. The ResNet architecture is known for its deep structure, which helps mitigate the vanishing gradient problem and enables training of very deep neural networks.
def lr_schedule(epoch):
    lr = 1e-3
    if epoch > 5:
        lr *= 1e-1
    print("learning rate: ", lr)
    return lr
This function defines a learning rate schedule. The learning rate is reduced by a factor of 10 after the 5th epoch.
def resnet_layer(inputs,
                 num_filters=16,
                 kernel_size=3,
                 strides=1,
                 activation='relu',
                 batch_normalization=True,
                 conv_first=True):
    conv = Conv2D(num_filters,
                  kernel_size=kernel_size,
                  strides=strides,
                  padding='same',
                  kernel_initializer='he_normal',
                  kernel_regularizer=l2(1e-4))

    x = inputs
    if conv_first:
        x = conv(x)
        if batch_normalization:
            x = BatchNormalization()(x)
        if activation is not None:
            x = Activation(activation)(x)
    else:
        if batch_normalization:
            x = BatchNormalization()(x)
        if activation is not None:
            x = Activation(activation)(x)
        x = conv(x)
    return x
This function defines a single layer in the ResNet architecture. It includes a convolutional layer, batch normalization, and activation.
def resnet_v1(input_shape, depth, num_classes=10):
    if (depth - 2) % 6 != 0:
        raise ValueError('depth should be 6n+2 (eg 20, 32, 44 in [a])')
    # Start model definition.
    num_filters = 16
    num_res_blocks = int((depth - 2) / 6)

    inputs = Input(shape=x_train.shape[1:])
    x = resnet_layer(inputs=inputs)
    # Instantiate the stack of residual units
    for stack in range(3):
        for res_block in range(num_res_blocks):
            strides = 1
            if stack > 0 and res_block == 0:  # first layer but not first stack
                strides = 2  # downsample
            y = resnet_layer(inputs=x,
                             num_filters=num_filters,
                             strides=strides)
            y = resnet_layer(inputs=y,
                             num_filters=num_filters,
                             activation=None)
            if stack > 0 and res_block == 0:  # first layer but not first stack
                # linear projection residual shortcut connection to match
                # changed dims
                x = resnet_layer(inputs=x,
                                 num_filters=num_filters,
                                 kernel_size=1,
                                 strides=strides,
                                 activation=None,
                                 batch_normalization=False)
            x = keras.layers.add([x, y])
            x = Activation('relu')(x)
        num_filters *= 2

    # Add classifier on top.
    # v1 does not use BN after last shortcut connection-ReLU
    x = AveragePooling2D(pool_size=8)(x)
    y = Flatten()(x)
    outputs = Dense(num_classes,
                    activation='softmax',
                    kernel_initializer='he_normal')(y)

    # Instantiate model.
    model = Model(inputs=inputs, outputs=outputs)
    return model

n = 3
version = 1
if version == 1:
    depth = n * 6 + 2
elif version == 2:
    depth = n * 9 + 2
model_type = 'ResNet%dv%d' % (depth, version)

model = resnet_v1(input_shape=x_train.shape[1:], depth=depth, num_classes=num_classes)
model.compile(loss='categorical_crossentropy',
              optimizer=Adam(lr=lr_schedule(0)), metrics=['accuracy'])
This function constructs the ResNet model based on the specified depth and input shape. It includes multiple residual blocks, each containing several residual layers.
The ResNet model is instantiated and compiled with categorical cross-entropy loss and the Adam optimizer. The learning rate is set using the defined learning rate schedule.
The ResNet model is defined with a depth of n * 6 + 2 for version 1.
7.Data Preprocessing
The provided code initializes an ImageDataGenerator in Keras for preprocessing and real-time data augmentation during neural network training. The configuration includes options for rotation, horizontal and vertical shifts, but these augmentations are kept relatively mild to avoid excessive distortion.
The generator is fitted to the training data, allowing it to compute statistics for real-time augmentation during training. This strategy aids in enhancing the model's generalization by introducing variability in the input data, a common technique to prevent overfitting and improve the model's ability to handle diverse scenarios
# this will do preprocessing and reall time data augmentation

datagen = ImageDataGenerator(featurewise_center = False, # set input mean to 0
over the dataset samplewise_center = False, # set each sample mean to 0
featurewise_std_normalization = False, # divide inputs by the std of the dataset
samplewise_std_normalization = False, # divide each input by its std
zca_whitening = False, # apply zca whitening
rotation_range = 5, # randomly rotate images in the range (degrees, 0 to 180)
width_shift_range = 0.1, # randomly shift images horizontally (fraction of total width)
height_shift_range = 0.1, # randomly shift images vertically (fraction of total height)
horizontal_flip = False, # randomly flip images
vertical_flip = False) # randomly flip images
datagen.fit(x_train)
# this will do preprocessing and reall time data augmentation
datagen = ImageDataGenerator(featurewise_center = False,
# set input mean to 0 over the dataset
samplewise_center = False, # set each sample mean to 0
featurewise_std_normalization = False, # divide inputs by the std of the dataset
samplewise_std_normalization = False, # divide each input by its std
zca_whitening = False, # apply zca whitening
rotation_range = 5, # randomly rotate images in the range (degrees, 0 to 180)
width_shift_range = 0.1, # randomly shift images horizontally
(fraction of total width)
height_shift_range = 0.1, # randomly shift images vertically
(fraction of total height)
horizontal_flip = False, # randomly flip images
vertical_flip = False) # randomly flip images
datagen.fit(x_train)8.Training the Model
The code initiates the training process for the ResNet-based convolutional neural network using the previously configured data generator. The training is performed over 15 epochs with a batch size of 50. The fit_generator function is employed, utilizing the data flow from the generator to train the model.
The validation data is also specified for performance evaluation during training. The learning rate is scheduled using a callback function, allowing dynamic adjustments during training. This approach aids in achieving better convergence and performance optimization over the course of training.
# let's run training process, 20 epochs is enough
batch_size = 50
epochs = 15
model.fit_generator(datagen.flow(x_train, y_train, batch_size=batch_size),
                    validation_data=(x_validation, y_validation),
                    epochs=epochs, verbose=1, workers=4,
                    callbacks=[LearningRateScheduler(lr_schedule)])
Conclusion
In this blog article, we explored the use of a ResNet CNN and deep learning to identify product locations on shelves. You now understand the main ideas and methods underlying this computer vision challenge as a reader. By putting such models into practice, retail process automation and inventory management system efficiency can both be greatly increased.
Deep learning and ResNet architecture are redefining the shelf-to-cart journey in the midst of retail change. The combination of AI, IoT, and AR promises a retail era that is even more personalized and responsive than it is today. The future of retail is emerging, propelled by the ease of use and strength of deep learning, and the shelves are already vibrant centers of innovation.
Future Considerations
Hyper-Personalization:
As AI develops, it will be able to provide highly customised shopping experiences by adjusting in-store recommendations and guidance based on individual tastes.
Smart Inventory Dynamics:
Inventory management is being transformed by AI-driven analytics, which predict demand patterns and optimise stock levels for smooth retail operations.
Frequently Asked Questions
1.How is computer vision used in retail industry?
Retailers can now automate real-time tracking of every item on their shelves with computer vision. Shelf monitoring is the first point of contact. Smart cameras continuously monitor the retail environment using computer vision algorithms to identify out-of-stock items or misplaced merchandise.
2.How is AI being used in the retail industry?
Retail businesses are shrewdly employing artificial intelligence in a number of ways. In the retail sector, demand forecasting, cashierless technologies, automated inventory management, and consumer sentiment analysis are a few of the more well-liked applications of AI.

Simplify Your Data Annotation Workflow With Proven Strategies
.png)
