

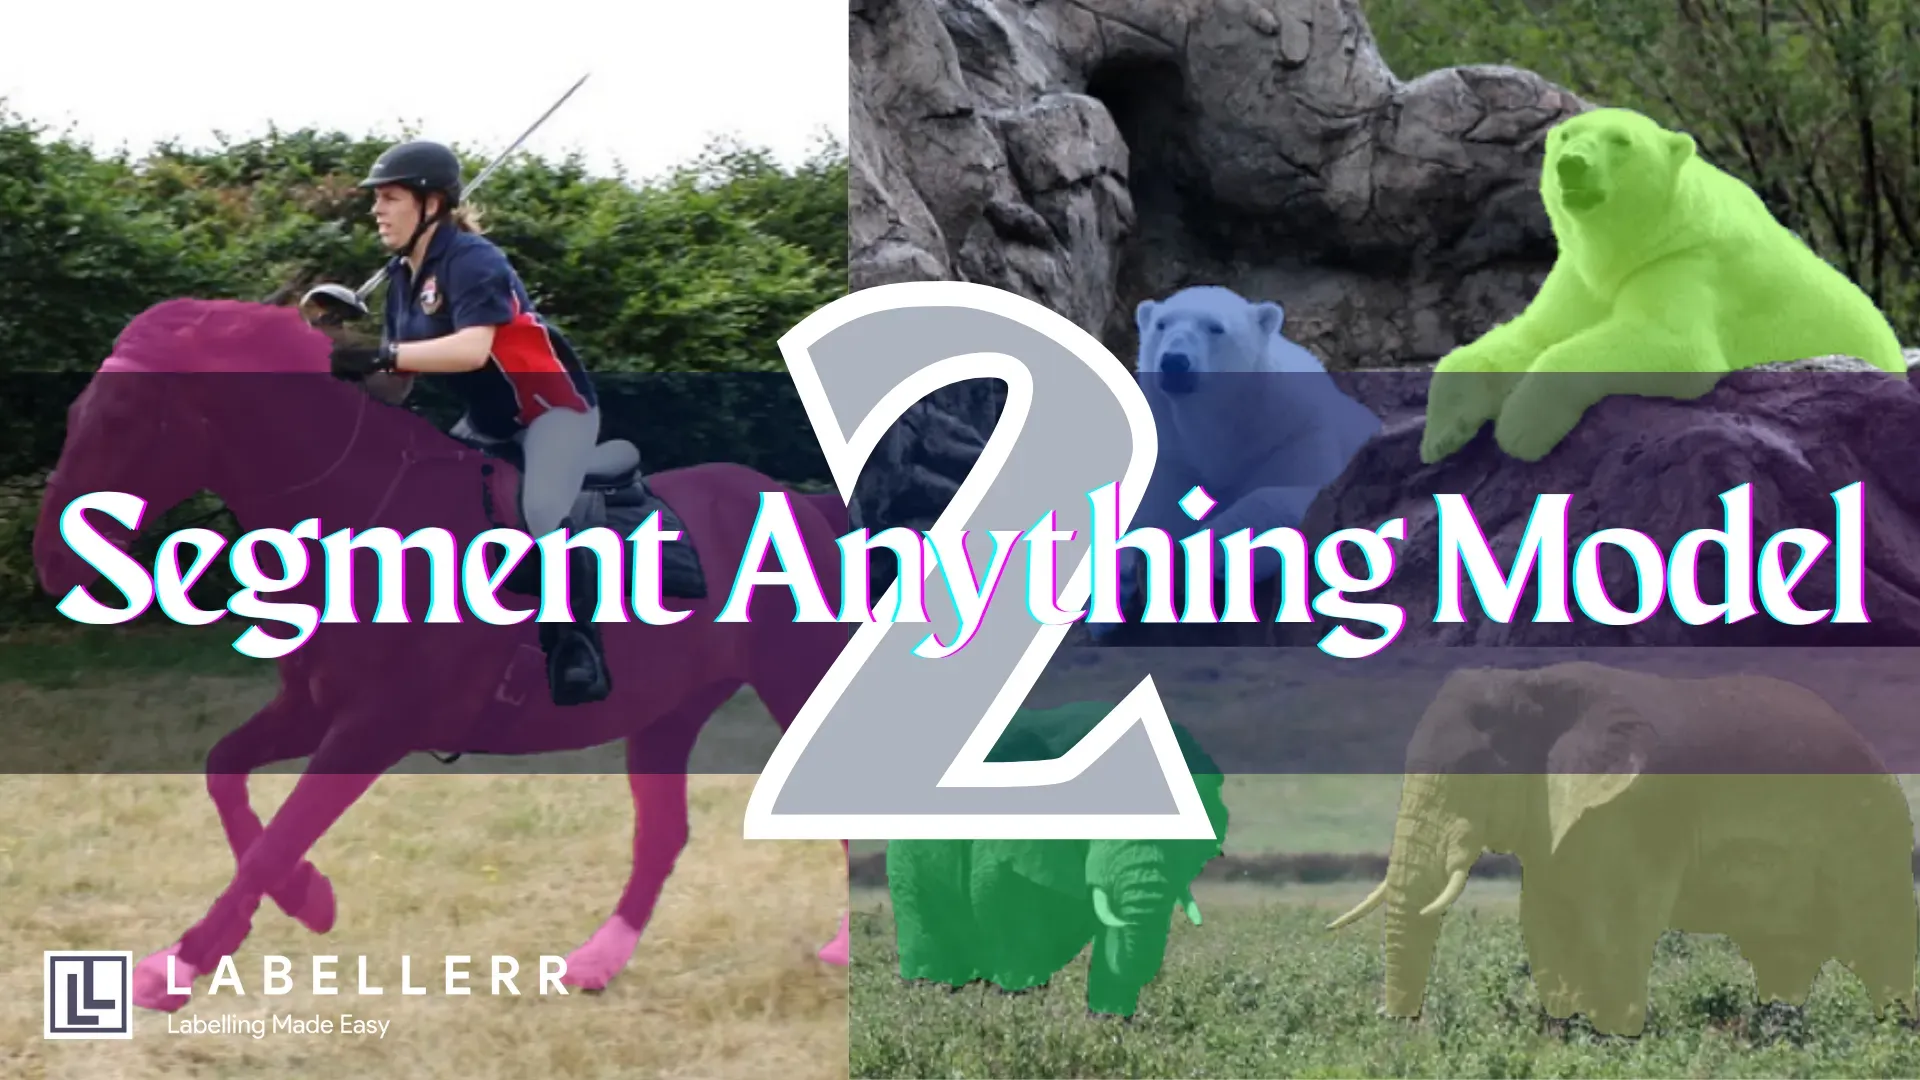
Learn SAM 2 in Minutes: The Ultimate Starter Guide for 2026
Learn to implement Meta's SAM2 for pixel-perfect image/video segmentation. Explore its zero-shot capabilities, real-time processing, and step-by-step code examples for bounding box & point-based object masking.

Are you looking for a powerful tool, or more accurately, a model to precisely segment objects in your images in a pixel-perfect manner and even provide segmentation tracking in video streams?
Perhaps you've experimented with segmentation models before, only to find them struggling with novel objects they weren't specifically trained on, requiring extensive, time-consuming manual annotation for every new task, or failing to generalize to diverse, real-world scenarios.
The demand for robust visual understanding tools is exploding, with applications ranging from autonomous driving and medical imaging to creative content editing and robotics.
Yet, achieving truly versatile, zero-shot segmentation, the ability to accurately segment any object in any image or video without prior specific training on that object class, has remained a significant hurdle for most models.
That problem has been solved by Meta AI's groundbreaking - Segment Anything Model 2.
SAM2 directly addresses the critical limitations of previous models by offering exceptional zero-shot generalization and prompting capabilities, allowing users to segment novel objects and concepts on the fly.
We will walk you through what SAM is, explore the exciting new capabilities of SAM2, and then provide hands-on guidance for implementing it on your own images and videos.
What is SAM?
The Segment Anything Model (SAM), introduced by Meta AI, marked a significant leap forward in image segmentation.
Segmentation using SAM2
It is a foundational model designed to "cut out" any object in any image with remarkable versatility. SAM's core strength lies in its promptable segmentation capability.
This means you can guide the model using various prompts, such as points, bounding boxes, or even rough masks, to specify what you want to segment.
SAM excels at zero-shot generalization, meaning it can identify and segment objects it hasn't been explicitly trained on, without needing additional training for new, unfamiliar objects or images.
The original SAM model is groundbreaking, but it still has some key limitations:
- It’s slow and resource-heavy
The bigger versions of SAM need a lot of computing power, making them too slow for real-time tasks or devices like smartphones or edge hardware that have limited resources. - It struggles with tiny details and edges
While SAM does a good job segmenting general objects, it often misses fine details or messes up the exact edges of complex shapes. This becomes obvious when working with highly detailed objects or tasks needing pixel-perfect precision. - It has trouble with small objects
SAM sometimes fails to cleanly segment very tiny objects in images, which limits its use in scenarios where small details matter. - It wasn’t built for videos
SAM was designed for single images, not videos. It doesn’t understand movement or how objects change between frames, so using it for video analysis (like tracking objects over time) isn’t efficient. - It falters in specialized fields
In areas like medical imaging, SAM struggles with highly complex tasks. For example, it might not accurately outline tricky tumor boundaries where subtle differences in shape or texture are critical for diagnosis.
These limitations highlighted the need for further advancements to make powerful segmentation more practical and accurate across a wider array of applications and data types.
What's new in SAM2?
Segment Anything Model 2 (SAM2) fixes many of the original SAM’s issues while making its strengths even better.
Here’s how it solves the old problems-
- Handles videos like a pro
SAM2 now works with videos, not just photos. It uses a smart "streaming memory" system to process videos in real time. This helps it track and segment moving objects smoothly across frames—something the first SAM couldn’t do. - Captures tiny details better
SAM2 is up to 6x more accurate than the original SAM for image tasks. It nails precise edges and fine details, fixing the earlier model’s struggles with blurry or messy boundaries. - Works faster and smarter
While SAM2’s speed isn’t spelled out, its focus on real-time video hints at big efficiency upgrades. Its simpler transformer design with streaming memory likely cuts down on lag, making it better for devices like phones or cameras. - Needs less hand-holding
SAM2 guesses what you want better. It requires fewer clicks or prompts to get accurate results, making it quicker and easier to use. - Learns from real-world data
SAM2 was trained on SA-V, the world’s biggest video dataset. A clever "model-in-the-loop" system also lets it improve itself over time by learning from user feedback.
Implementing SAM2 on Images
Just like the previous SAM, SAM2 can perform segmentation on images using two methods.
First, through bounding boxes and second, through specifying points on images.
Here I am going to explain both ways to perform segmentation.
First, we have to install the required libraries for a SAM2 model.
! uv pip install -q torch torchvision numpy matplotlib opencv-python pillow
Then we import those libraries into our environment
import torch
import torchvision
import numpy as np
import matplotlib.pyplot as plt
import cv2
from PIL import Image
import torch
import torchvision
Now we install the SAM2 git repo in our environment using,
!uv pip install 'git+https://github.com/facebookresearch/sam2.git'
Then we create a folder and download the SAM2 model in it.
!mkdir -p ../checkpoints/
!wget -P ../checkpoints/ https://dl.fbaipublicfiles.com/segment_anything_2/092824/sam2.1_hiera_large.pt
Now, using this script, we can create a function called predictor that can help us in implementing SAM2
from sam2.build_sam import build_sam2
from sam2.sam2_image_predictor import SAM2ImagePredictor

if torch.cuda.is_available():
    device = torch.device("cuda")
else:
    device = torch.device("cpu")

sam2_checkpoint = "../checkpoints/sam2.1_hiera_large.pt"
model_cfg = "configs/sam2.1/sam2.1_hiera_l.yaml"

sam2_model = build_sam2(model_cfg, sam2_checkpoint, device=device)

predictor = SAM2ImagePredictor(sam2_model)
Now, everything is ready. We only have to create a function to perform each specific segmentation task.
- Segmentation using bounding boxes
We will create a function that takes bounding boxes as input and performs segmentation using them.
def box_segmentor(image_path, box_coords, model_checkpoint=None, device='auto'):
    """
    Perform SAM2 segmentation using multiple box coordinates with optimized processing.

    Args:
        image_path (str): Path to input image
        box_coords (list): List of [x_min, y_min, x_max, y_max] coordinates
        model_checkpoint (str): Optional path to SAM2 checkpoint
        device (str): 'cuda', 'cpu' or 'auto' (default)

    Returns:
        tuple: (masks_list, scores_list) containing segmentation results
    """
    # Device configuration
    if device == 'auto':
        device = torch.device('cuda' if torch.cuda.is_available() else 'cpu')

    # Load model (if not already loaded)
    if not hasattr(box_segmentor, 'predictor'):
        checkpoint = model_checkpoint or "../checkpoints/sam2.1_hiera_large.pt"
        model_cfg = "configs/sam2.1/sam2.1_hiera_l.yaml"

        sam2_model = build_sam2(model_cfg, checkpoint, device=device)
        box_segmentor.predictor = SAM2ImagePredictor(sam2_model)

    # Load and preprocess image
    image = np.array(Image.open(image_path).convert("RGB"))

    # Set image once for all predictions (optimization)
    with torch.inference_mode(), torch.autocast(device.type, dtype=torch.bfloat16):
        box_segmentor.predictor.set_image(image)

        masks_list = []
        scores_list = []

        for box in box_coords:
            box_array = np.array(box)[None, :]  # Add batch dimension

            # Correct unpacking: predict returns (masks, scores, logits)
            predicted_masks, predicted_scores, _ = box_segmentor.predictor.predict(
                box=box_array,
                multimask_output=False
            )

            masks_list.append(predicted_masks[0])
            scores_list.append(predicted_scores[0])

    return masks_list, scores_list
And to visualize the result, we have to create another function.
def display_masks(image, masks, alpha=0.5, random_color=True, borders=True):
    """
    Display multiple masks over an image with different colors

    Args:
        image: PIL.Image - Original image
        masks: List of 2D numpy arrays (float32 masks 0-1)
        alpha: float (0-1) - Transparency of mask fills
        random_color: bool - Use random colors for each mask
        borders: bool - Show border contours
    """
    # Convert image to numpy array
    img_np = np.array(image.convert("RGB"))
    h, w = img_np.shape[:2]

    # Create overlay canvas
    overlay = np.zeros((h, w, 4), dtype=np.float32)

    # Generate colors for each mask
    colors = []
    for _ in masks:
        if random_color:
            colors.append(np.append(np.random.random(3), alpha))
        else:
            colors.append(np.array([30/255, 144/255, 255/255, alpha]))

    # Process each mask
    for i, mask in enumerate(masks):
        # Convert mask to binary
        binary_mask = (mask > 0.5).astype(np.uint8)

        # Create mask overlay
        mask_overlay = np.zeros((h, w, 4))
        mask_overlay[binary_mask == 1] = colors[i]

        # Add borders
        if borders:
            contours, _ = cv2.findContours(binary_mask, cv2.RETR_EXTERNAL, cv2.CHAIN_APPROX_SIMPLE)
            contours = [cv2.approxPolyDP(c, 0.01*cv2.arcLength(c, True), True) for c in contours]

            # Draw white borders (80% opacity)
            border_color = (1, 1, 1, 0.8)  # White borders
            cv2.drawContours(mask_overlay, contours, -1, border_color, 2)

        # Combine overlays
        overlay = np.where(mask_overlay != 0, mask_overlay, overlay)

    # Create final composition
    fig, ax = plt.subplots(figsize=(10, 10))
    ax.imshow(img_np)
    ax.imshow(overlay)
    ax.axis('off')
    plt.show()
Now we can perform our segmentation using this
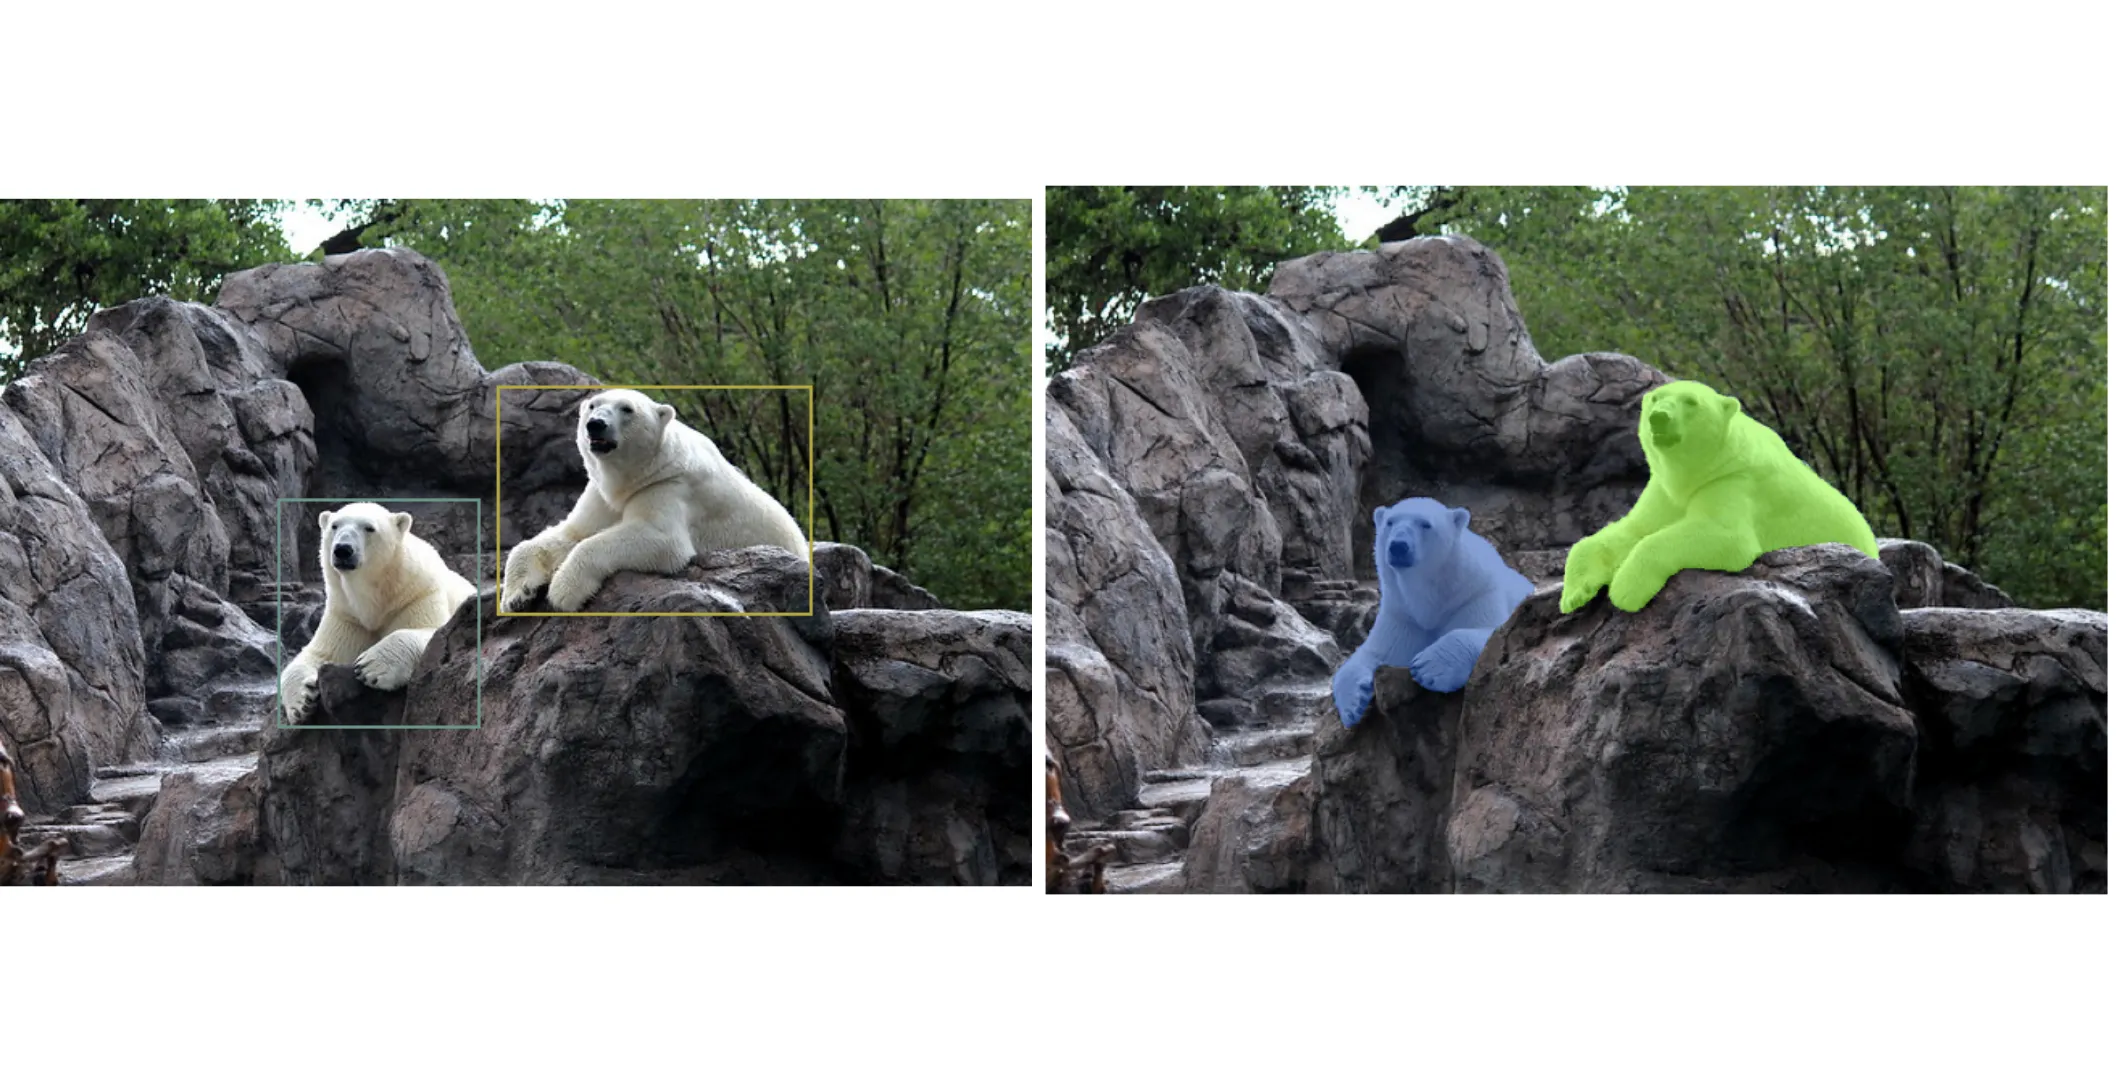
image_path = "elephant.jpg"
image = Image.open(image_path)
input_boxes = [[95.1795, 156.5467, 255.3454, 307.8629],
                [299.7108, 138.8779, 578.4392, 318.1660]]
masks, scores = box_segmentor(
    image_path=image_path,
    box_coords= input_boxes
)

display_masks(image, masks, alpha=0.5, random_color=True, borders=False)
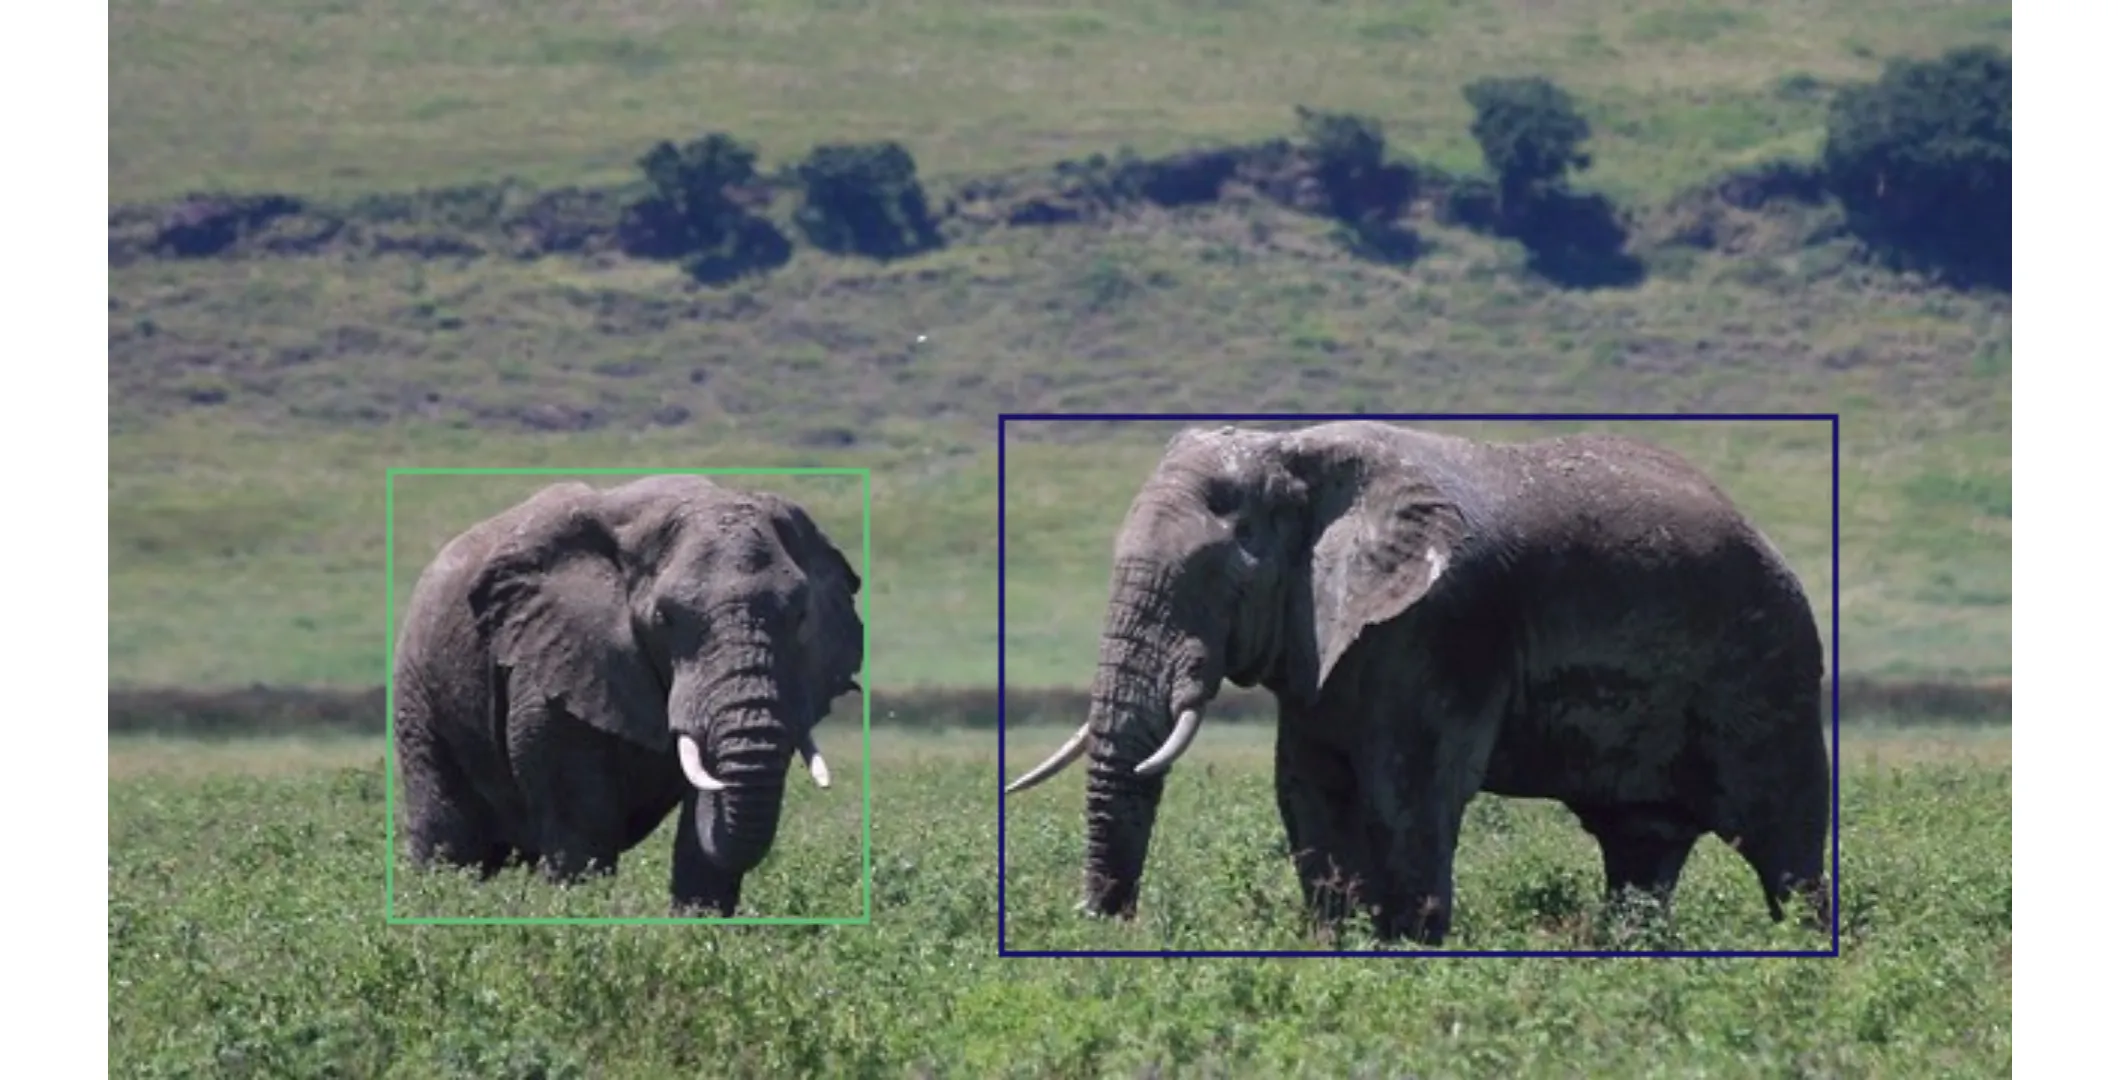
Bounding Boxes of objects
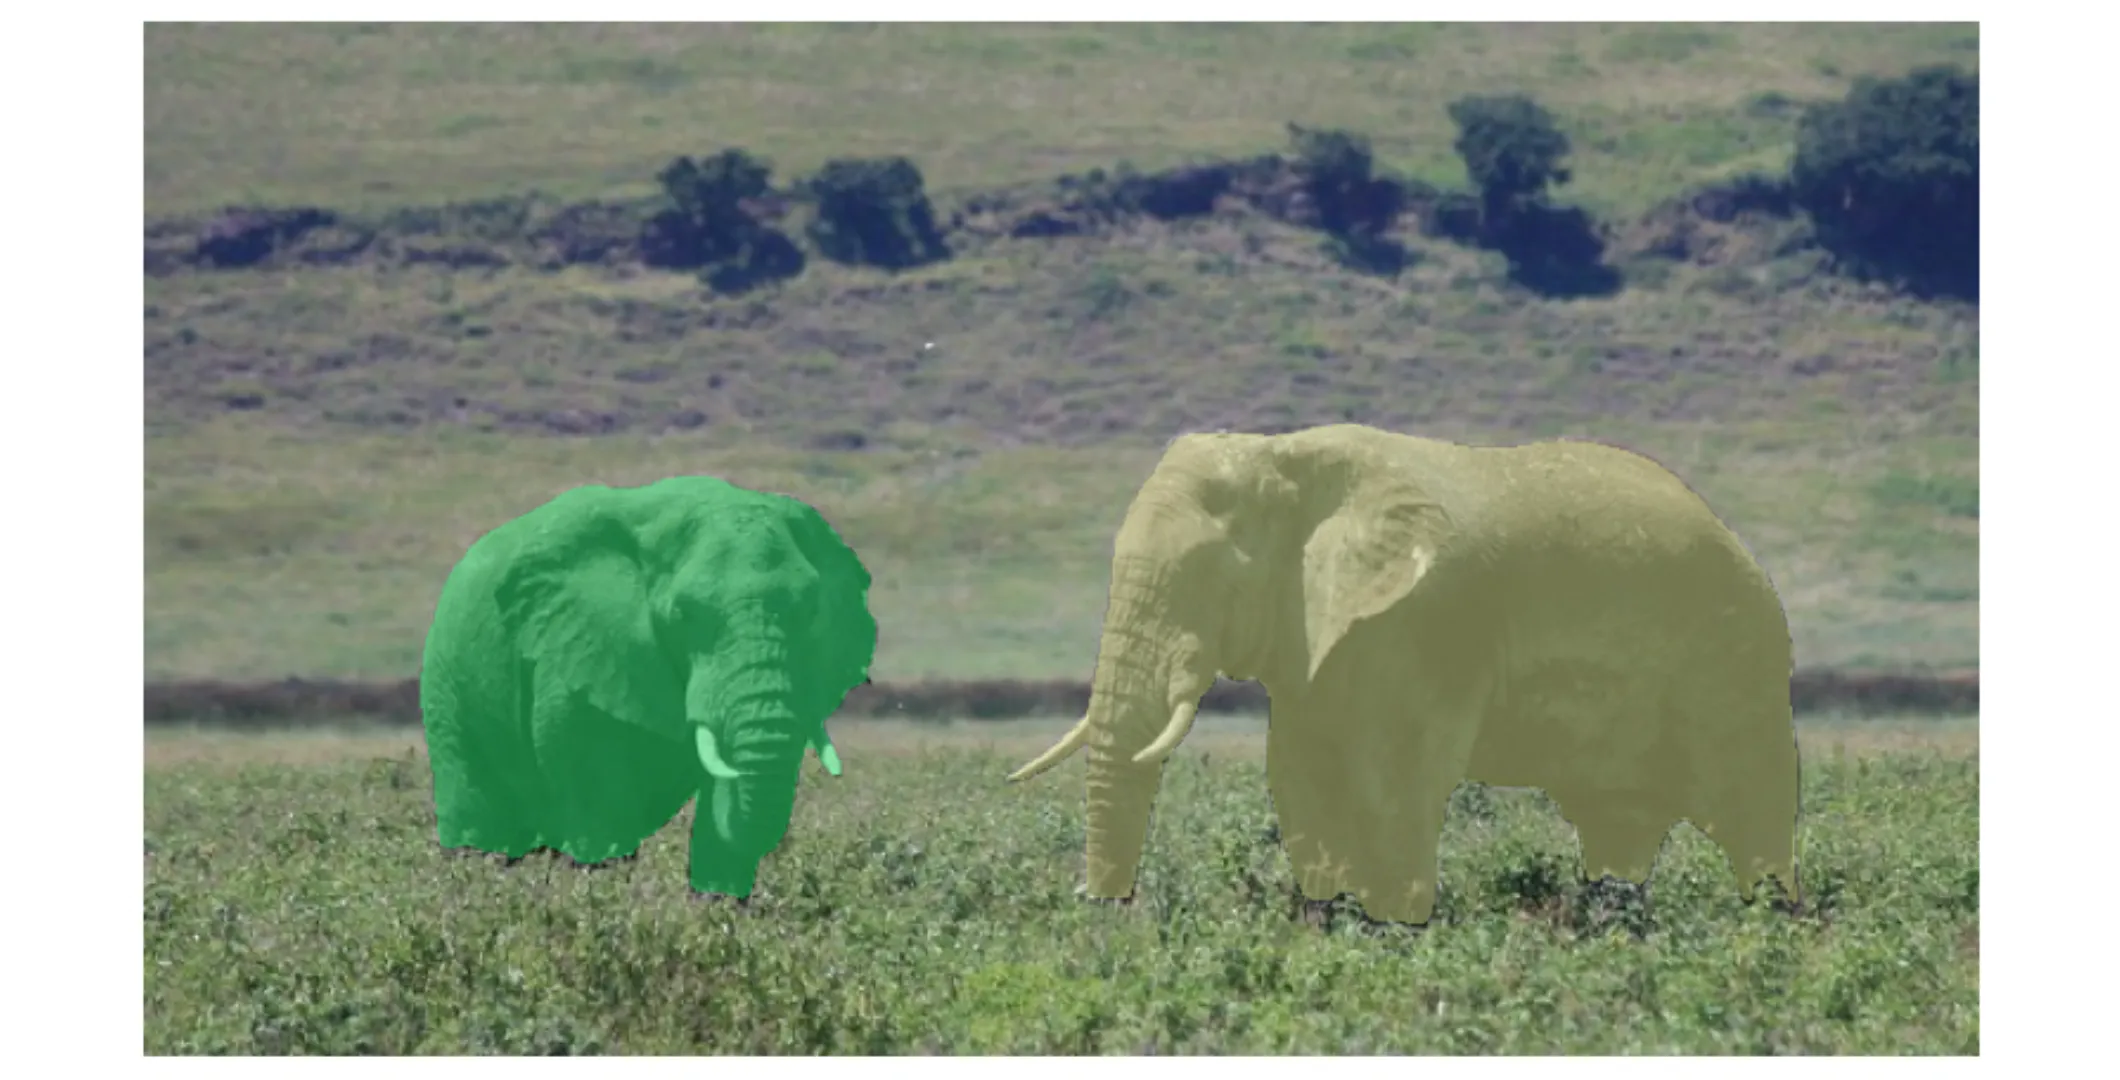
Segmentation Result
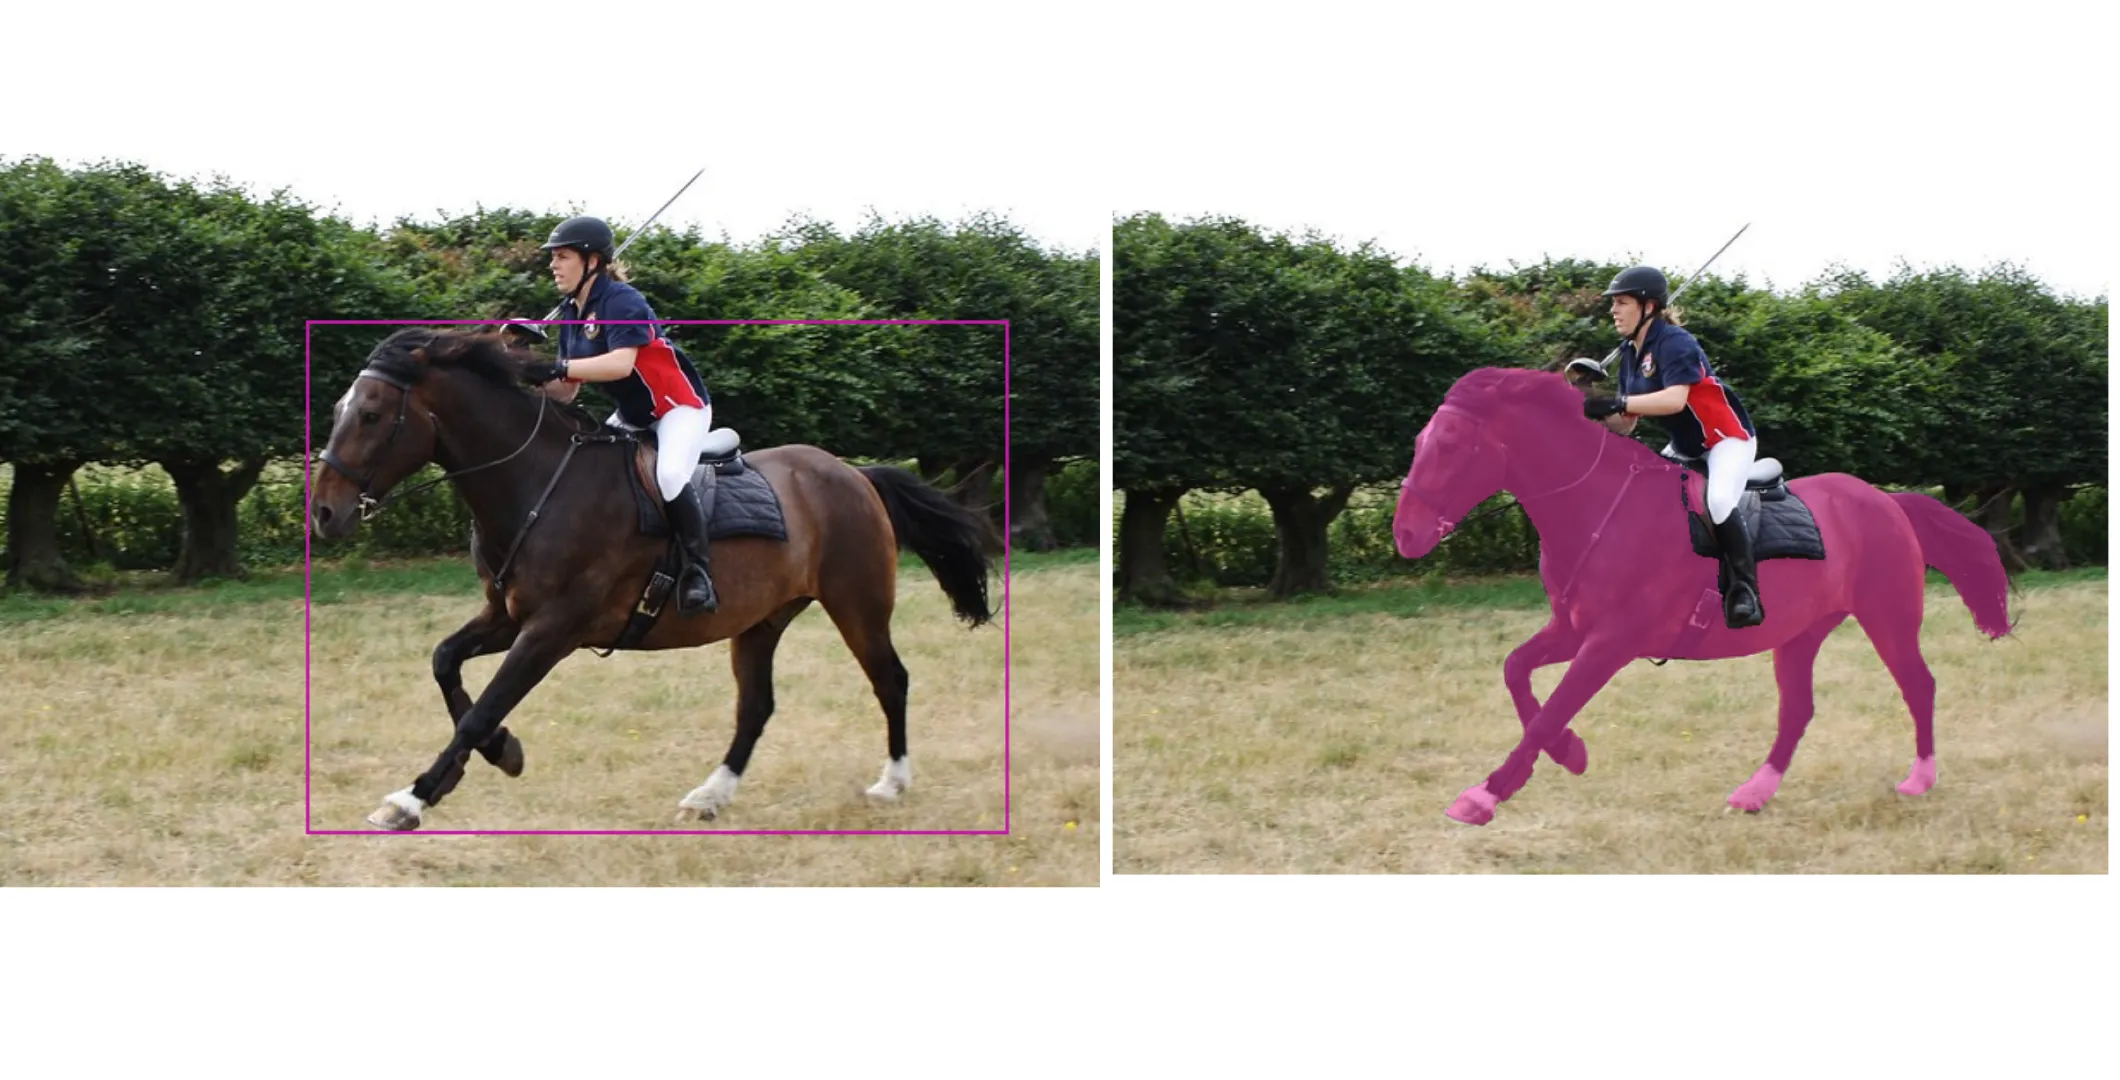
Similarly, you can do it for other images by providing their bounding boxes.
input_boxes = [[308.9709, 116.7895, 503.7764, 258.8303],
          [172.0639, 186.9951, 297.3459, 328.9594]]
Segmentation Result
input_boxes = [[178.88, 97.84, 586.23, 395.83]]
Segmentation Result
- Segmentation using Points
First, we have to create some helper functions
def show_mask(mask, ax, random_color=False, borders = True):
    if random_color:
        color = np.concatenate([np.random.random(3), np.array([0.6])], axis=0)
    else:
        color = np.array([30/255, 144/255, 255/255, 0.6])
    h, w = mask.shape[-2:]
    mask = mask.astype(np.uint8)
    mask_image =  mask.reshape(h, w, 1) * color.reshape(1, 1, -1)
    if borders:
        import cv2
        contours, _ = cv2.findContours(mask,cv2.RETR_EXTERNAL, cv2.CHAIN_APPROX_NONE)
        # Try to smooth contours
        contours = [cv2.approxPolyDP(contour, epsilon=0.01, closed=True) for contour in contours]
        mask_image = cv2.drawContours(mask_image, contours, -1, (1, 1, 1, 0.5), thickness=2)
    ax.imshow(mask_image)

def show_points(coords, labels, ax, marker_size=375):
    pos_points = coords[labels==1]
    neg_points = coords[labels==0]
    ax.scatter(pos_points[:, 0], pos_points[:, 1], color='green', marker='*', s=marker_size, edgecolor='white', linewidth=1.25)
    ax.scatter(neg_points[:, 0], neg_points[:, 1], color='red', marker='*', s=marker_size, edgecolor='white', linewidth=1.25)

def show_box(box, ax):
    x0, y0 = box[0], box[1]
    w, h = box[2] - box[0], box[3] - box[1]
    ax.add_patch(plt.Rectangle((x0, y0), w, h, edgecolor='green', facecolor=(0, 0, 0, 0), lw=2))

def show_masks(image, masks, scores, point_coords=None, box_coords=None, input_labels=None, borders=True):
    for i, (mask, score) in enumerate(zip(masks, scores)):
        plt.figure(figsize=(10, 10))
        plt.imshow(image)
        show_mask(mask, plt.gca(), borders=borders)
        if point_coords is not None:
            assert input_labels is not None
            show_points(point_coords, input_labels, plt.gca())
        if box_coords is not None:
            # boxes
            show_box(box_coords, plt.gca())
        if len(scores) > 1:
            plt.title(f"Mask {i+1}, Score: {score:.3f}", fontsize=18)
        plt.axis('off')
        plt.show()
Now, we create a function that will perform point-based segmentation
def point_segmentor(
    image,
    point_sets,
    label_sets,
    predictor,
    show_individual=False,
    show_combined=True,
    multimask_output=False
):
    """
    Segments objects in an image using multiple sets of points with SAM2 and visualizes the results.

    Args:
        image (np.ndarray): The input image as a numpy array (H, W, 3).
        point_sets (list of np.ndarray): List of (N_points, 2) arrays, each array is a set of (x, y) points.
        label_sets (list of np.ndarray): List of (N_points,) arrays, each array is a set of labels (1=fg, 0=bg) for corresponding points.
        predictor (SAM2ImagePredictor): Predictor object.
        show_individual (bool): If True, show each segmentation result individually.
        show_combined (bool): If True, show all masks overlaid on the image.
        multimask_output (bool): If True, returns multiple masks per prompt set.

    Returns:
        all_masks (list): List of mask arrays for each point set.
        all_scores (list): List of scores for each mask.
    """
    predictor.set_image(image)
    all_masks = []
    all_scores = []

    # Predict masks for each set of points
    for pts, lbls in zip(point_sets, label_sets):
        masks, scores, _ = predictor.predict(
            point_coords=pts,
            point_labels=lbls,
            multimask_output=multimask_output
        )
        all_masks.append(masks)
        all_scores.append(scores)

    # Visualize each mask individually
    if show_individual:
        for i, (masks, scores, pts, lbls) in enumerate(zip(all_masks, all_scores, point_sets, label_sets)):
            show_masks(
                image,
                masks,
                scores,
                point_coords=pts,
                input_labels=lbls,
                borders=True
            )

    # Visualize all best masks together
    if show_combined:
        plt.figure(figsize=(10, 10))
        plt.imshow(image)
        for masks, pts, lbls in zip(all_masks, point_sets, label_sets):
            # Use the best mask (highest score)
            best_idx = np.argmax(all_scores[all_masks.index(masks)])
            show_mask(masks[best_idx], plt.gca(), random_color=True)
            show_points(pts, lbls, plt.gca())
        plt.title("All Segmented Objects (Best Masks)")
        plt.axis('off')
        plt.show()

    return all_masks, all_scores
Now, we can perform point-segmentation just by this code,
# Example: segmenting two objects with different point prompts
point_sets = [
    np.array([[406, 187 ], [220, 258]]) # Points for object
]
label_sets = [
    np.array([1, 1])                   # Labels for object
]

masks, scores = point_segmentor(img1, point_sets, label_sets, predictor, show_combined = True)
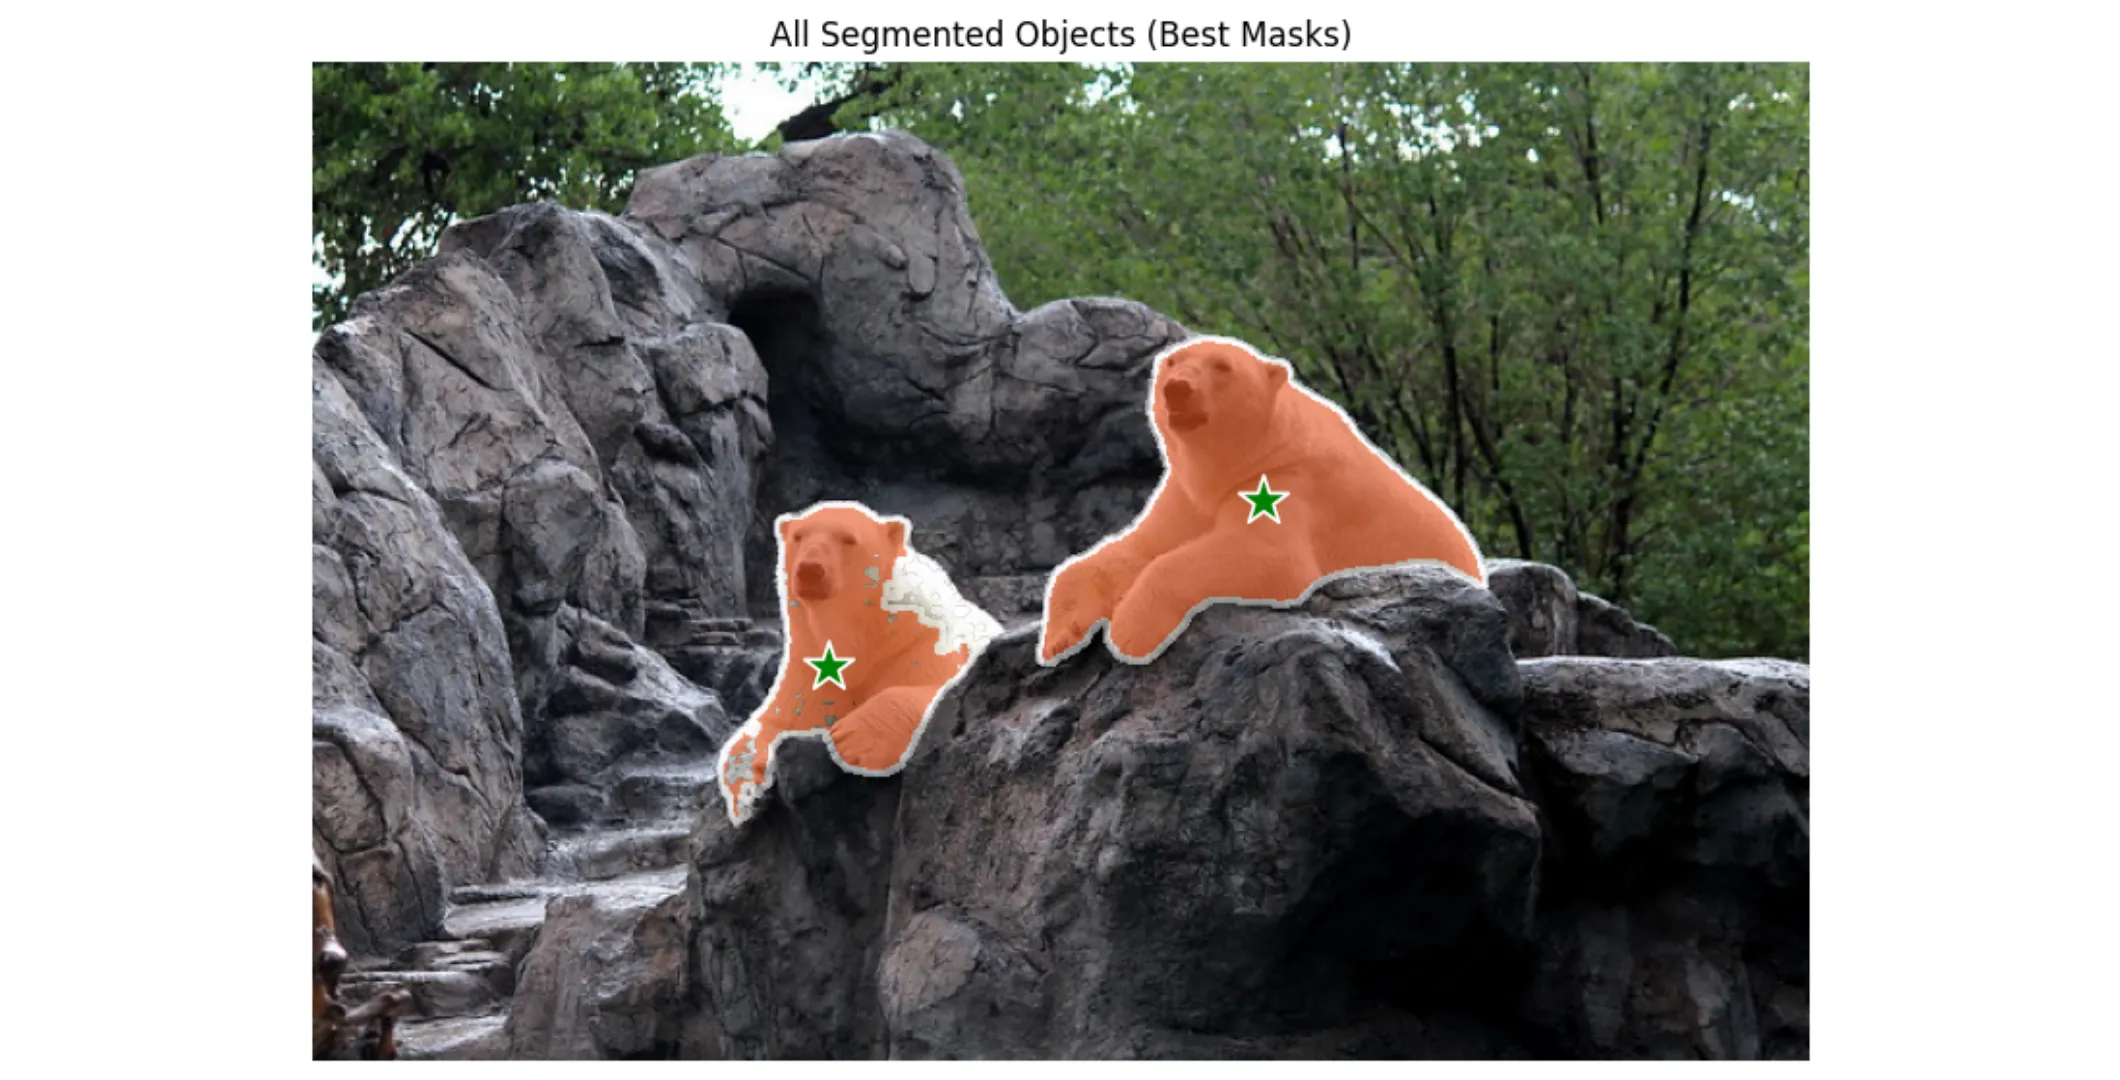
Point-based segmentation of Bear
point_sets = [
    np.array([[350, 246]]) # Points for object
]
label_sets = [
    np.array([1])                   # Labels for object
]

masks, scores = point_segmentor(img2, point_sets, label_sets, predictor, show_combined = True)
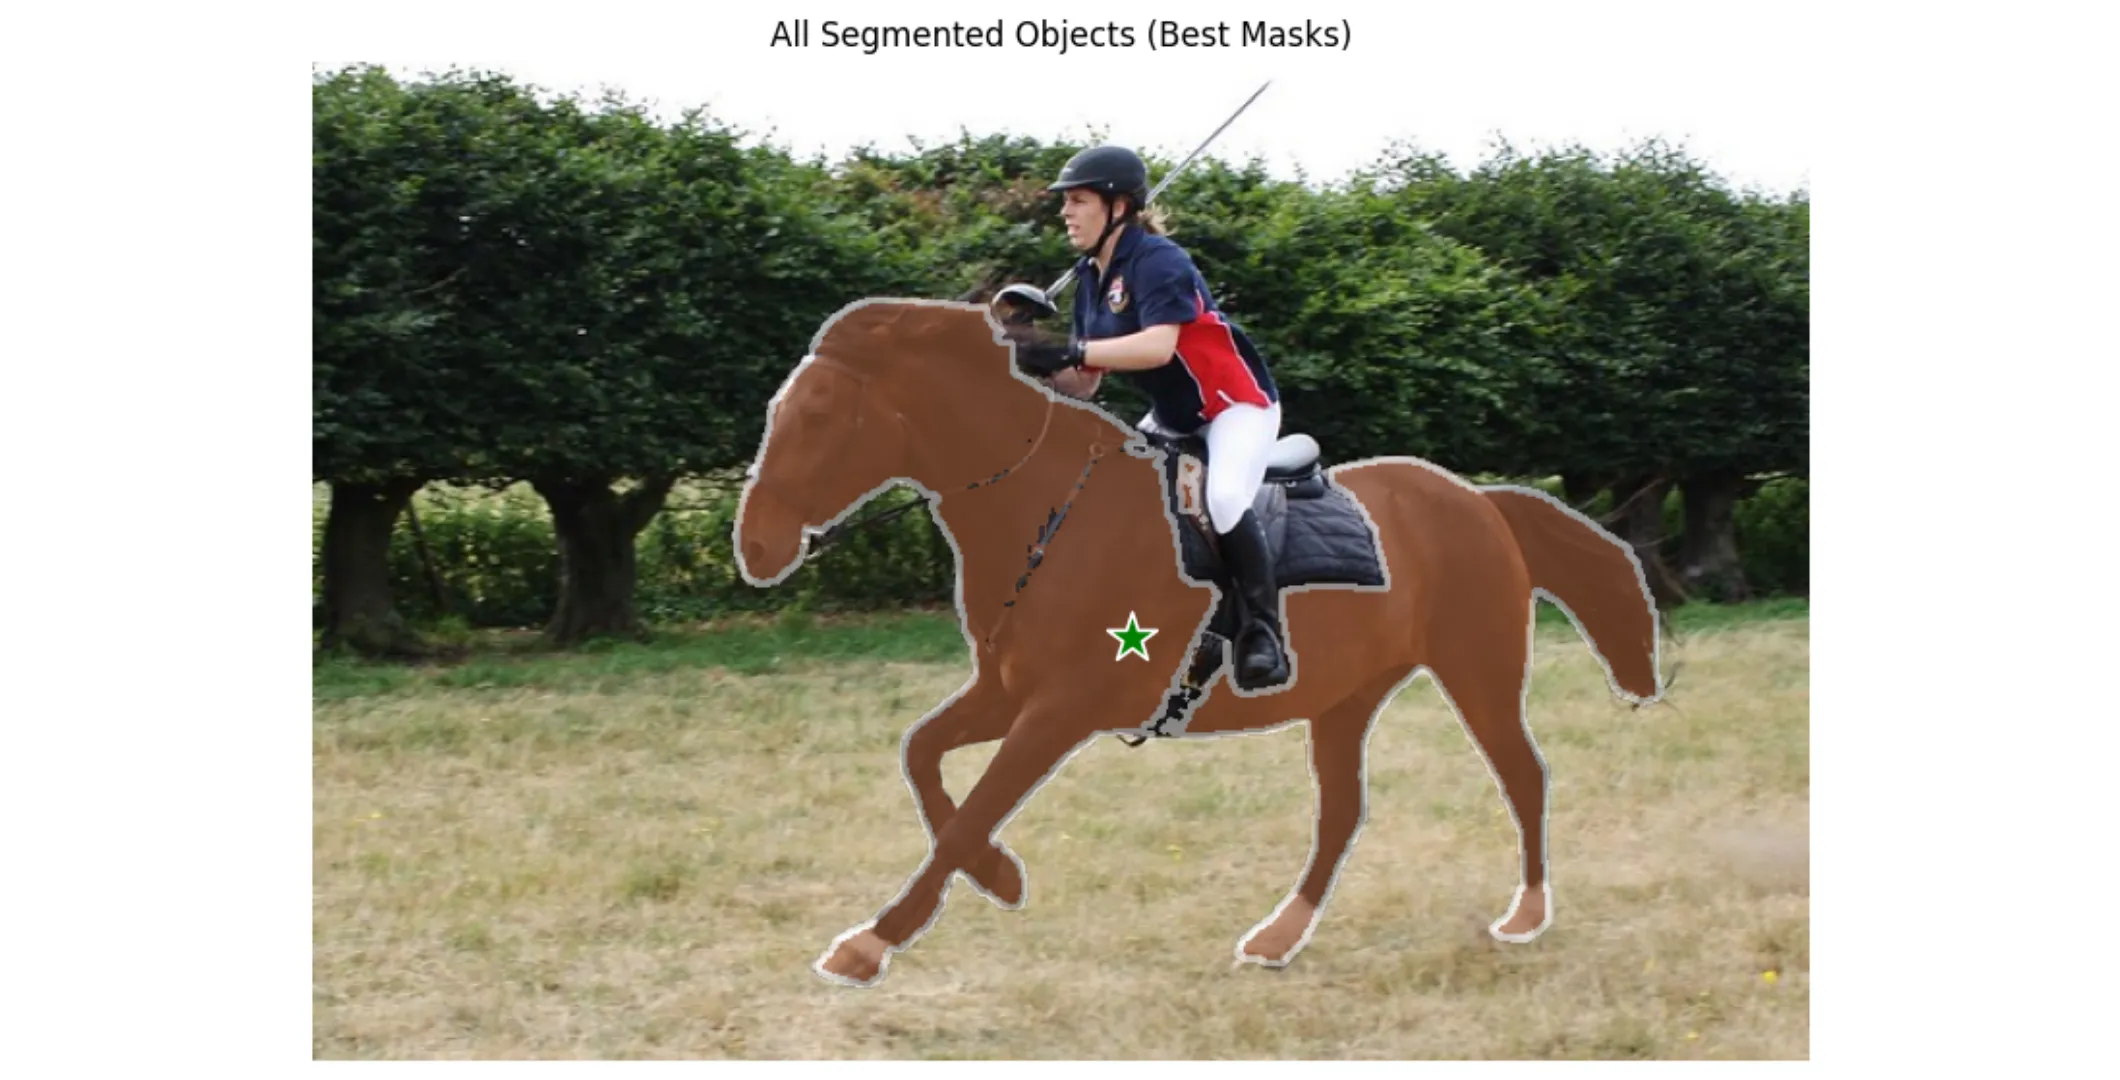
Point-based segmentation of horse
Conclusion
The Segment Anything Model 2 (SAM2) represents a paradigm shift in computer vision, offering unprecedented zero-shot segmentation capabilities that bridge the gap between research and real-world applications.
By addressing the limitations of its predecessor, such as poor edge detail, lack of video support, and computational inefficiency, SAM2 empowers developers, researchers, and creatives to tackle complex visual tasks with pixel-perfect precision.
FAQs
What key advantages does SAM2 offer over the original SAM for image segmentation?
SAM2 provides 6x better edge accuracy, handles small objects effectively, requires fewer user prompts, and supports real-time processing via optimized architecture, unlike the slower, less precise original SAM.
Can SAM2 process video streams for object tracking?
Yes! SAM2 introduces a "streaming memory" system to track objects across video frames, enabling seamless segmentation and motion analysis – a feature absent in the original image-only SAM.
What hardware is required to run SAM2 effectively?
SAM2 runs best on CUDA-enabled GPUs for real-time performance, but can operate on CPUs with smaller model variants. Its efficiency improvements make it more device-friendly than the resource-heavy original SAM.
References

Simplify Your Data Annotation Workflow With Proven Strategies
.png)
