

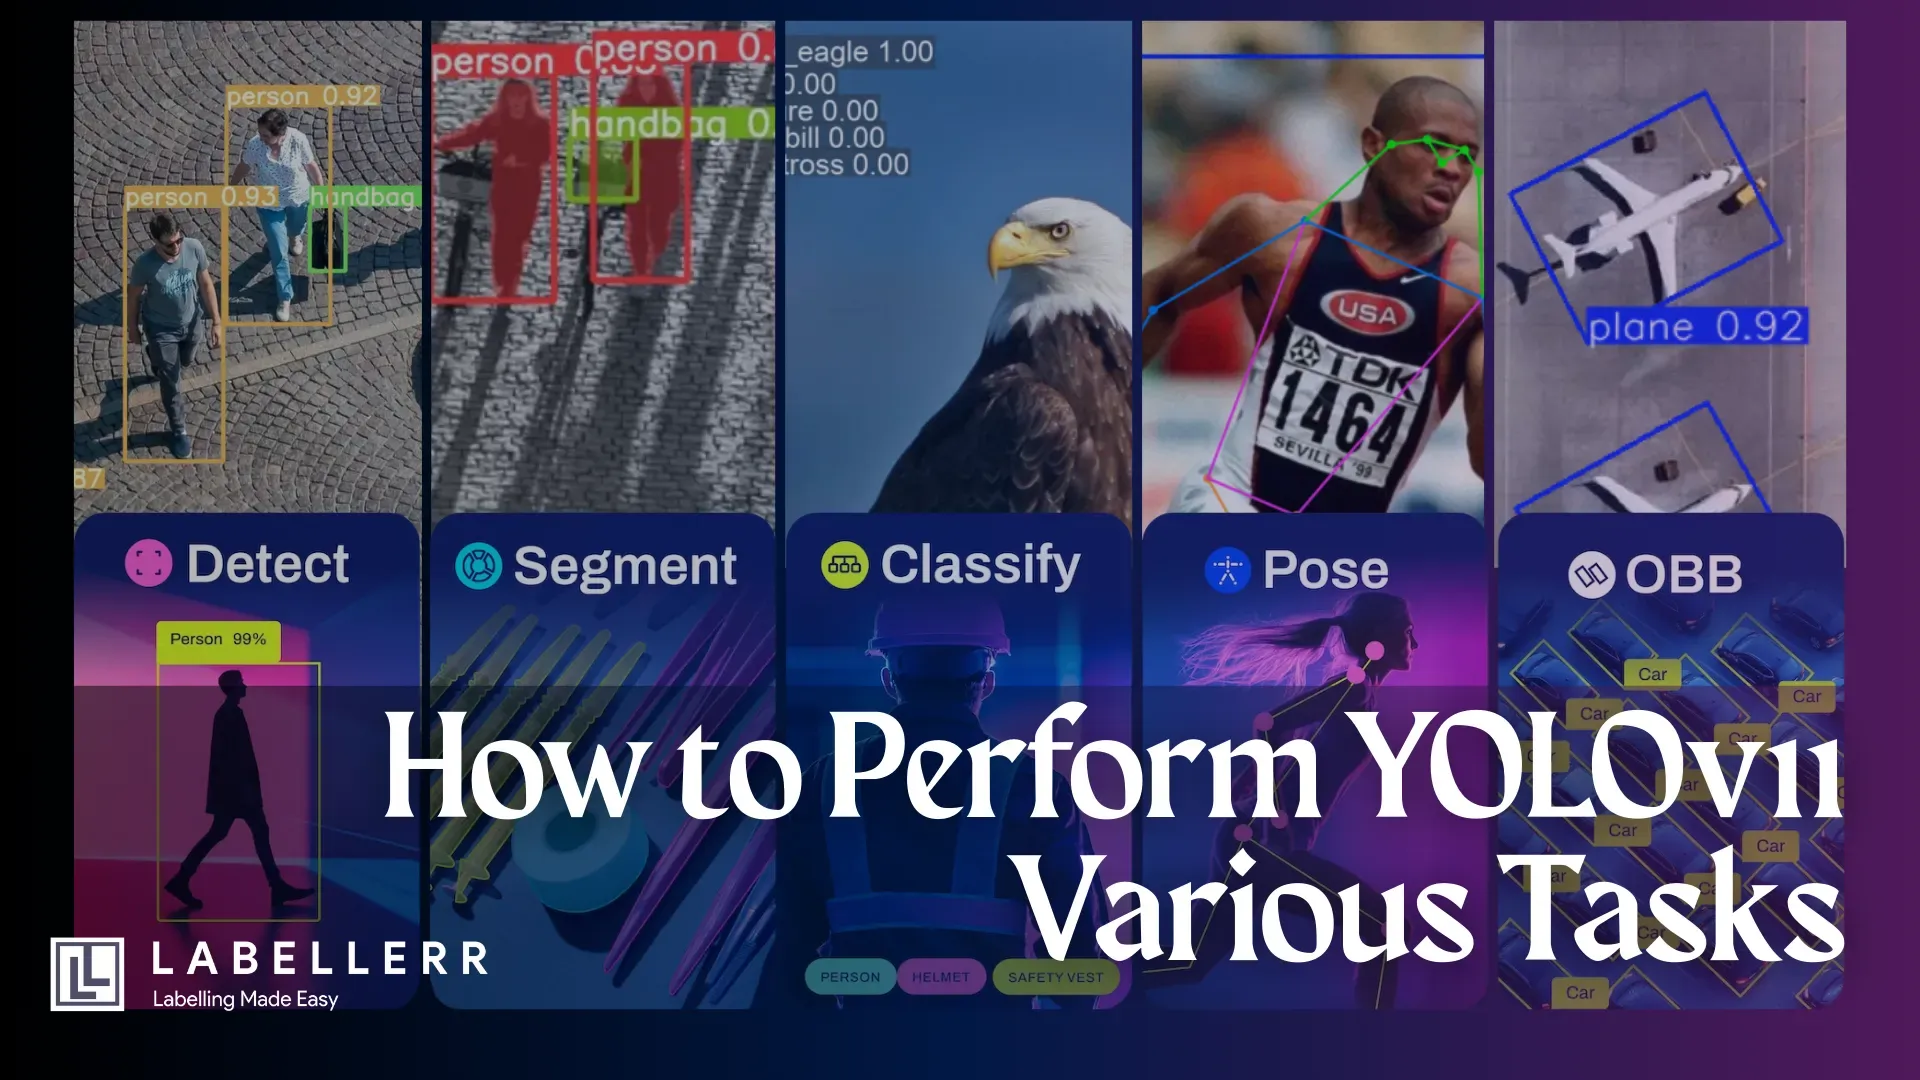
The Only YOLOv11 Multi-Labeling Guide You’ll Ever Need
This guide details how to perform all vision tasks: detection, segmentation, pose estimation & more in YOLOv11.

You've likely seen YOLO (You Only Look Once) in action, accurately drawing bounding boxes around objects in images and videos.
But have you ever paused and asked: Is object detection the absolute limit of YOLO's capabilities, or is there more features beneath its lightning-fast surface?
Consider this: the sheer volume of visual data generated daily is staggering, with applications of advanced computer vision now entering industries from retail and manufacturing to healthcare and smart cities.
The demand isn't just for finding objects anymore, but for a deeper, more detailed understanding visual scenes.
So, if you're a student stepping into the world of computer vision, a developer looking to integrate computer vision features into your applications, or a researcher aiming to use a versatile and efficient toolkit for your vision tasks.
Then you've landed in the right place.
We'll provide you with practical, step-by-step instructions on how to perform various YOLO tasks.
What is YOLO?
YOLO, which stands for "You Only Look Once," is a popular and clever approach to computer vision.
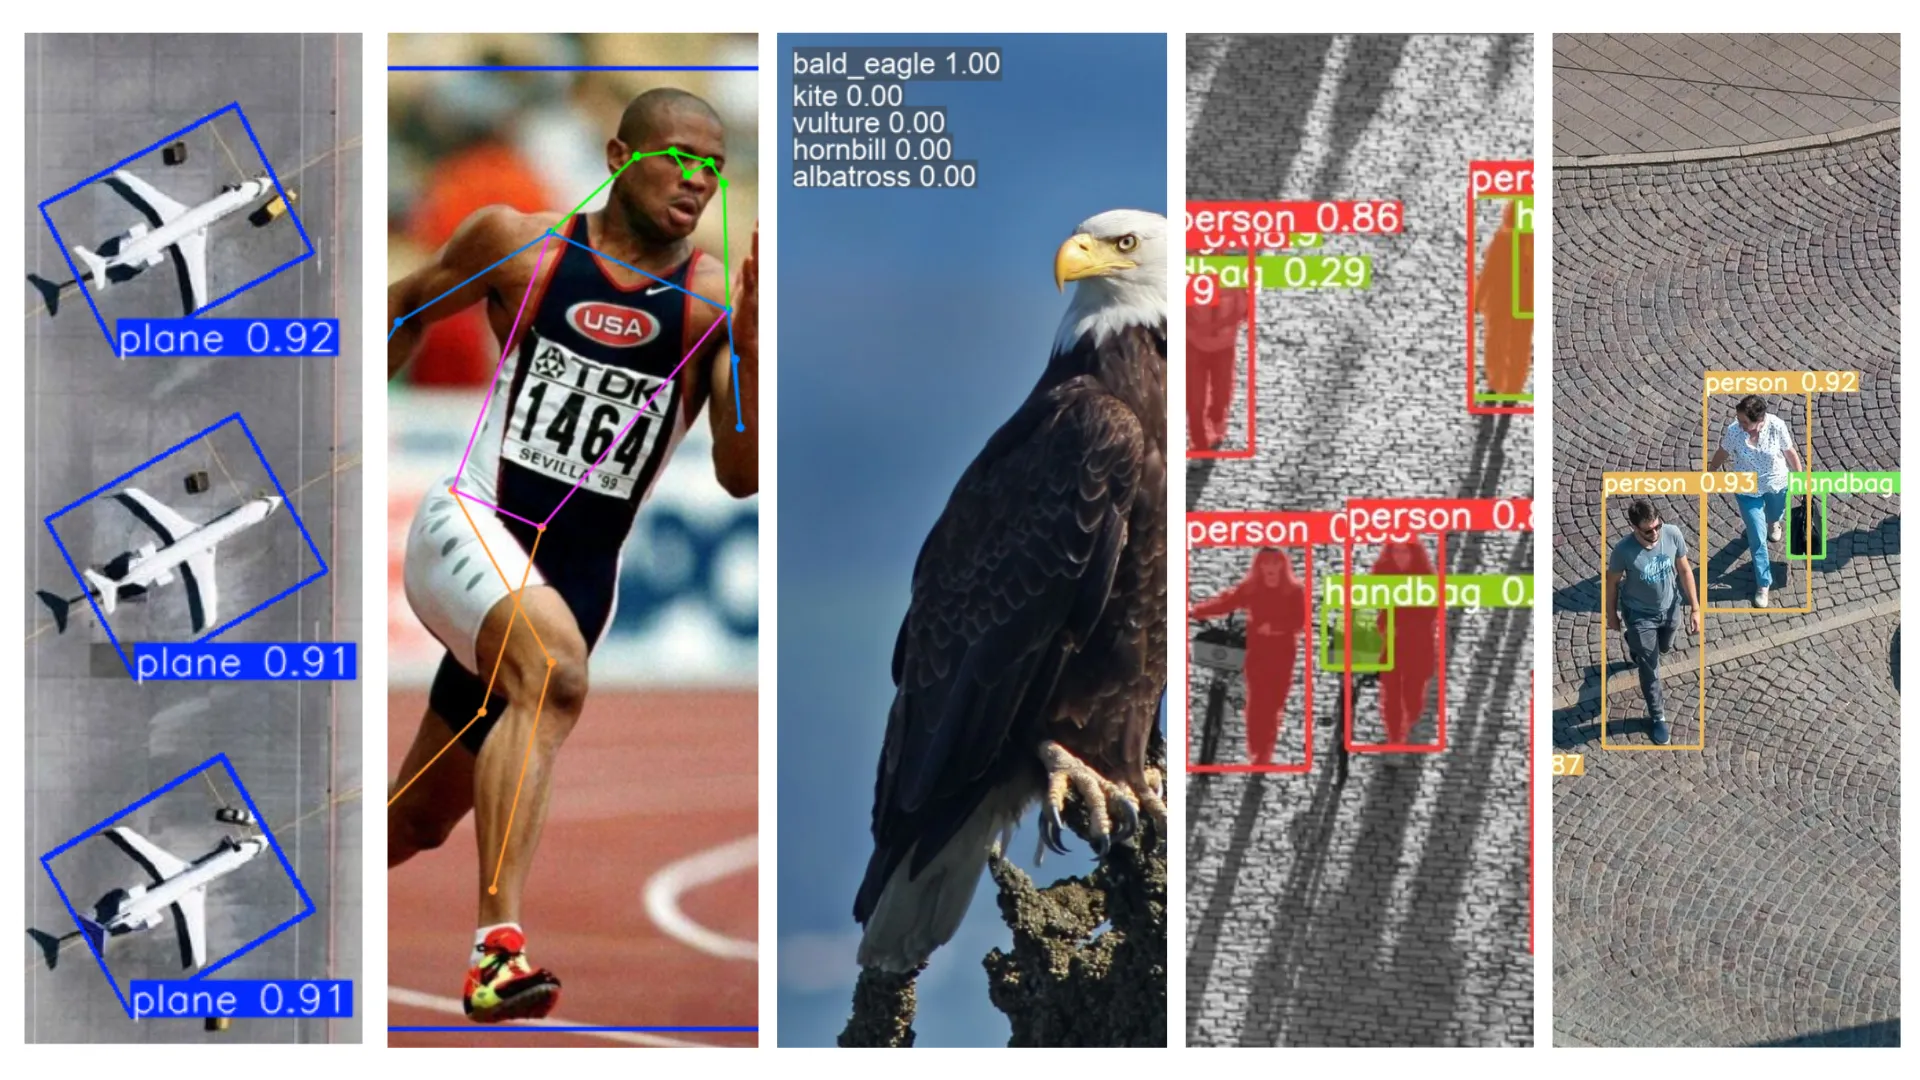
Various Tasks by YOLO
Before YOLO, many computer systems looked at an image multiple times or in different stages to find objects.
YOLO does it all in a single pass through the neural network. It looks at the entire image at once, predicts bounding boxes for objects, and identifies their classes simultaneously.
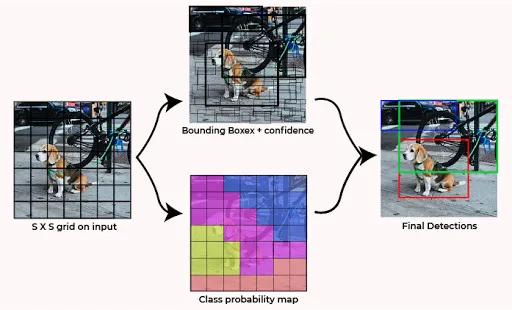
How YOLO works
This unified approach is what makes it incredibly fast and efficient, suitable for real-time applications like self-driving cars, video surveillance, or robotics.
How many tasks does it support?
Today, a modern YOLO-based model can typically be trained or fine-tuned to support several core computer vision tasks:
- Object Detection: This remains YOLO's primary and most famous task. It identifies what objects are in an image/video and draws bounding boxes around them.
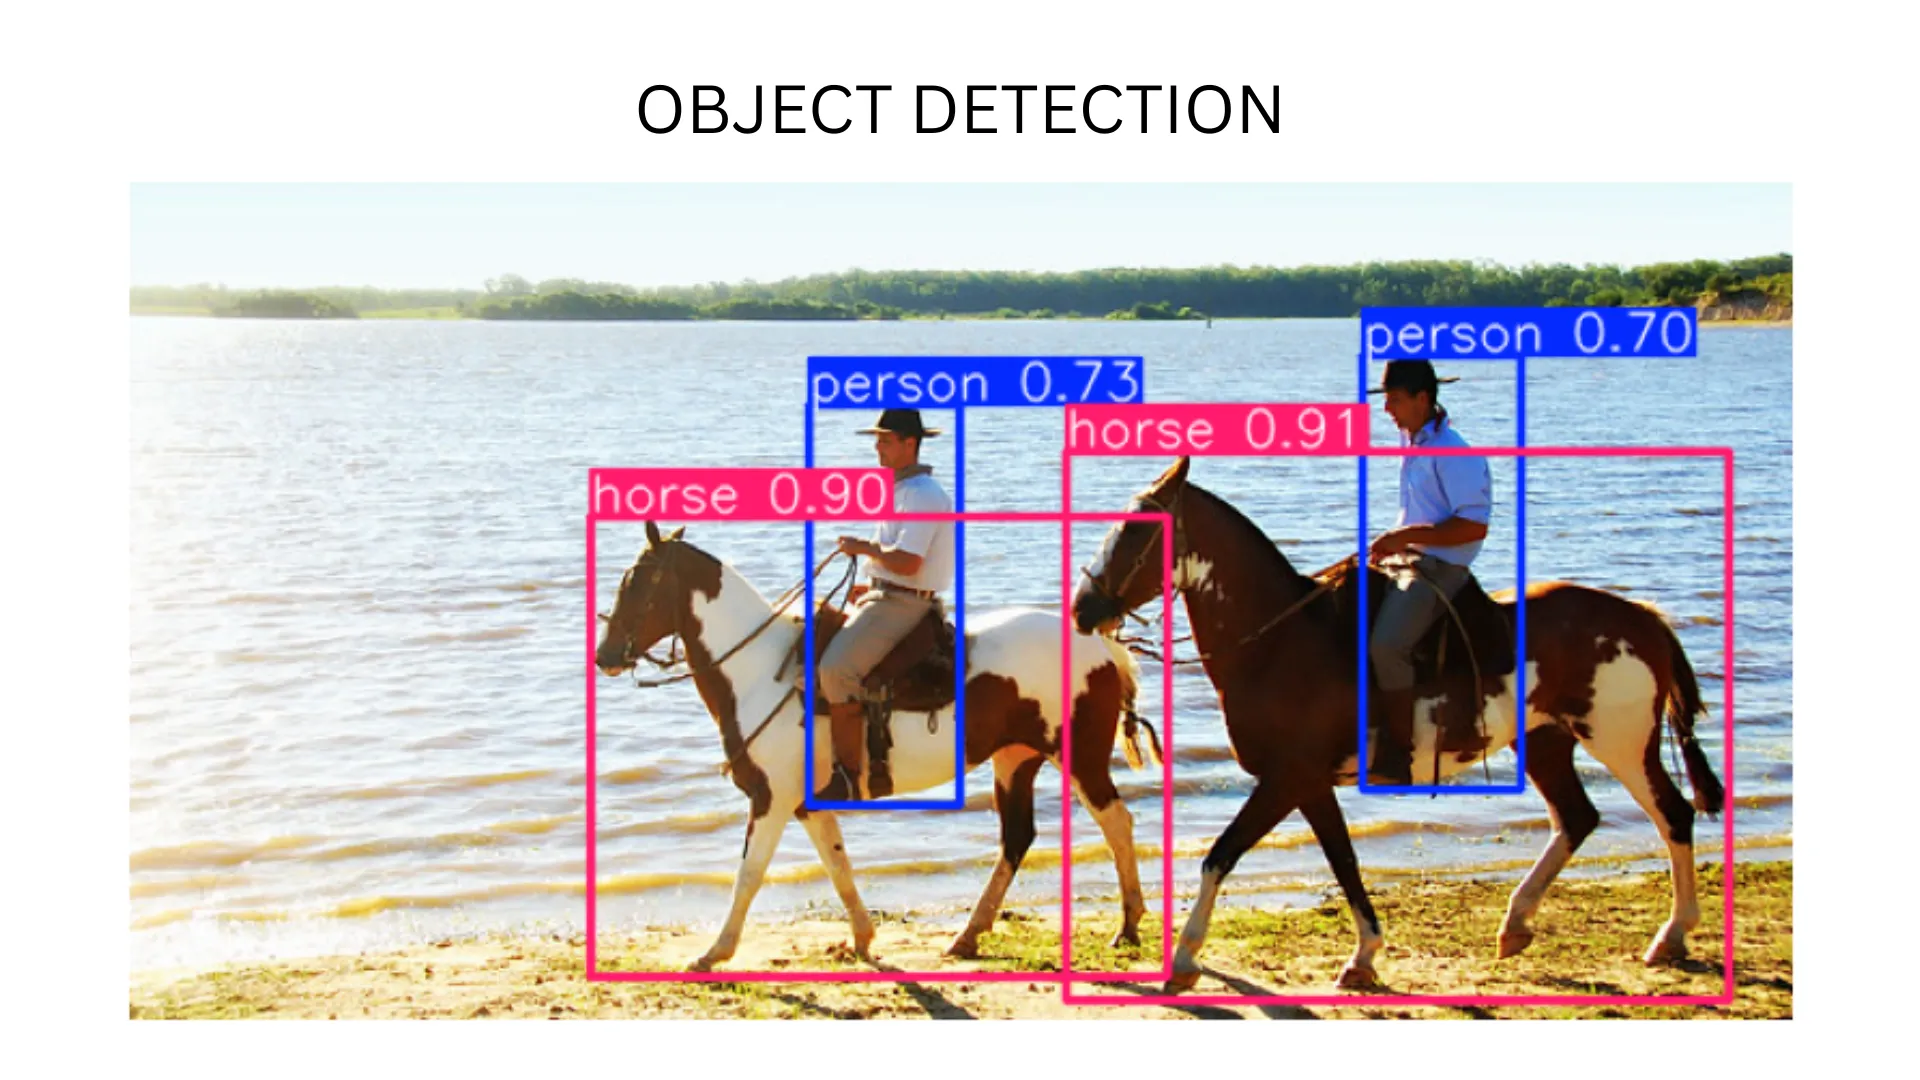
Object Detection
- Image Classification: Beyond just detecting objects, newer YOLO versions can be trained to classify an entire image. For example, determining if an image is of a "vulture" or "an eagle" without necessarily boxing individual items.
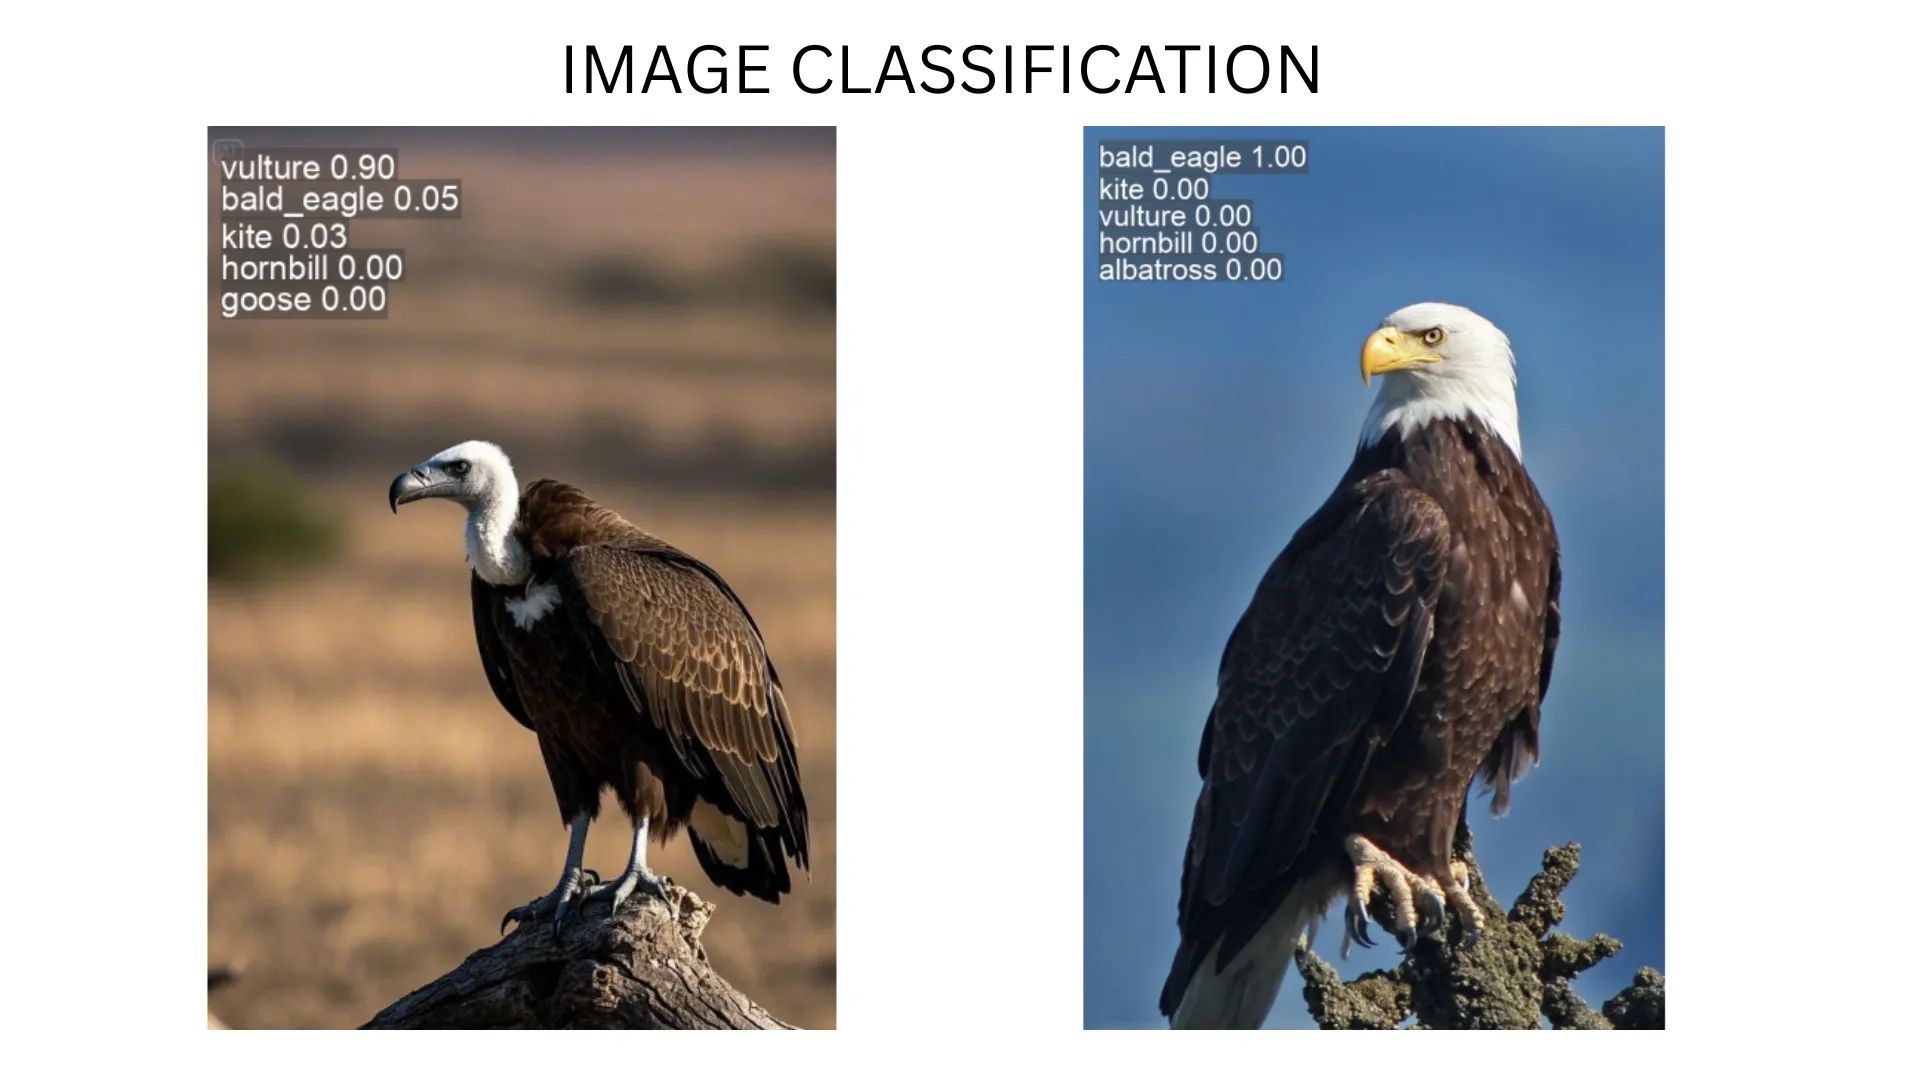
Image Classification
- Instance Segmentation (or just Segmentation): This is a step up from object detection. Instead of just drawing a bounding box, instance segmentation identifies each object and creates a pixel-level mask outlining its exact shape. Think of it as coloring in each detected object.
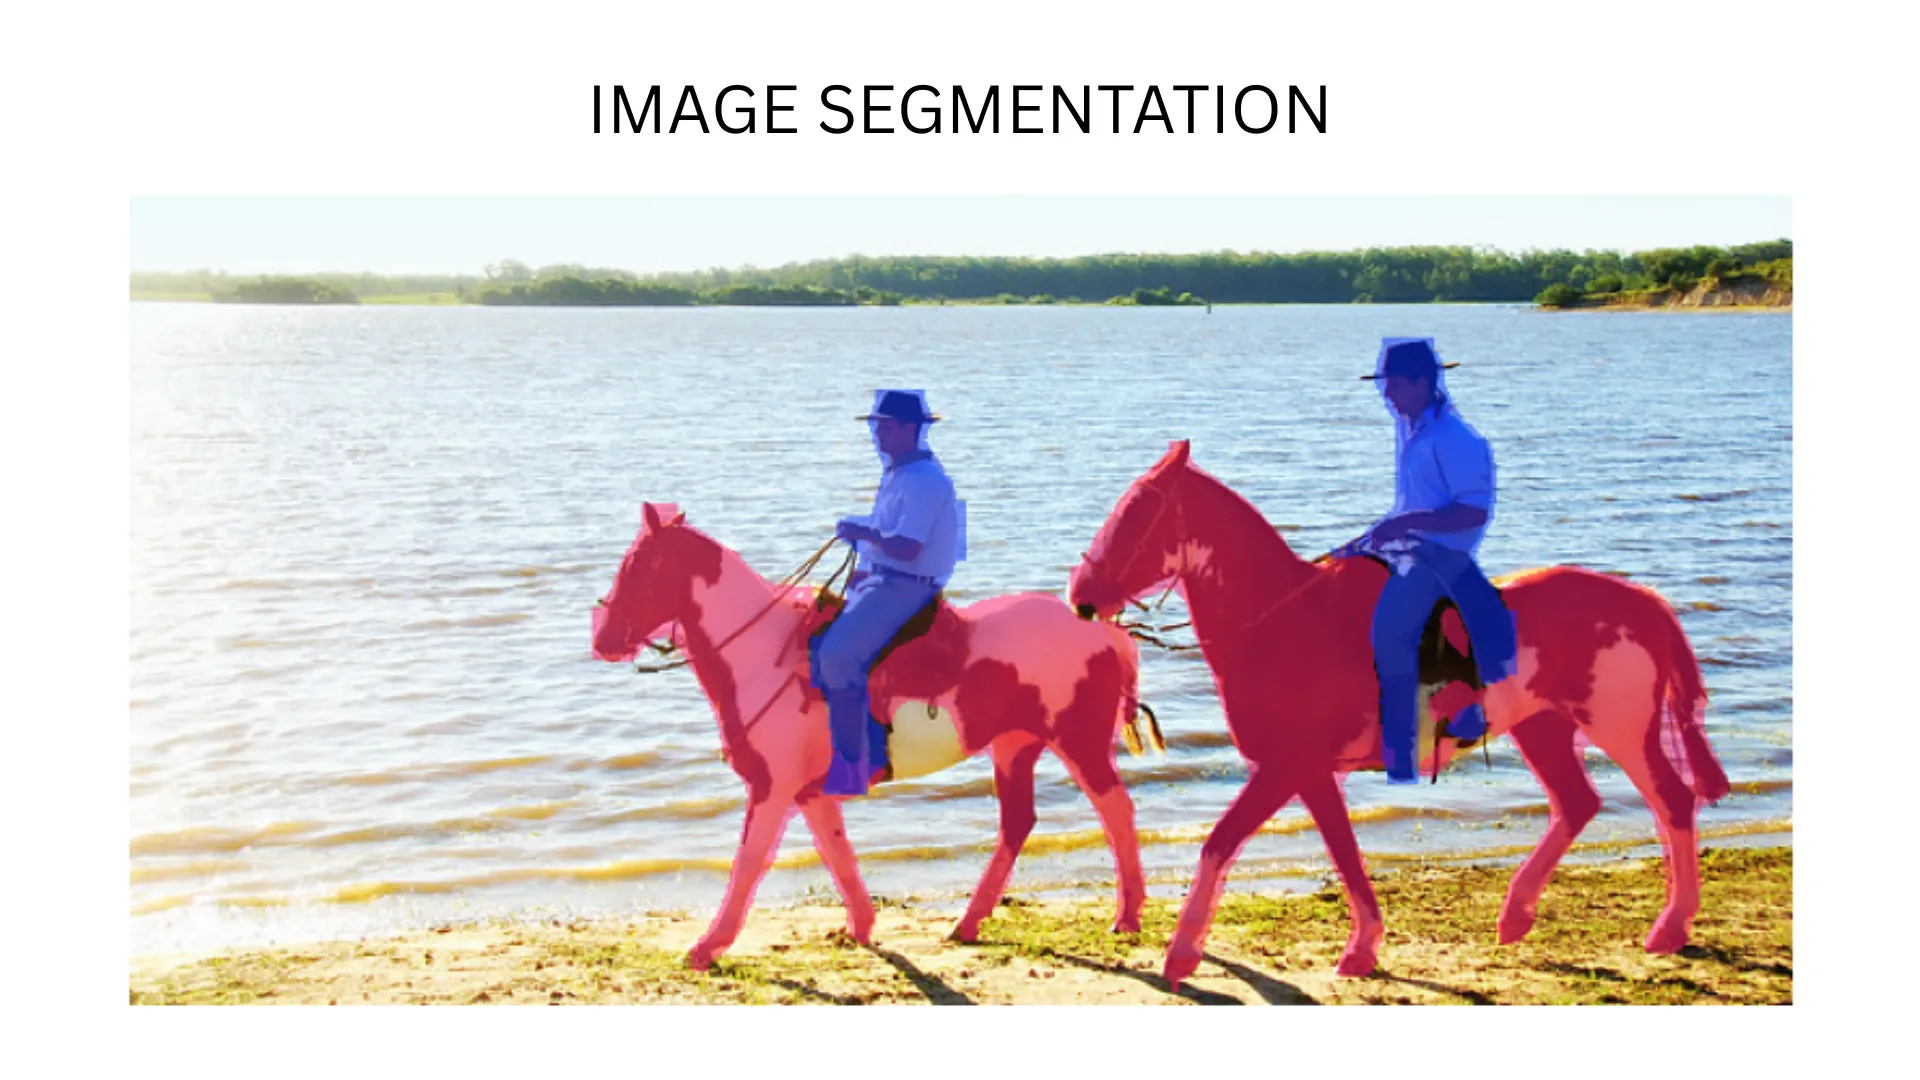
Instance Segmentation
- Pose Estimation (Keypoint Detection): Some advanced YOLO models (like YOLOv11 and YOLOv8) can identify the poses of humans or objects by detecting key points (e.g., elbows, knees, shoulders for humans; or specific parts of an object).
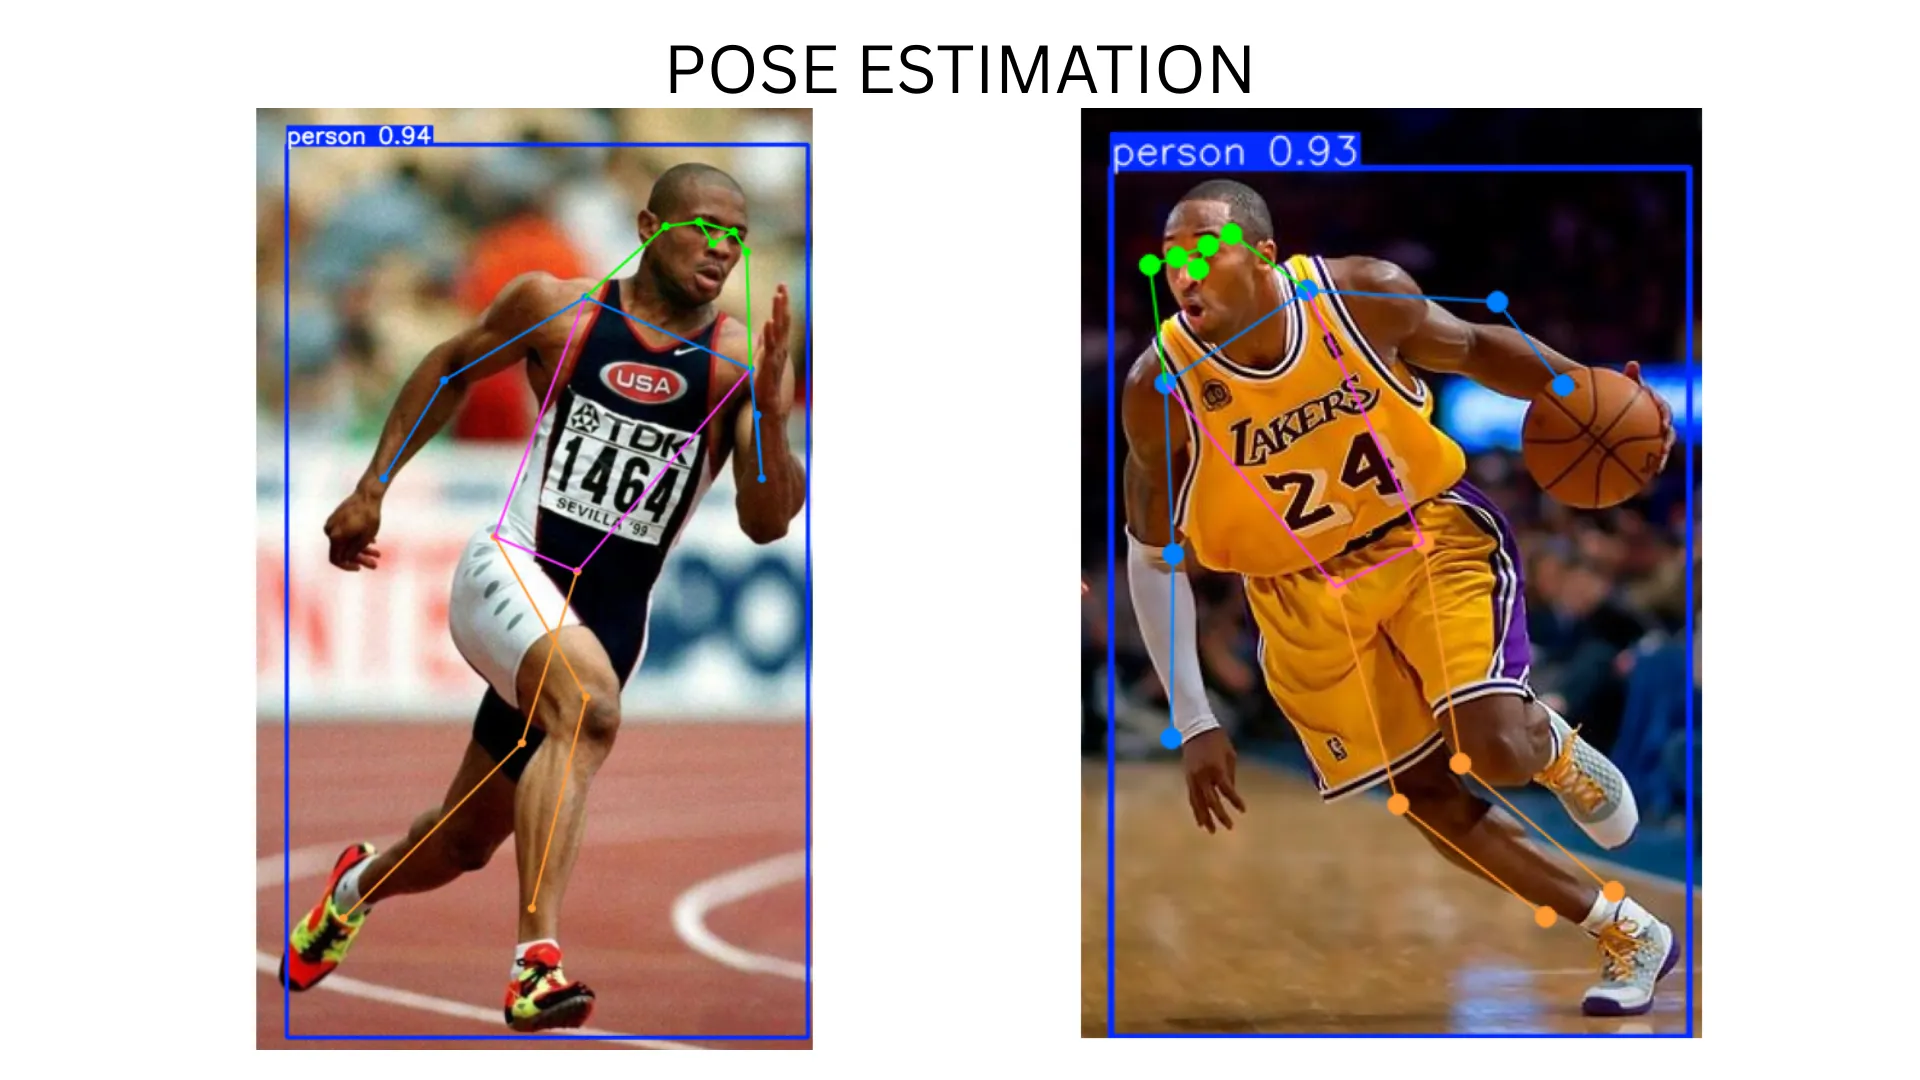
Pose Estimation
- Oriented Object Detection (OBB): Standard object detection uses rectangular boxes aligned with the image axes. However, many objects in the real world (e.g., ships in satellite images, text at an angle, diagonally parked cars) are not perfectly aligned. Oriented Object Detection addresses this by predicting bounding boxes that can be rotated to tightly enclose these objects.
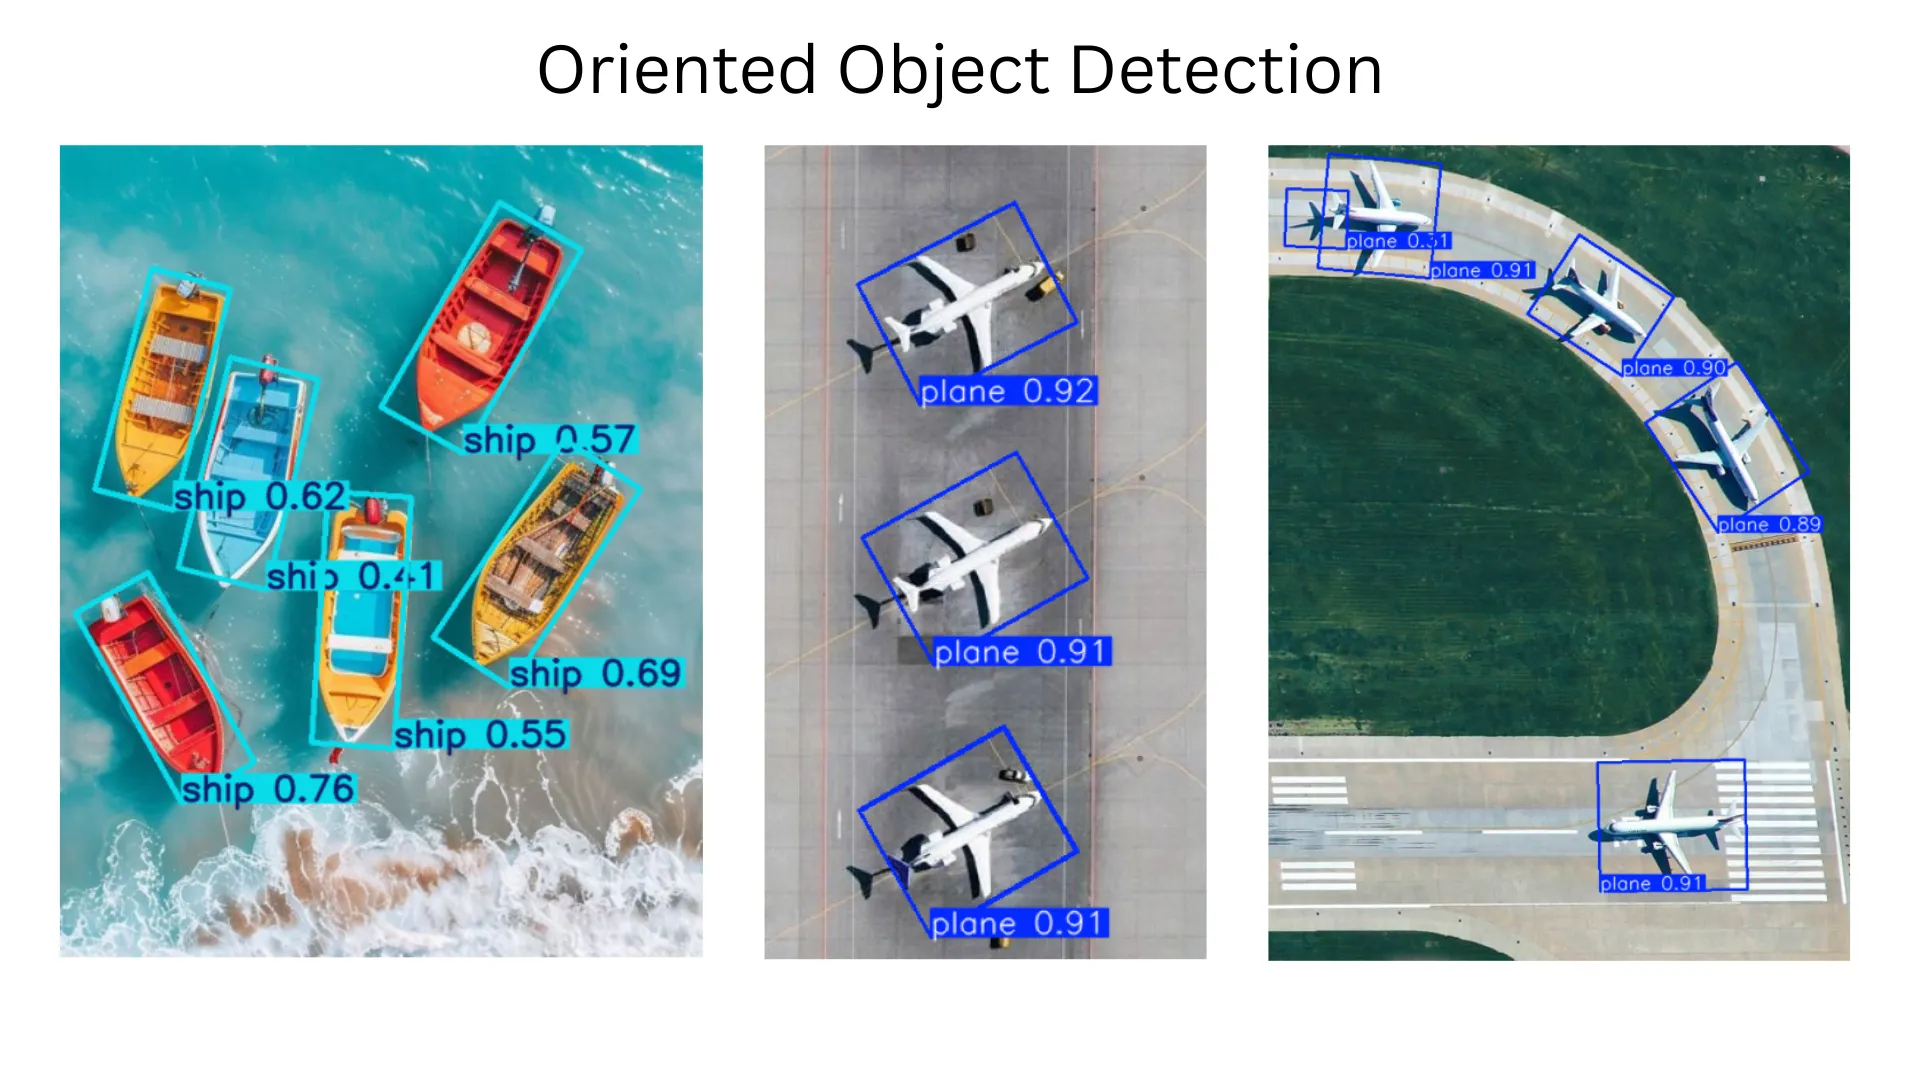
Oriented Object Detection
Setting Up Your YOLO Environment
To get started with YOLOv11 for various task, you'll first need to set up a compatible environment that includes Python, necessary libraries, and GPU acceleration (if available).
Follow the steps below to perform various vision tasks on images/video.
!pip install ultralytics
!pip install opencv-python matplotlib pillow
from ultralytics import YOLO
import matplotlib.pyplot as plt
import cv2
from PIL import Image
Object Detection
# Load a pre-trained YOLO model (adjust model type as needed)
model = YOLO("yolo11n.pt")  # n, s, m, l, x versions available

# Perform object detection on an image
results = model.predict(source="sample_image.jpg")  # Can also use video, directory, URL, etc.
plt.figure(figsize=(10, 10))
plt.title('YOLOv11 Object Detection Results')
plt.axis('off')
plt.imshow(cv2.cvtColor(results[0].plot(), cv2.COLOR_BGR2RGB))

YOLOv11 Object Detection Results
Oriented Object Detection (OBB)
# Load a pre-trained YOLO model (adjust model type as needed)
model = YOLO("yolo11n-obb.pt")  # n, s, m, l, x versions available

# Perform object detection on an image
results = model.predict(source="sample_image.jpg")  # Can also use video, directory, URL, etc.
plt.figure(figsize=(10, 10))
plt.title('YOLOv11 Oriented Object Detection')
plt.axis('off')
plt.imshow(cv2.cvtColor(results[0].plot(), cv2.COLOR_BGR2RGB))
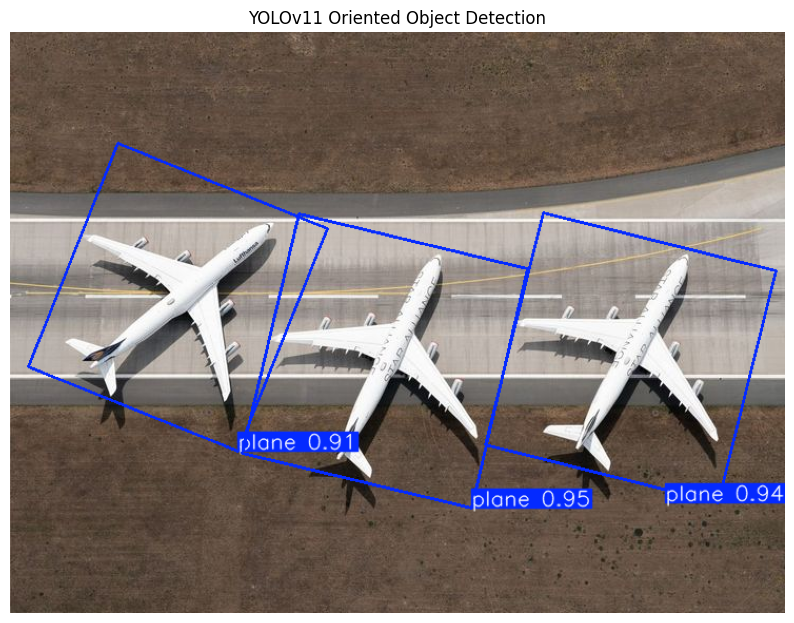
YOLOv11 Oriented Object Detection
Instance Segmentation
# Load a pre-trained YOLO model (adjust model type as needed)
model = YOLO("yolo11n-seg.pt")  # n, s, m, l, x versions available

# Perform object detection on an image
results = model.predict(source="sample_image.jpg")  # Can also use video, directory, URL, etc.
plt.figure(figsize=(10, 10))
plt.title('YOLOv11 Segmentation')
plt.axis('off')
plt.imshow(cv2.cvtColor(results[0].plot(), cv2.COLOR_BGR2RGB))
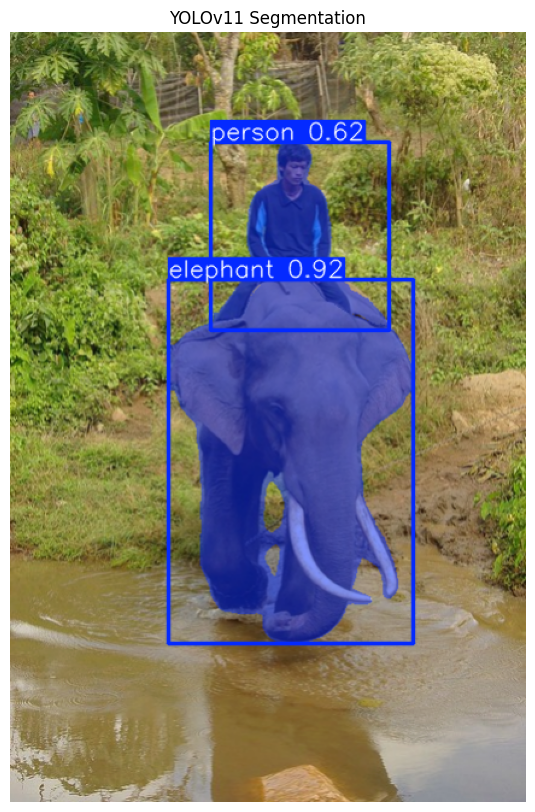
YOLOv11 Segmentation
Pose Estimation / Keypoint Detection
# Load a pre-trained YOLO model (adjust model type as needed)
model = YOLO("yolo11n-pose.pt")  # n, s, m, l, x versions available

# Perform object detection on an image
results = model.predict(source="sample_image.jpg")  # Can also use video, directory, URL, etc.
plt.figure(figsize=(10, 10))
plt.title('YOLOv11 Pose Results')
plt.axis('off')
plt.imshow(cv2.cvtColor(results[0].plot(), cv2.COLOR_BGR2RGB))
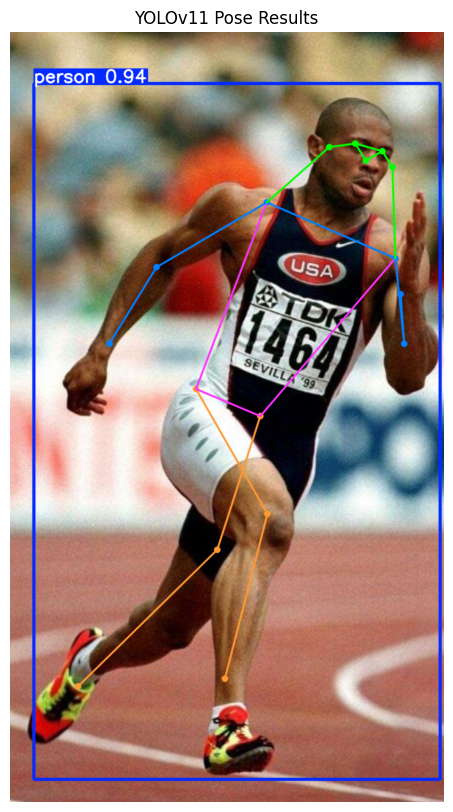
YOLOv11 Pose Results
Image Classification
# Load a pre-trained YOLO model (adjust model type as needed)
model = YOLO("yolo11n-cls.pt")  # n, s, m, l, x versions available

# Perform object detection on an image
results = model.predict(source="sample_image.jpg")  # Can also use video, directory, URL, etc.
plt.figure(figsize=(10, 10))
plt.title('YOLOv11 Classification Results')
plt.axis('off')
plt.imshow(cv2.cvtColor(results[0].plot(), cv2.COLOR_BGR2RGB))
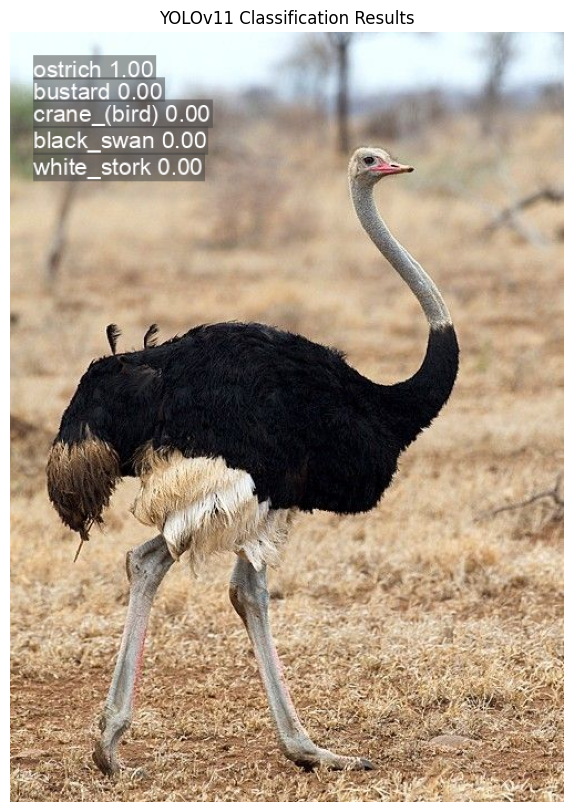
YOLOv11 Classification Results
Conclusion
And there you have it! By following along with this guide, you've unlocked the power of YOLO and seen firsthand how it tackles a variety of computer vision tasks.
YOLO's speed and accuracy make it a formidable tool. With the skills you've gained here, you're now equipped to explore these frontiers and countless others.
The applications are vast, and the problems waiting to be solved are numerous.
So, take what you've learned, experiment, and start building the next amazing vision-powered solution.
FAQs
What are the main computer vision tasks I can perform using YOLOv11, and how do I choose the right one for my project?
YOLOv11 (or advanced YOLO models) typically supports object detection (locating items with boxes), instance segmentation (outlining exact shapes), image classification (categorizing the whole image), pose estimation (detecting keypoints like human joints), and potentially oriented object detection (for rotated items).
Choose the task based on what you need to extract: simple presence (classification), location (detection), precise shape (segmentation), skeletal structure (pose estimation), or rotated bounding boxes (oriented detection).
Do I need to train a separate YOLOv11 model for each different task (e.g., one for detection, one for segmentation), or can a single model handle multiple tasks?
Often, specific YOLOv11 model variants or heads are optimized for particular tasks. For instance, a model checkpoint pre-trained for object detection (yolov11n) might differ from one for segmentation (yolov11-seg).
While the core architecture might be similar, you'll typically use or fine-tune a model variant specifically designed or trained for the task at hand (detection, segmentation, pose, etc.) to achieve the best performance.
Some models might offer multi-task learning capabilities, but it's common to focus on them.
What are the key steps to prepare my custom dataset if I want to train YOLOv11 for a specific task like instance segmentation or pose estimation?
For instance segmentation, your dataset needs images with pixel-level masks for each object instance, usually in formats like COCO JSON or YOLOv5/v8 segmentation format.
For pose estimation, you'll need images with annotated keypoints (e.g., coordinates of joints) for each object or person.
Ensure your annotations are accurate and consistent, and split your data into training, validation, and (optionally) test sets. The specific annotation format will depend on the YOLOv11 framework tools you use.
References

Simplify Your Data Annotation Workflow With Proven Strategies
.png)
