

How To Perform Vision Tasks Using Florence 2
Discover the way to perform various tasks Florence 2 can handle, from object detection to OCR using just prompts. Learn how this unified vision model simplifies complex workflows without sacrificing accuracy.


In a world where AI powers everything from social media filters to self-driving cars, vision models are evolving fast. Yet, most models still focus on one task at a time.
That’s changing with Microsoft Florence 2 using a unified vision foundation model.
So, what makes Florence 2 stand out? It’s not just another vision model. It can understand prompts, perform multiple vision-language tasks without retraining, and deliver state-of-the-art results with fewer parameters.
If you’re a developer, AI researcher, or tech enthusiast exploring scalable, multi-task vision solutions, this blog will walk you through why Florence 2 might just be the most versatile model in your AI toolkit and how to implement it youself.
What is Florence 2 ?
Florence 2 is a state-of-the-art vision foundation model developed by Microsoft that uses a sequence-to-sequence transformer architecture.
Unlike traditional models specialising in a single vision task, Florence 2 is a multi-task model trained on a massive FLD-5B dataset containing 5.4 billion annotations on 126 million images.
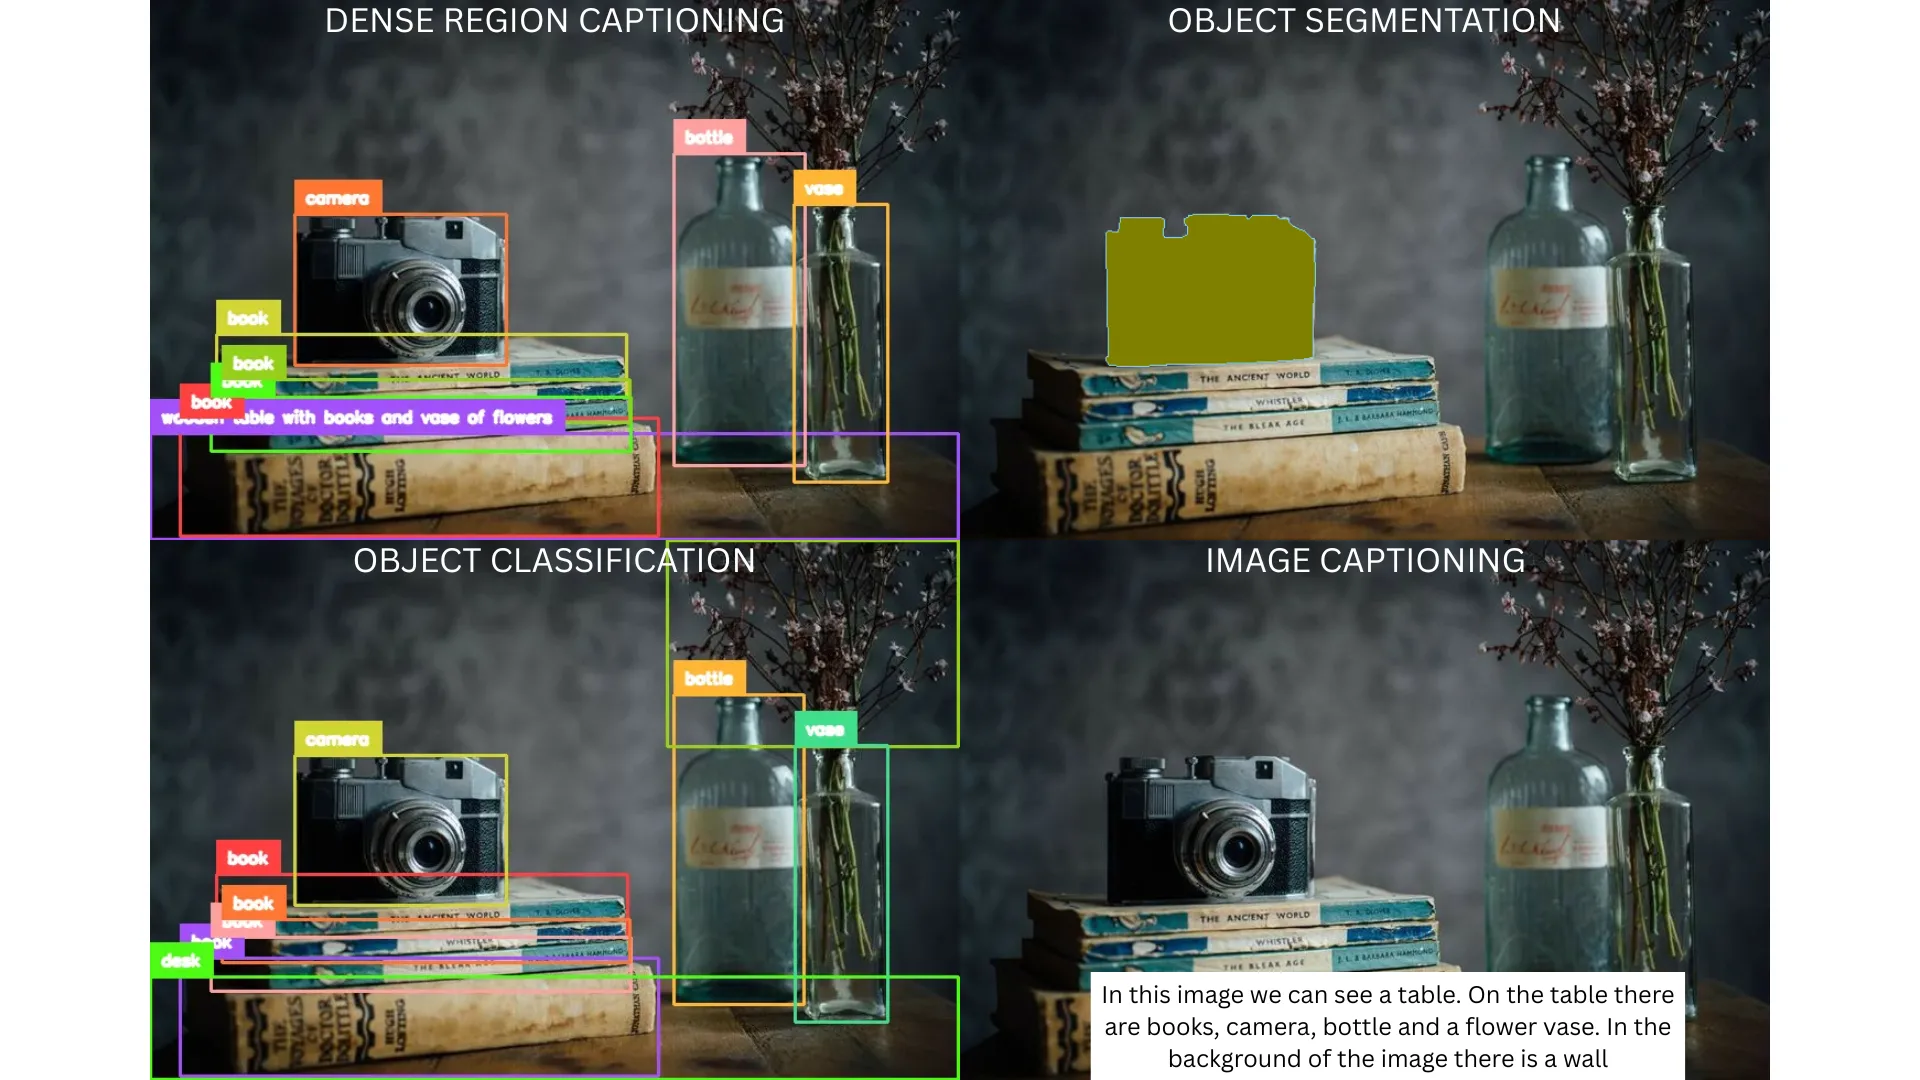
Various tasks supported by Florence 2
This extensive training enables it to understand images and text prompts simultaneously, allowing it to perform multiple vision and vision-language tasks without needing separate models or complex task-specific adjustments.
What does Florence 2 - large Support and how to implement?
Florence 2 is designed to interpret simple text prompts and deliver outputs across a variety of vision tasks.
The method to implement it:
- Downloading Florence 2 using the transformers module
from transformers import AutoProcessor, AutoModelForCausalLM

model = AutoModelForCausalLM.from_pretrained("microsoft/Florence-2-large", torch_dtype=torch_dtype, trust_remote_code=True).to(device)
processor = AutoProcessor.from_pretrained("microsoft/Florence-2-large", trust_remote_code=True)
- Creating a function to run Florence on the given image
def florence2(task_prompt, image, text_input=None):
    if text_input is None:
        prompt = task_prompt
    else:
        prompt = task_prompt + text_input
    inputs = processor(text=prompt, images=image, return_tensors="pt").to('cuda', torch.float16)
    generated_ids = model.generate(
      input_ids=inputs["input_ids"].cuda(),
      pixel_values=inputs["pixel_values"].cuda(),
      max_new_tokens=1024,
      early_stopping=False,
      do_sample=False,
      num_beams=3,
    )
    generated_text = processor.batch_decode(generated_ids, skip_special_tokens=False)[0]
    parsed_answer = processor.post_process_generation(
        generated_text,
        task=task_prompt,
        image_size=(image.width, image.height)
    )

    return parsed_answer
Here are the main tasks it supports:
Image Captioning
Generates descriptive text captions for images, summarizing the overall scene or content. For example, it can caption an image as "A camera sitting on top of a stack of books."
- task prompt = "<CAPTION>"
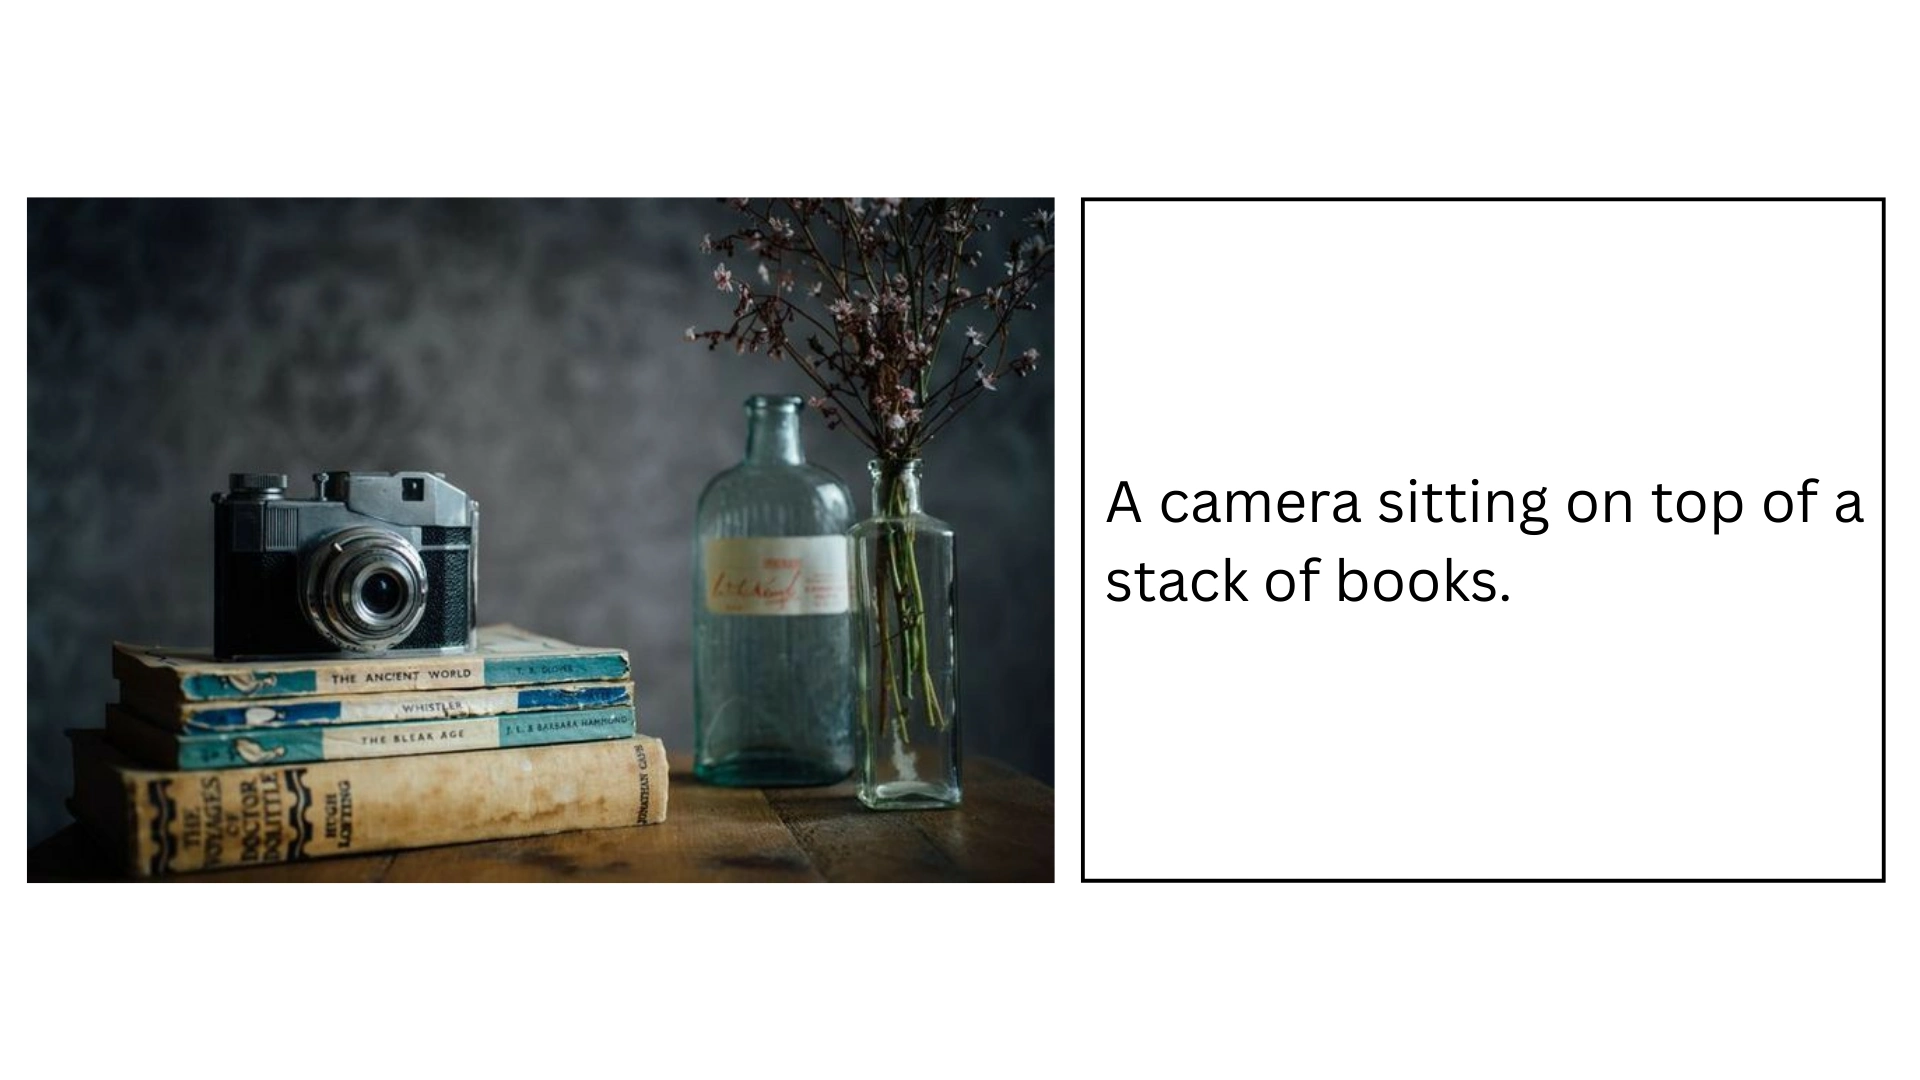
Caption
- task prompt = "<DETAILED_CAPTION>"
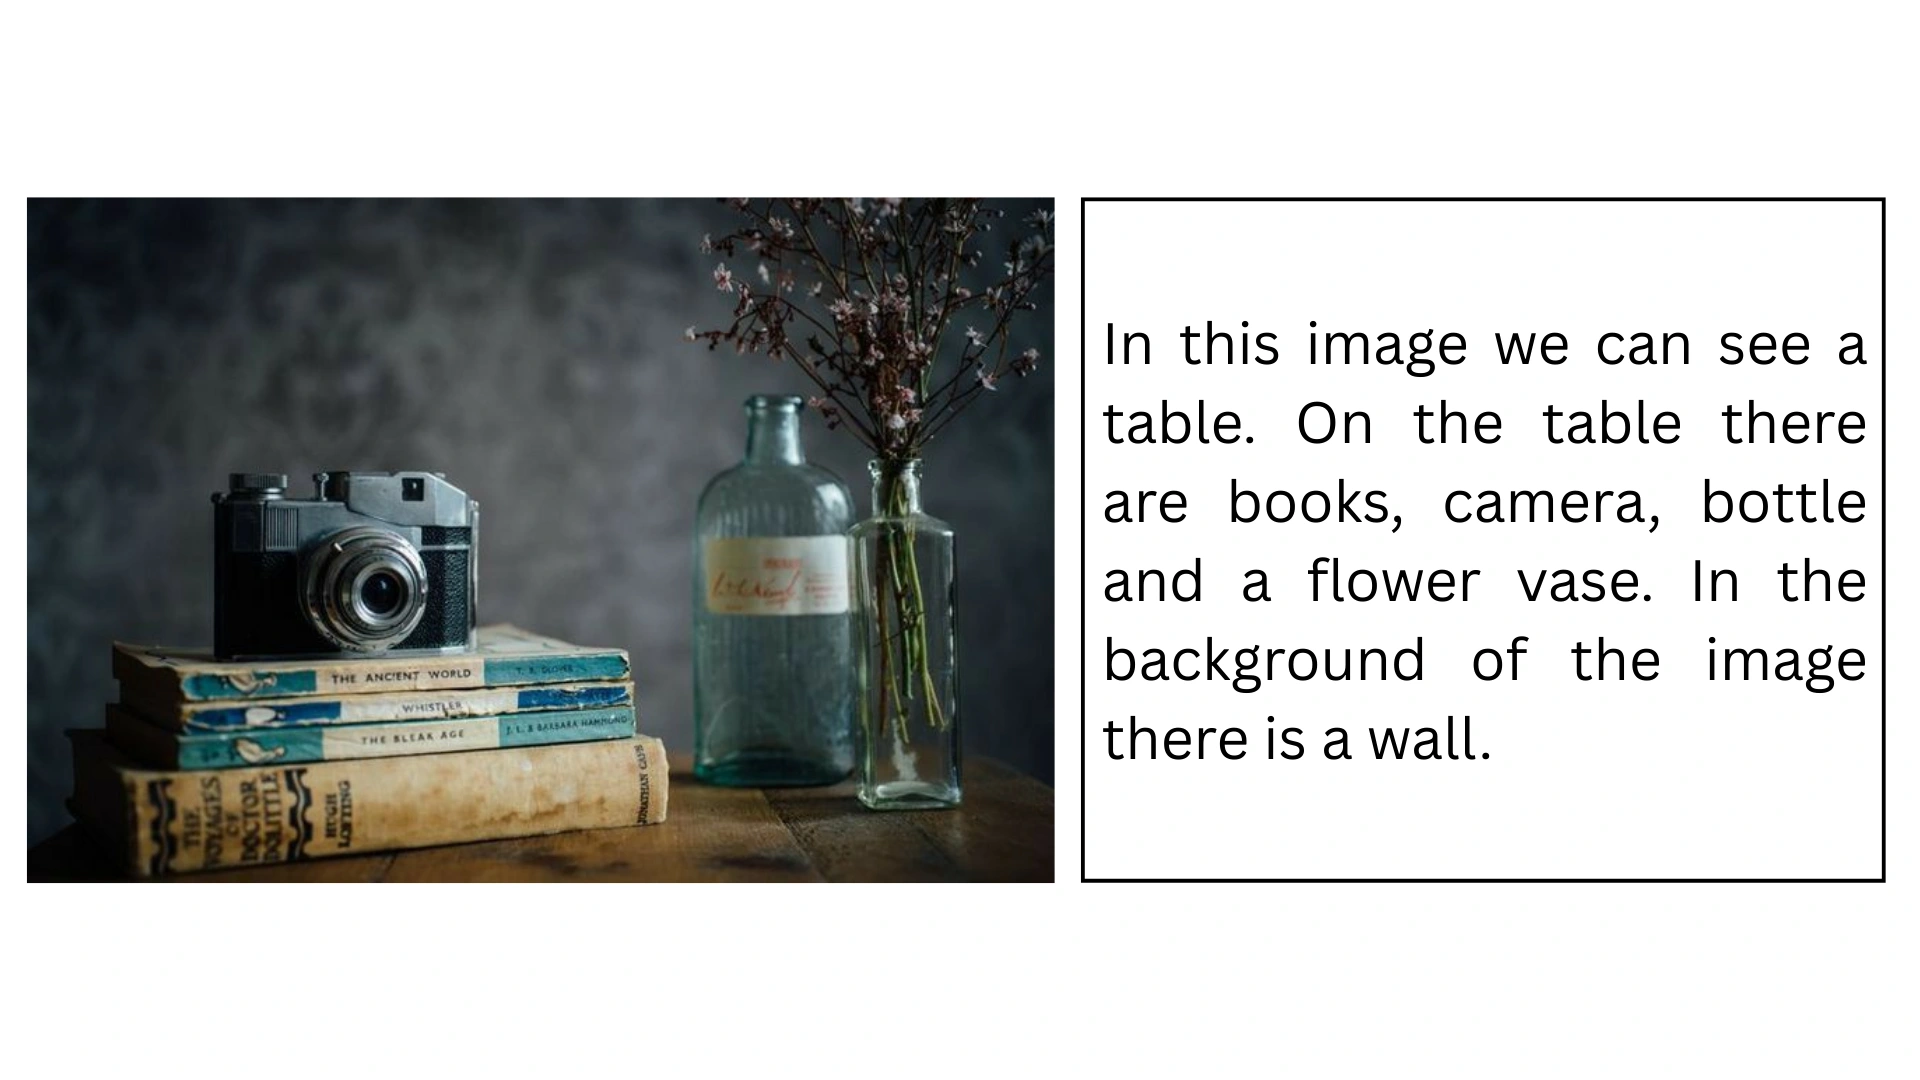
Detailed Caption
- task prompt = "<MORE_DETAILED_CAPTION>"
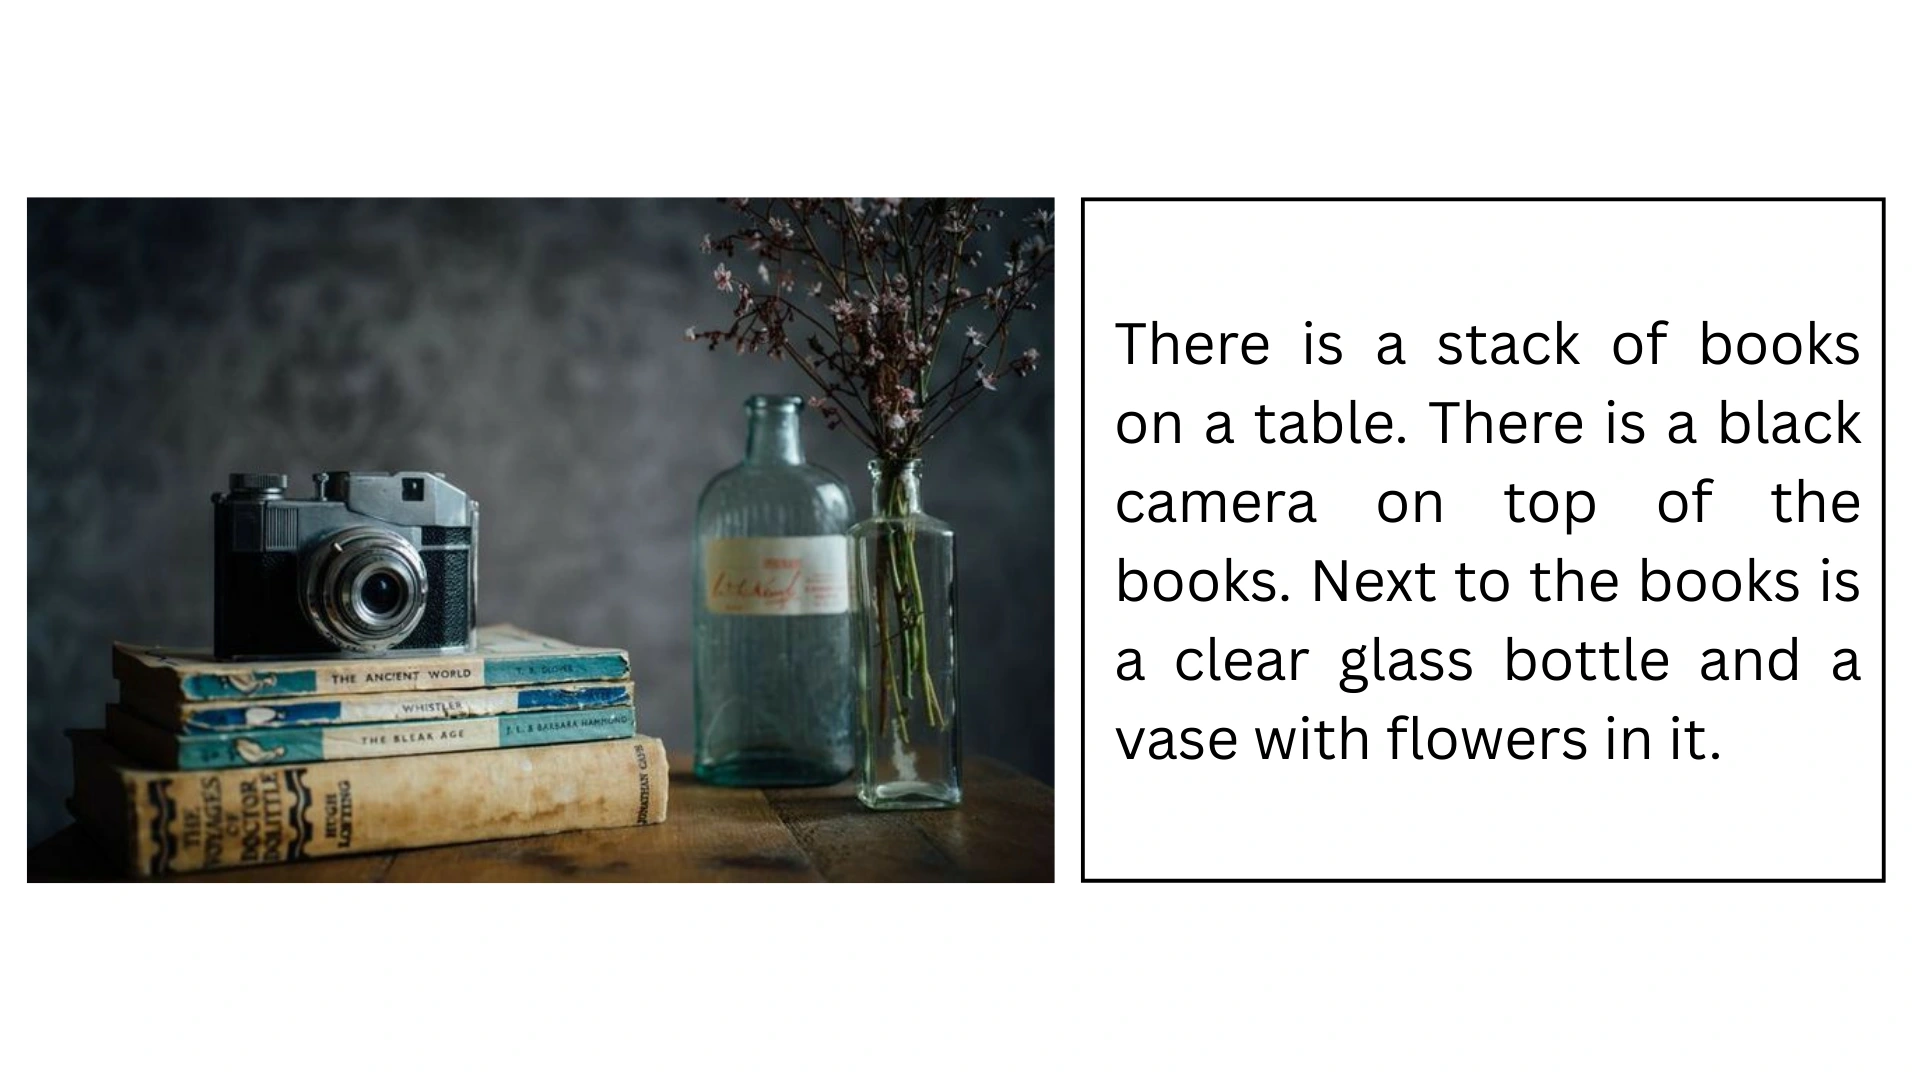
More Detailed Caption
Object Detection and Classification
Identifies and locates objects within an image, marking bounding boxes around entities such as cars, people, animals, and more.
- task prompt = '<OD>'
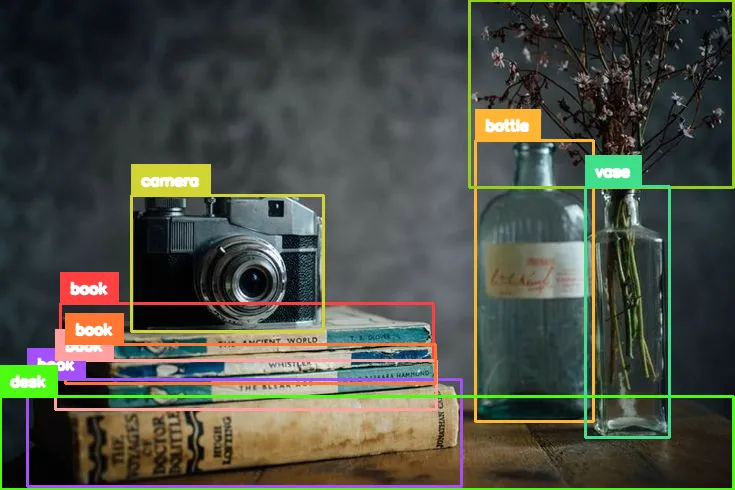
Object Detection
Object Segmentation
Separates different objects or regions within an image at the pixel level, enabling detailed analysis of image components. This includes dense region captioning and region proposal tasks.
- task prompt = '<REFERRING_EXPRESSION_SEGMENTATION>'
- text input = "['a camera', 'books', 'bottle', 'vase']"
object segementation
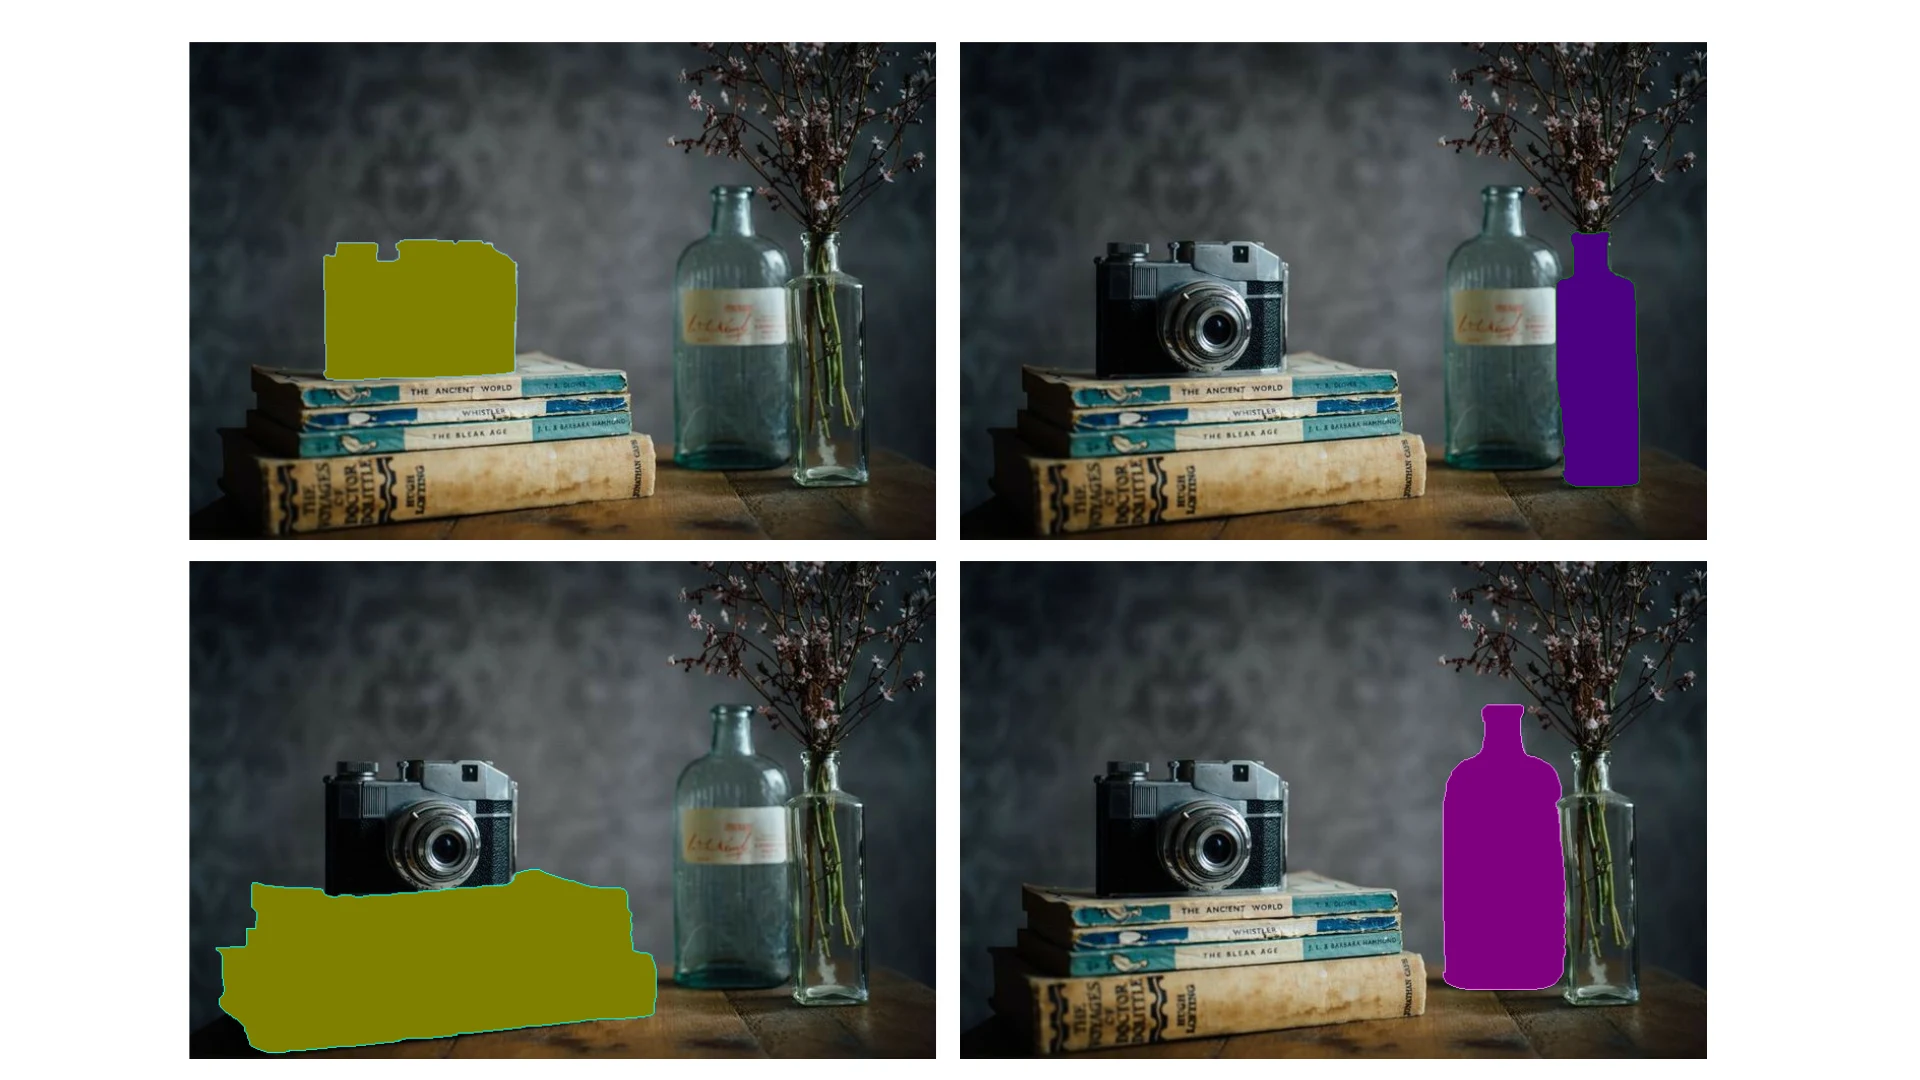
Optical Character Recognition (OCR)
Florence 2 extracts and recognizes text from images, including handwritten or printed text.
It can output raw text or provide spatial information about where text appears in the image.
- task prompt = '<OCR_WITH_REGION>'
OCR
Visual Grounding
Matches textual phrases to specific regions or objects in an image, aligning fine-grained visual details with language.
text_input = "The image shows an old camera sitting atop a stack of books on a table, with a flower vase beside it. The background is slightly blurred, giving the image a dreamy feel."
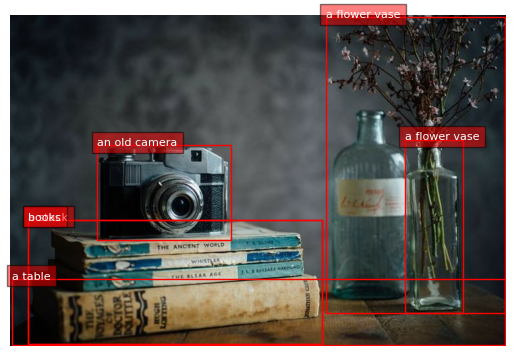
Visual Grounding
Real-World Applications & Use Cases
Thanks to its versatility, Florence 2 can be applied in many domains:
Content moderation and tagging for social media images.
A social media platform uses Florence 2 to scan millions of images uploaded every day. The model looks at the objects and scenes in each image to find inappropriate content, such as violence, nudity, or hate symbols.
It also adds keywords like "beach," "concert," or "food" to help people find content more easily and get better recommendations.
This system helps the platform review content faster and reduces the work for human moderators.
Automated Image Description for Accessibility Tools
An accessibility app integrates Florence 2 to generate real-time image captions for visually impaired users.
When a user receives an image in a chat or views a social media post, Florence 2 produces a detailed textual description (e.g., "A group of people hiking on a mountain trail under a clear blue sky"), enabling users to understand visual content through screen readers or audio narration.
E-commerce for Product Recognition and Visual Search
An online fashion retailer integrates Florence 2 into its mobile app to allow customers to upload photos of clothing items they like.
The model identifies and matches products in the retailer’s catalog by recognizing patterns, colors, and shapes.
It can also generate multiple product images from a single photo, showing different angles or styling options, enhancing the shopping experience and increasing conversion rates.
How to Fine-tune Florence-2 on Your Custom Dataset
Set Up LoRA for Efficient Fine-tuning
LoRA helps you fine-tune faster using less memory by only training small adapter layers. You usually don't need to change this much, but it's essential for the process.
from peft import LoraConfig, get_peft_model

# Define which parts of the model LoRA will adapt
TARGET_MODULES = [
"q_proj", "o_proj", "k_proj", "v_proj",
"dense", "fc1", "fc2", "lm_head"
]

# Configure LoRA
config = LoraConfig(
r=16, # Rank (higher might learn more but uses more memory)
lora_alpha=32, # Scaling factor (often 2*r)
target_modules=TARGET_MODULES,
task_type="CAUSAL_LM", # Model type
lora_dropout=0.05,
bias="none",
inference_mode=False # Set to False for training
)

# Apply LoRA to the model
peft_model = get_peft_model(model, config)
peft_model.print_trainable_parameters() # See how few parameters are trained
Create Your Custom Dataset Loader
THIS IS THE MOST IMPORTANT PART TO EDIT. You need to tell the script how to load your images and your annotations.
from torch.utils.data import Dataset, DataLoader
from PIL import Image
import os
import json # Or library for your annotation format

class DetectionDataset(Dataset):
# --- YOU MUST EDIT load_annotations ---
def load_annotations(self, annotations_path):
"""
EDIT THIS FUNCTION to load YOUR annotation file (JSON, CSV, etc.).
It should return a dictionary like:
{
"image_filename1.jpg": [ {"label": "cat", "bbox": [100, 150, 200, 250]}, ... ],
"image_filename2.jpg": [ ... ]
}
NOTE: Bounding boxes (bbox) should be in the 0-1000 range.
"""
print(f"EDIT ME: Loading annotations from {annotations_path}")
# Example for a dummy JSON structure:
try:
with open(annotations_path, 'r') as f:
data = json.load(f)
return data # Return the loaded dictionary
except Exception as e:
print(f"Error loading annotations: {e}. Returning empty data.")
return {}

# --- YOU MUST EDIT __getitem__ to format the target_text ---
def __getitem__(self, idx):
img_filename = self.image_files[idx]
img_path = os.path.join(self.image_dir, img_filename)
image = Image.open(img_path).convert("RGB")
annotation = self.annotations[img_filename]
task_prompt = "" # Object Detection prompt

# EDIT THIS PART: Build the target string correctly
target_text = task_prompt
for item in annotation:
label = item['label']
box = item['bbox'] # Assumes bbox is [x1, y1, x2, y2] in 0-1000 range
loc_str = f"<loc_{int(box[0])}><loc_{int(box[1])}><loc_{int(box[2])}><loc_{int(box[3])}>"
target_text += f"{label}{loc_str}"

# Process image and prompt
inputs = self.processor(text=task_prompt, images=image, return_tensors="pt")
inputs = {k: v.squeeze(0).to(DEVICE) for k, v in inputs.items()} # Remove batch dim, move to device

return inputs, target_text # Return processed inputs and the target text string

# --- Keep or slightly modify __init__ and __len__ ---
def __init__(self, image_dir, annotations_path, processor):
self.image_dir = image_dir
self.processor = processor
# Load annotations using YOUR edited function
self.annotations = self.load_annotations(annotations_path)
self.image_files = list(self.annotations.keys())

def __len__(self):
return len(self.image_files)

# --- You need to create instances of this dataset later ---
# train_dataset = DetectionDataset("path/to/train_images", "path/to/train_ann.json", processor)
# val_dataset = DetectionDataset("path/to/valid_images", "path/to/valid_ann.json", processor)
Set Up and Run the Training Loop
This is where the actual learning happens. You need to define how many times to train (epochs) and how fast the model should learn (learning rate).
from transformers import AdamW, get_scheduler
from tqdm.notebook import tqdm # Use notebook version for progress bar

# --- Define Training Parameters (EDIT THESE) ---
EPOCHS = 5 # How many times to go through the training data
LEARNING_RATE = 1e-5 # How fast the model learns (adjust if needed)
BATCH_SIZE = 4 # How many images per step (lower if out of memory)

# --- Create DataLoaders (uses your custom dataset) ---
# Make sure train_dataset and val_dataset are created using your paths first!
# train_dataset = DetectionDataset(...)
# val_dataset = DetectionDataset(...)
# train_loader = DataLoader(train_dataset, batch_size=BATCH_SIZE, shuffle=True)
# val_loader = DataLoader(val_dataset, batch_size=BATCH_SIZE)

# --- Basic Training Loop Structure ---
def simple_train(model, train_loader, epochs, lr):
optimizer = AdamW(model.parameters(), lr=lr)
num_training_steps = epochs * len(train_loader)
lr_scheduler = get_scheduler(
name="linear", optimizer=optimizer,
num_warmup_steps=0, num_training_steps=num_training_steps
)

model.train() # Set model to training mode
for epoch in range(epochs):
print(f"Starting Epoch {epoch+1}/{epochs}")
progress_bar = tqdm(train_loader, desc="Training")
for batch in progress_bar:
if batch is None: continue # Handle potential loading errors
inputs, answers = batch

# Prepare labels
labels = processor.tokenizer(
text=answers, return_tensors="pt", padding=True, truncation=True, max_length=1024
).input_ids.to(DEVICE)
labels[labels == processor.tokenizer.pad_token_id] = -100 # Ignore padding in loss

# Forward pass
outputs = model(
input_ids=inputs["input_ids"].to(DEVICE),
pixel_values=inputs["pixel_values"].to(DEVICE),
labels=labels
)
loss = outputs.loss

# Backward pass & Optimize
loss.backward()
optimizer.step()
lr_scheduler.step()
optimizer.zero_grad()

progress_bar.set_postfix({"loss": loss.item():.4f})

print(f"Epoch {epoch+1} finished. Loss: {loss.item():.4f}") # Note: This is last batch loss

# --- Save Checkpoint After Each Epoch ---
output_dir = f"./florence2_lora_epoch_{epoch+1}"
model.save_pretrained(output_dir) # Saves only the LoRA adapters
print(f"Saved checkpoint to {output_dir}")

# --- Start Training (Make sure loaders are defined first!) ---
# simple_train(peft_model, train_loader, EPOCHS, LEARNING_RATE)
- Edit Parameters: Change EPOCHS, LEARNING_RATE, and BATCH_SIZE as needed for your specific setup and dataset.
- Run Training: After defining your datasets and dataloaders (using the code commented out at the bottom of cell 4 and the top of cell 5), uncomment and run the simple_train call. The loop handles training and saves checkpoints.
Run Inference
After training, use this to see how your fine-tuned model performs on a new image.
from PIL import Image
import numpy as np
import cv2 # Make sure cv2 is imported

# --- Helper functions (needed for visualization) ---
def parse_inference_output(response):
# Simplified parser for common OD output structure
key = "" # Assuming Object Detection task
if key in response:
return response[key]
else:
print(f"Warning: Task key '{key}' not found in response.")
return {"boxes": [], "labels": []}

def draw_inference_boxes(image, detections):
# Simplified drawing function
img_draw = image.copy().convert("RGB")
img_array = np.array(img_draw)
img_width, img_height = image.size

boxes = detections.get("boxes", [])
labels = detections.get("labels", [])

for box, label in zip(boxes, labels):
if len(box) != 4: continue # Skip malformed boxes

# Assume 0-1000 scale and convert to pixel coordinates
x1, y1, x2, y2 = map(int, [
box[0] * img_width / 1000.0, box[1] * img_height / 1000.0,
box[2] * img_width / 1000.0, box[3] * img_height / 1000.0
])
# Clamp coordinates
x1, y1 = max(0, x1), max(0, y1)
x2, y2 = min(img_width - 1, x2), min(img_height - 1, y2)

if x1 >= x2 or y1 >= y2: continue # Skip invalid dimensions

cv2.rectangle(img_array, (x1, y1), (x2, y2), (0, 255, 0), 2) # Green boxes
cv2.putText(img_array, str(label), (x1, y1 - 10 if y1 > 20 else y1 + 15),
cv2.FONT_HERSHEY_SIMPLEX, 0.6, (255, 0, 0), 2) # Red text

return Image.fromarray(img_array)

# --- Run Inference (EDIT path to your test image) ---
TEST_IMAGE_PATH = "path/to/your/test_image.jpg"
TASK_PROMPT = ""

# Ensure model is loaded and on the correct device (use peft_model after training)
peft_model.eval()
peft_model.to(DEVICE)

image = Image.open(TEST_IMAGE_PATH).convert("RGB")
inputs = processor(text=TASK_PROMPT, images=image, return_tensors="pt").to(DEVICE)

with torch.no_grad():
generated_ids = peft_model.generate(
input_ids=inputs["input_ids"],
pixel_values=inputs["pixel_values"],
max_new_tokens=1024,
num_beams=3
)
generated_text = processor.batch_decode(generated_ids, skip_special_tokens=False)[0]

# Post-process to get structured output
response = processor.post_process_generation(
generated_text, task=TASK_PROMPT, image_size=(image.width, image.height)
)

# Parse and draw
detections = parse_inference_output(response)
print("Detections:", detections)
image_with_boxes = draw_inference_boxes(image, detections)
display(image_with_boxes) # Display in notebook
# image_with_boxes.show() # Opens in default viewer
Conclusion
Florence 2 is a big step forward in computer vision. It brings many vision tasks together in one powerful, prompt-based model.
Developers and businesses can use it to build smart systems that understand images, whether for captioning, detecting objects, reading text, or more. Thanks to its strong zero-shot skills and fine-tuning options, Florence 2 works well across many use cases.
With its flexible design and strong performance, it stands out as one of the top models in modern computer vision.
References
HuggingFace | Florence-2-large sample usage
FAQ
What tasks can Microsoft Florence 2 perform?
Florence 2 supports a wide range of tasks like image captioning, object detection, image segmentation, OCR, and visual grounding — all through a single prompt-based model.
Can Florence 2 understand both images and text?
Yes, Florence 2 is built for vision-language tasks, allowing it to understand and respond to prompts that combine visual and textual inputs.
Does Florence 2 require task-specific models?
No, Florence 2 uses a unified architecture that handles multiple tasks with a single model, eliminating the need for task-specific architectures.

Simplify Your Data Annotation Workflow With Proven Strategies
.png)
