

ML Beginner's Guide For Helmet Detection Model

Embark on a thrilling exploration into the world of machine learning, where we unravel the power of Helmet Detection in diverse scenarios. From bustling construction sites to the open road on a motorcycle, we're about to harness machine learning to determine if individuals are wearing helmets.
Navigating the Landscape of Object Detection Algorithms
In the sea of object detection algorithms, YOLO (You Only Look Once) stands out for its speed and versatility. But mastering machine learning isn't just about code – it's an art that requires understanding real-world scenarios. Factors like lighting, camera angles, and backgrounds can affect the accuracy of object detection models in images. Let's dive into the intricacies of object detection algorithms, setting the stage for training our own model.

Crafting Your Own Custom Object Detection Model
For newcomers to machine learning, training a custom object detection model might seem challenging. Fear not! To begin this adventure, you'll need a robust dataset with thousands of images of the objects you want to detect. Real-life scenarios provide valuable data, ensuring practical accuracy in your model.
Data Set Preparation
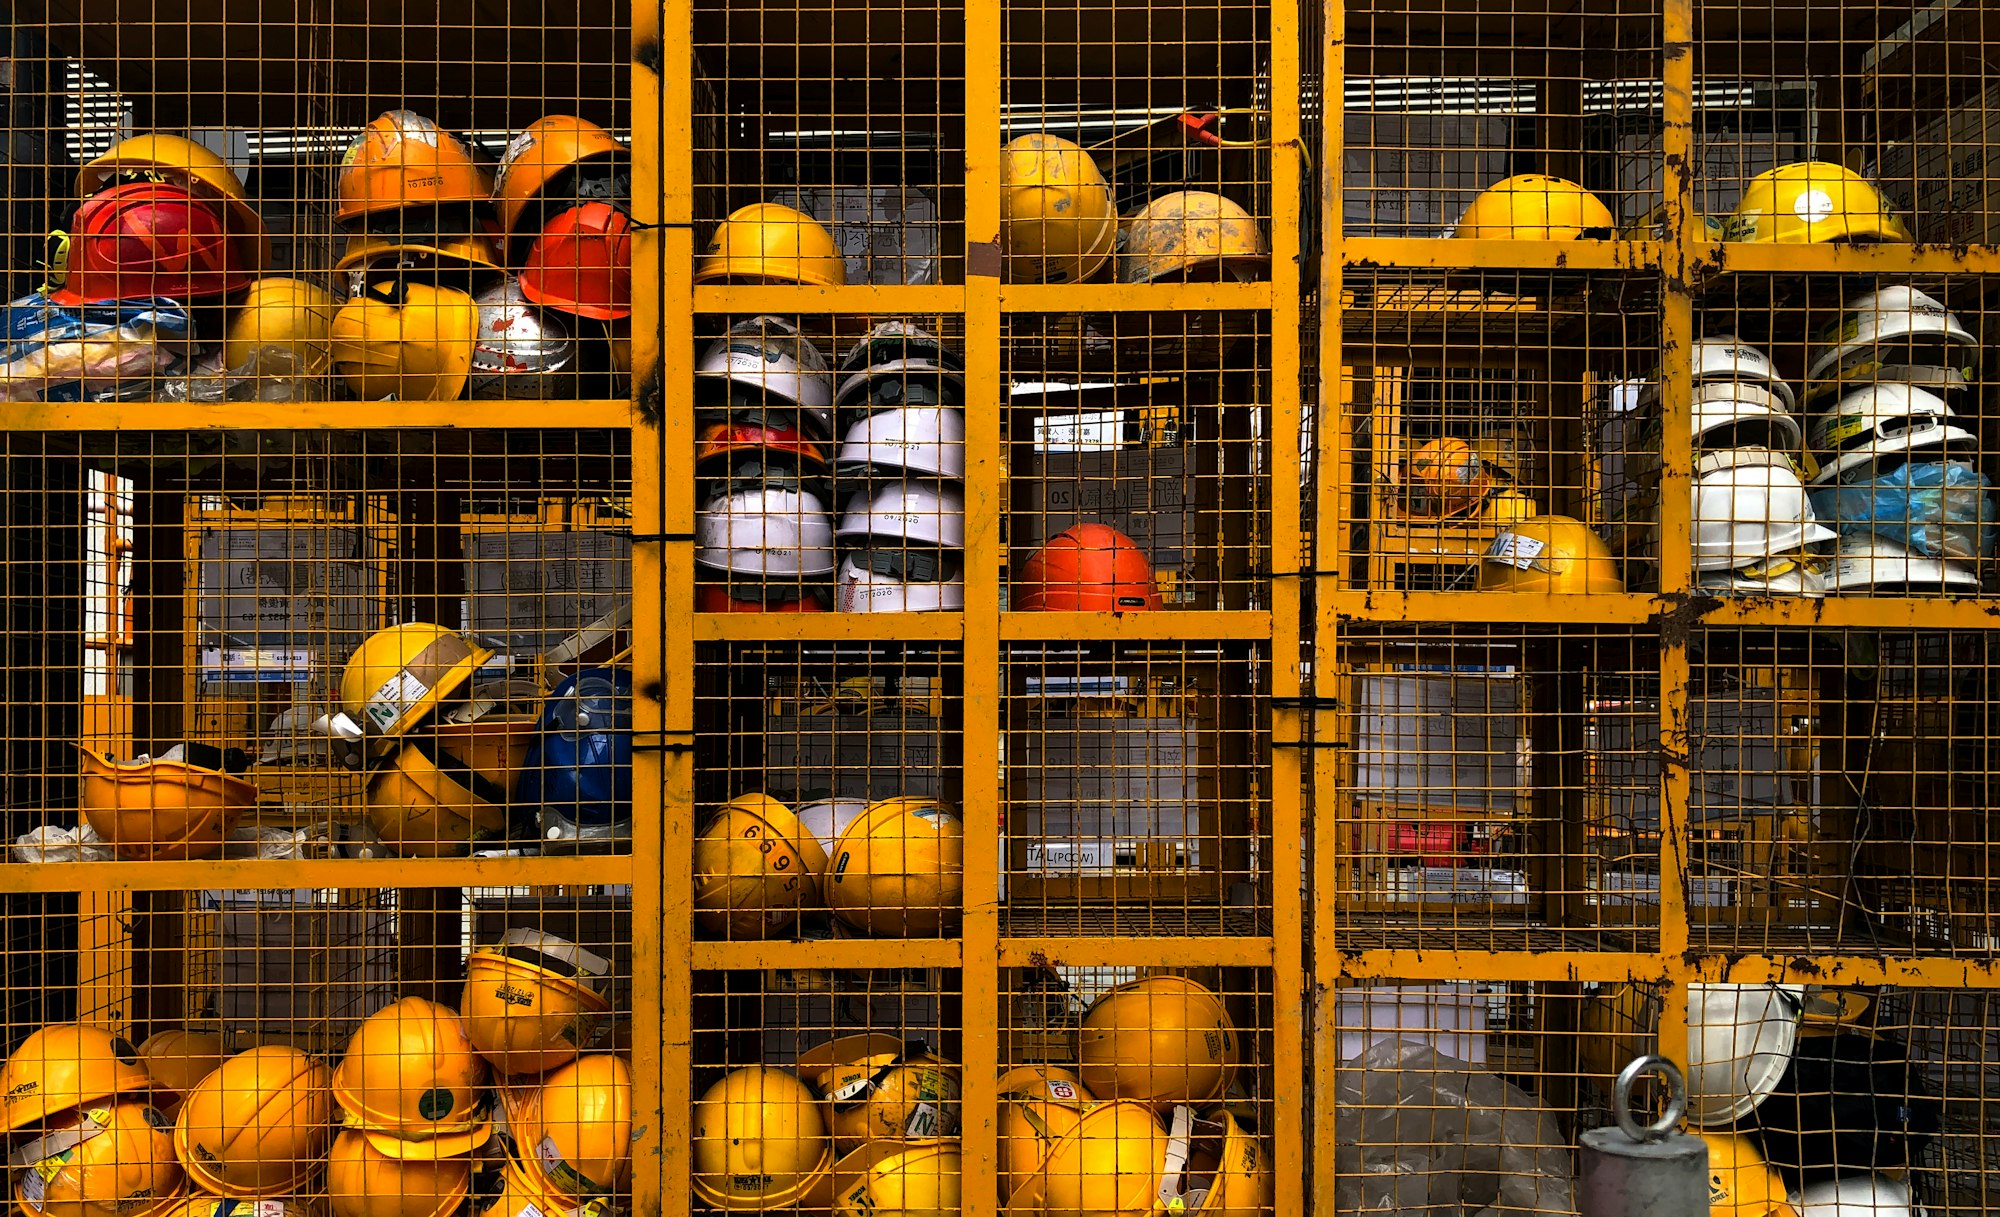
For this dataset we have taken specifically work place location dataset so that we can detect any worker is wearing helmet or not This dataset, contains 5000 images with bounding box annotations in the PASCAL VOC format for these 3 classes:
- Helmet
- Person
- Head.
Selecting the Pre-Trained Model
In the process of training our model, we have opted to utilize the Ultralytics library, incorporating the YOLOv8 model for its exceptional speed and convenience.
Why YOLO V8?
Utilization of Cutting-Edge Backbone and Neck Architectures: YOLOv8 leverages advanced backbone and neck architectures, leading to enhanced feature extraction and superior object detection performance.
Innovative Anchor-free Split Ultralytics Head: YOLOv8 embraces an anchor-free split Ultralytics head, contributing to heightened accuracy and a more efficient detection process when compared to approaches relying on anchors.
Optimal Accuracy-Speed Tradeoff: YOLOv8 is designed with a deliberate emphasis on maintaining an ideal balance between accuracy and speed. This feature renders it particularly suitable for real-time object detection tasks across diverse application areas.
Diverse Array of Pre-Trained Models: YOLOv8 provides a comprehensive selection of pre-trained models, catering to a spectrum of tasks and performance requirements. This diversity simplifies the process of finding the most suitable model for your specific use case.
Helmet Detection using YOLO V8
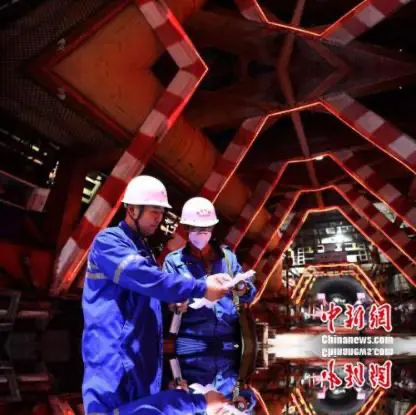
In this blog post, we'll explore how to use the YOLO (You Only Look Once) object detection algorithm to detect helmets in images. We'll use pre-trained YOLO models for detecting helmet in construction site.
Lets code this model
This section provides a hands-on approach to loading and exploring the dataset, setting the stage for the practical implementation of helmet detection.
This comprehensive guide aims to equip readers with the knowledge and skills to leverage machine learning, specifically YOLOv8, for helmet detection in various real-world scenarios.
import numpy as np # linear algebra
import pandas as pd # data processing, CSV file I/O (e.g. pd.read_csv)

# Input data files are available in the read-only "../input/" directory
# For example, running this (by clicking run or pressing Shift+Enter) will list
all files under the input directory
from pathlib import Path
from xml.dom.minidom import parse
from shutil import copyfile
import os
Selecting the classes and making new folders
import numpy as np
import pandas as pd
import os
import cv2
!mkdir -p Dataset/labels
!mkdir -p Dataset/images
classes = ['helmet','head','person']
Let's make a new function which can convert the annotation of the desired format which YOLO algorithms expects
def convert_annot(size , box):
    x1 = int(box[0])
    y1 = int(box[1])
    x2 = int(box[2])
    y2 = int(box[3])

    dw = np.float32(1. / int(size[0]))
    dh = np.float32(1. / int(size[1]))

    w = x2 - x1
    h = y2 - y1
    x = x1 + (w / 2)
    y = y1 + (h / 2)

    x = x * dw
    w = w * dw
    y = y * dh
    h = h * dh
    return [x, y, w, h]
After converting the annotation and returning the result with 4 different attributes we need a function to save the files.
def save_txt_file(img_jpg_file_name, size, img_box):
    save_file_name = '/Dataset/labels/' +  img_jpg_file_name + '.txt'

    #file_path = open(save_file_name, "a+")
    with open(save_file_name ,'a+') as file_path:
        for box in img_box:

            cls_num = classes.index(box[0])

            new_box = convert_annot(size, box[1:])

            file_path.write(f"{cls_num} {new_box[0]} {new_box[1]} {new_box[2]} {new_box[3]}\n")

        file_path.flush()
        file_path.close()
Also we have data in XML format in order to get those XML files we need to write another function.
def get_xml_data(file_path, img_xml_file):
    img_path = file_path + '/' + img_xml_file + '.xml'
    #print(img_path)

    dom = parse(img_path)
    root = dom.documentElement
    img_name = root.getElementsByTagName("filename")[0].childNodes[0].data
    img_size = root.getElementsByTagName("size")[0]
    objects = root.getElementsByTagName("object")
    img_w = img_size.getElementsByTagName("width")[0].childNodes[0].data
    img_h = img_size.getElementsByTagName("height")[0].childNodes[0].data
    img_c = img_size.getElementsByTagName("depth")[0].childNodes[0].data

    img_box = []
    for box in objects:
        cls_name = box.getElementsByTagName("name")[0].childNodes[0].data
        x1 = int(box.getElementsByTagName("xmin")[0].childNodes[0].data)
        y1 = int(box.getElementsByTagName("ymin")[0].childNodes[0].data)
        x2 = int(box.getElementsByTagName("xmax")[0].childNodes[0].data)
        y2 = int(box.getElementsByTagName("ymax")[0].childNodes[0].data)

        img_jpg_file_name = img_xml_file + '.jpg'
        img_box.append([cls_name, x1, y1, x2, y2])


    # test_dataset_box_feature(img_jpg_file_name, img_box)
    save_txt_file(img_xml_file, [img_w, img_h], img_box)
Importing the annotations files and XML files
files = os.listdir('/hard-hat-detection/annotations')
for file in files:
    file_xml = file.split(".")
    get_xml_data('/hard-hat-detection/annotations', file_xml[0])
Now importing the `train_test_split module from sklearn and divide the data into train ,val and test`
from sklearn.model_selection import train_test_split
image_list = os.listdir('/input/hard-hat-detection/images')
train_list, test_list = train_test_split(image_list, test_size=0.2, random_state=42)
val_list, test_list = train_test_split(test_list, test_size=0.5, random_state=42)
print('total =',len(image_list))
print('train :',len(train_list))
print('val   :',len(val_list))
print('test  :',len(test_list))
You can see some output like this
total = 5000 train : 4000 val : 500 test : 500- Lets copy the image and labels and set the error handling ,for the cases we receive the empty images annotations.
def copy_data(file_list, img_labels_root, imgs_source, mode):

    root_file = Path( '/Dataset/images/'+  mode)
    if not root_file.exists():
        print(f"Path {root_file} does not exit")
        os.makedirs(root_file)

    root_file = Path('/Dataset/labels/' + mode)
    if not root_file.exists():
        print(f"Path {root_file} does not exit")
        os.makedirs(root_file)

    for file in file_list:
        img_name = file.replace('.png', '')
        img_src_file = imgs_source + '/' + img_name + '.png'
        label_src_file = img_labels_root + '/' + img_name + '.txt'

        #print(img_sor_file)
        #print(label_sor_file)
        # im = Image.open(rf"{img_sor_file}")
        # im.show()

        # Copy image
        DICT_DIR = '/Dataset/images/'  + mode
        img_dict_file = DICT_DIR + '/' + img_name + '.png'

        copyfile(img_src_file, img_dict_file)

        # Copy label
        DICT_DIR = '/working/Dataset/labels/' + mode
        img_dict_file = DICT_DIR + '/' + img_name + '.txt'
        copyfile(label_src_file, img_dict_file)
copy_data(train_list, Dataset/labels', '//hard-hat-detection/images', "train")
copy_data(val_list,   '/Dataset/labels', '/hard-hat-detection/images', "val")
copy_data(test_list,  '/Dataset/labels', '/hard-hat-detection/images', "test")
Now we will import the model and clone the Ultralytics library.
!git clone https://github.com/ultralytics/ultralytics
!pip install ultralytics
Model Training and Configuration
create the config list and open the yaml files which contains path and names of the labels.
import yaml

# Create configuration
config = {
   "path": "/working/Dataset/images",
   "train": "train",
   "val": "val",
   "test": "test",
   "nc": 3,
   "names": ['helmet','head','person']
}
with open("data.yaml", "w") as file:
   yaml.dump(config, file, default_flow_style=False)
!cat data.yaml
Now lets set the hyper parameter's and model weights for the training. this code will start the training with epochs=20
!yolo task=detect mode=train data=data.yaml model=yolov8s.pt epochs=20 lr0=0.01You will see something like this at the end of the result output
Model summary (fused): 168 layers, 11126745 parameters, 0 gradients, 28.4 GFLOPs
Class Images Instances Box(P R mAP50 m
all 500 2422 0.621 0.588 0.641 0.421
helmet 500 1922 0.951 0.913 0.963 0.631
head 500 396 0.912 0.851 0.915 0.609
person 500 104 0 0 0.0444 0.0226
Speed: 0.9ms preprocess, 5.1ms inference, 0.0ms loss, 2.1ms postprocess per image
Results saved to runs/detect/train
- Now lets Visualize the model that we trained and see the confidence curve
from IPython.display import Image, clear_output
import matplotlib.pyplot as plt
%matplotlib inline
Image(filename='/runs/detect/train/F1_curve.png', width=600)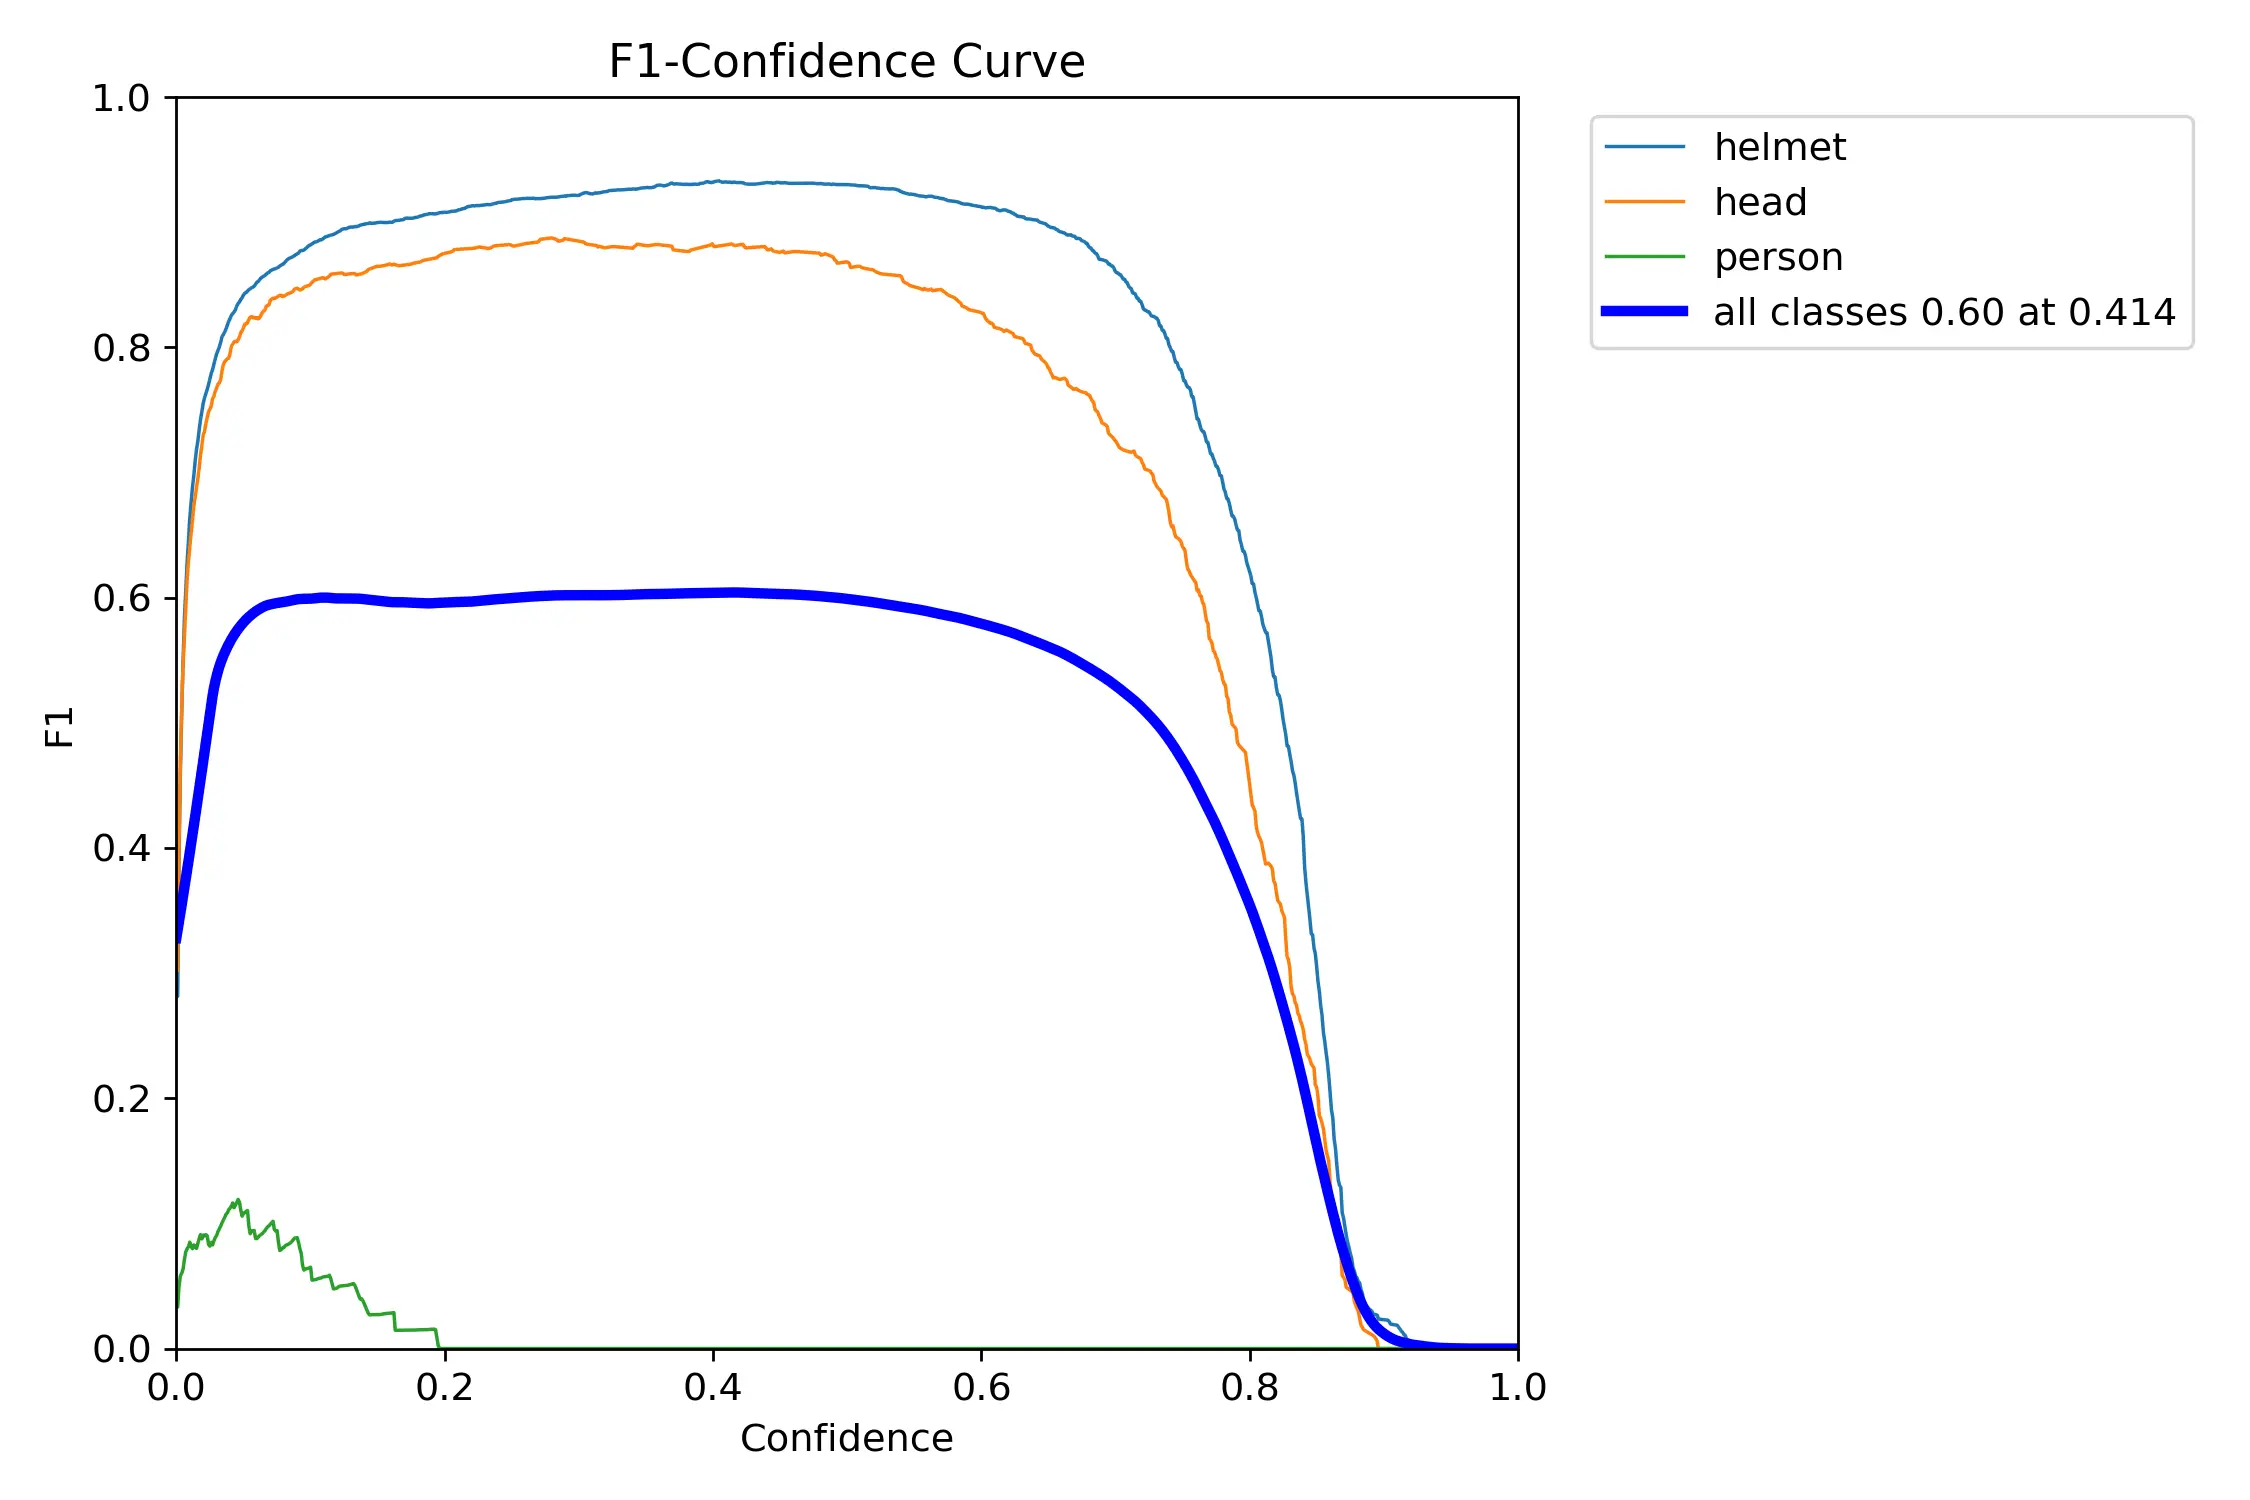
Now lets get Map50 score
import plotly.express as px
import pandas as pd

df = pd.read_csv("working/runs/detect/train/results.csv")
fig = px.line(df, x='                  epoch', y='       metrics/mAP50(B)', title='mAP50')
fig.show()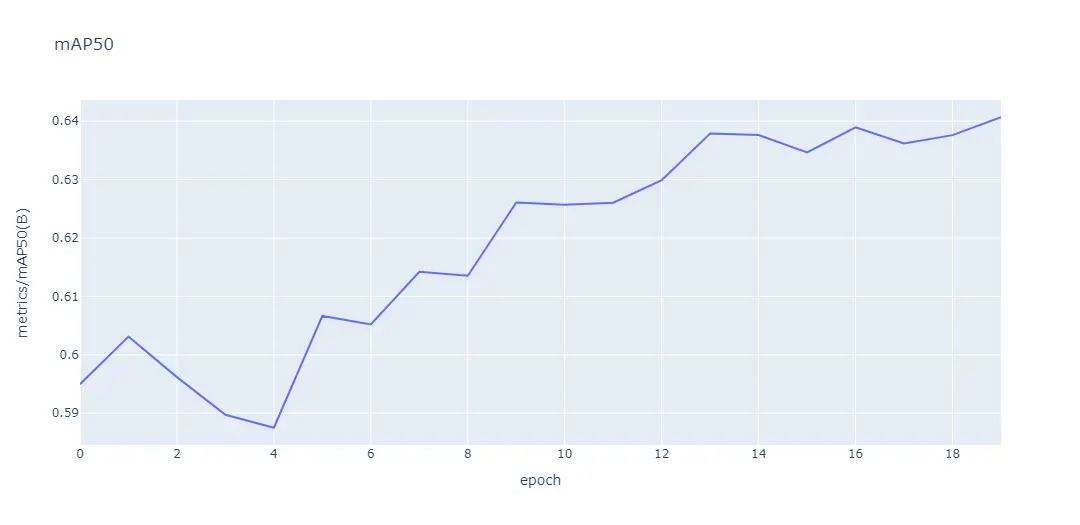
Lets see the final result or our model inaction
Image(filename='/runs/detect/train/val_batch0_pred.jpg', width=1000)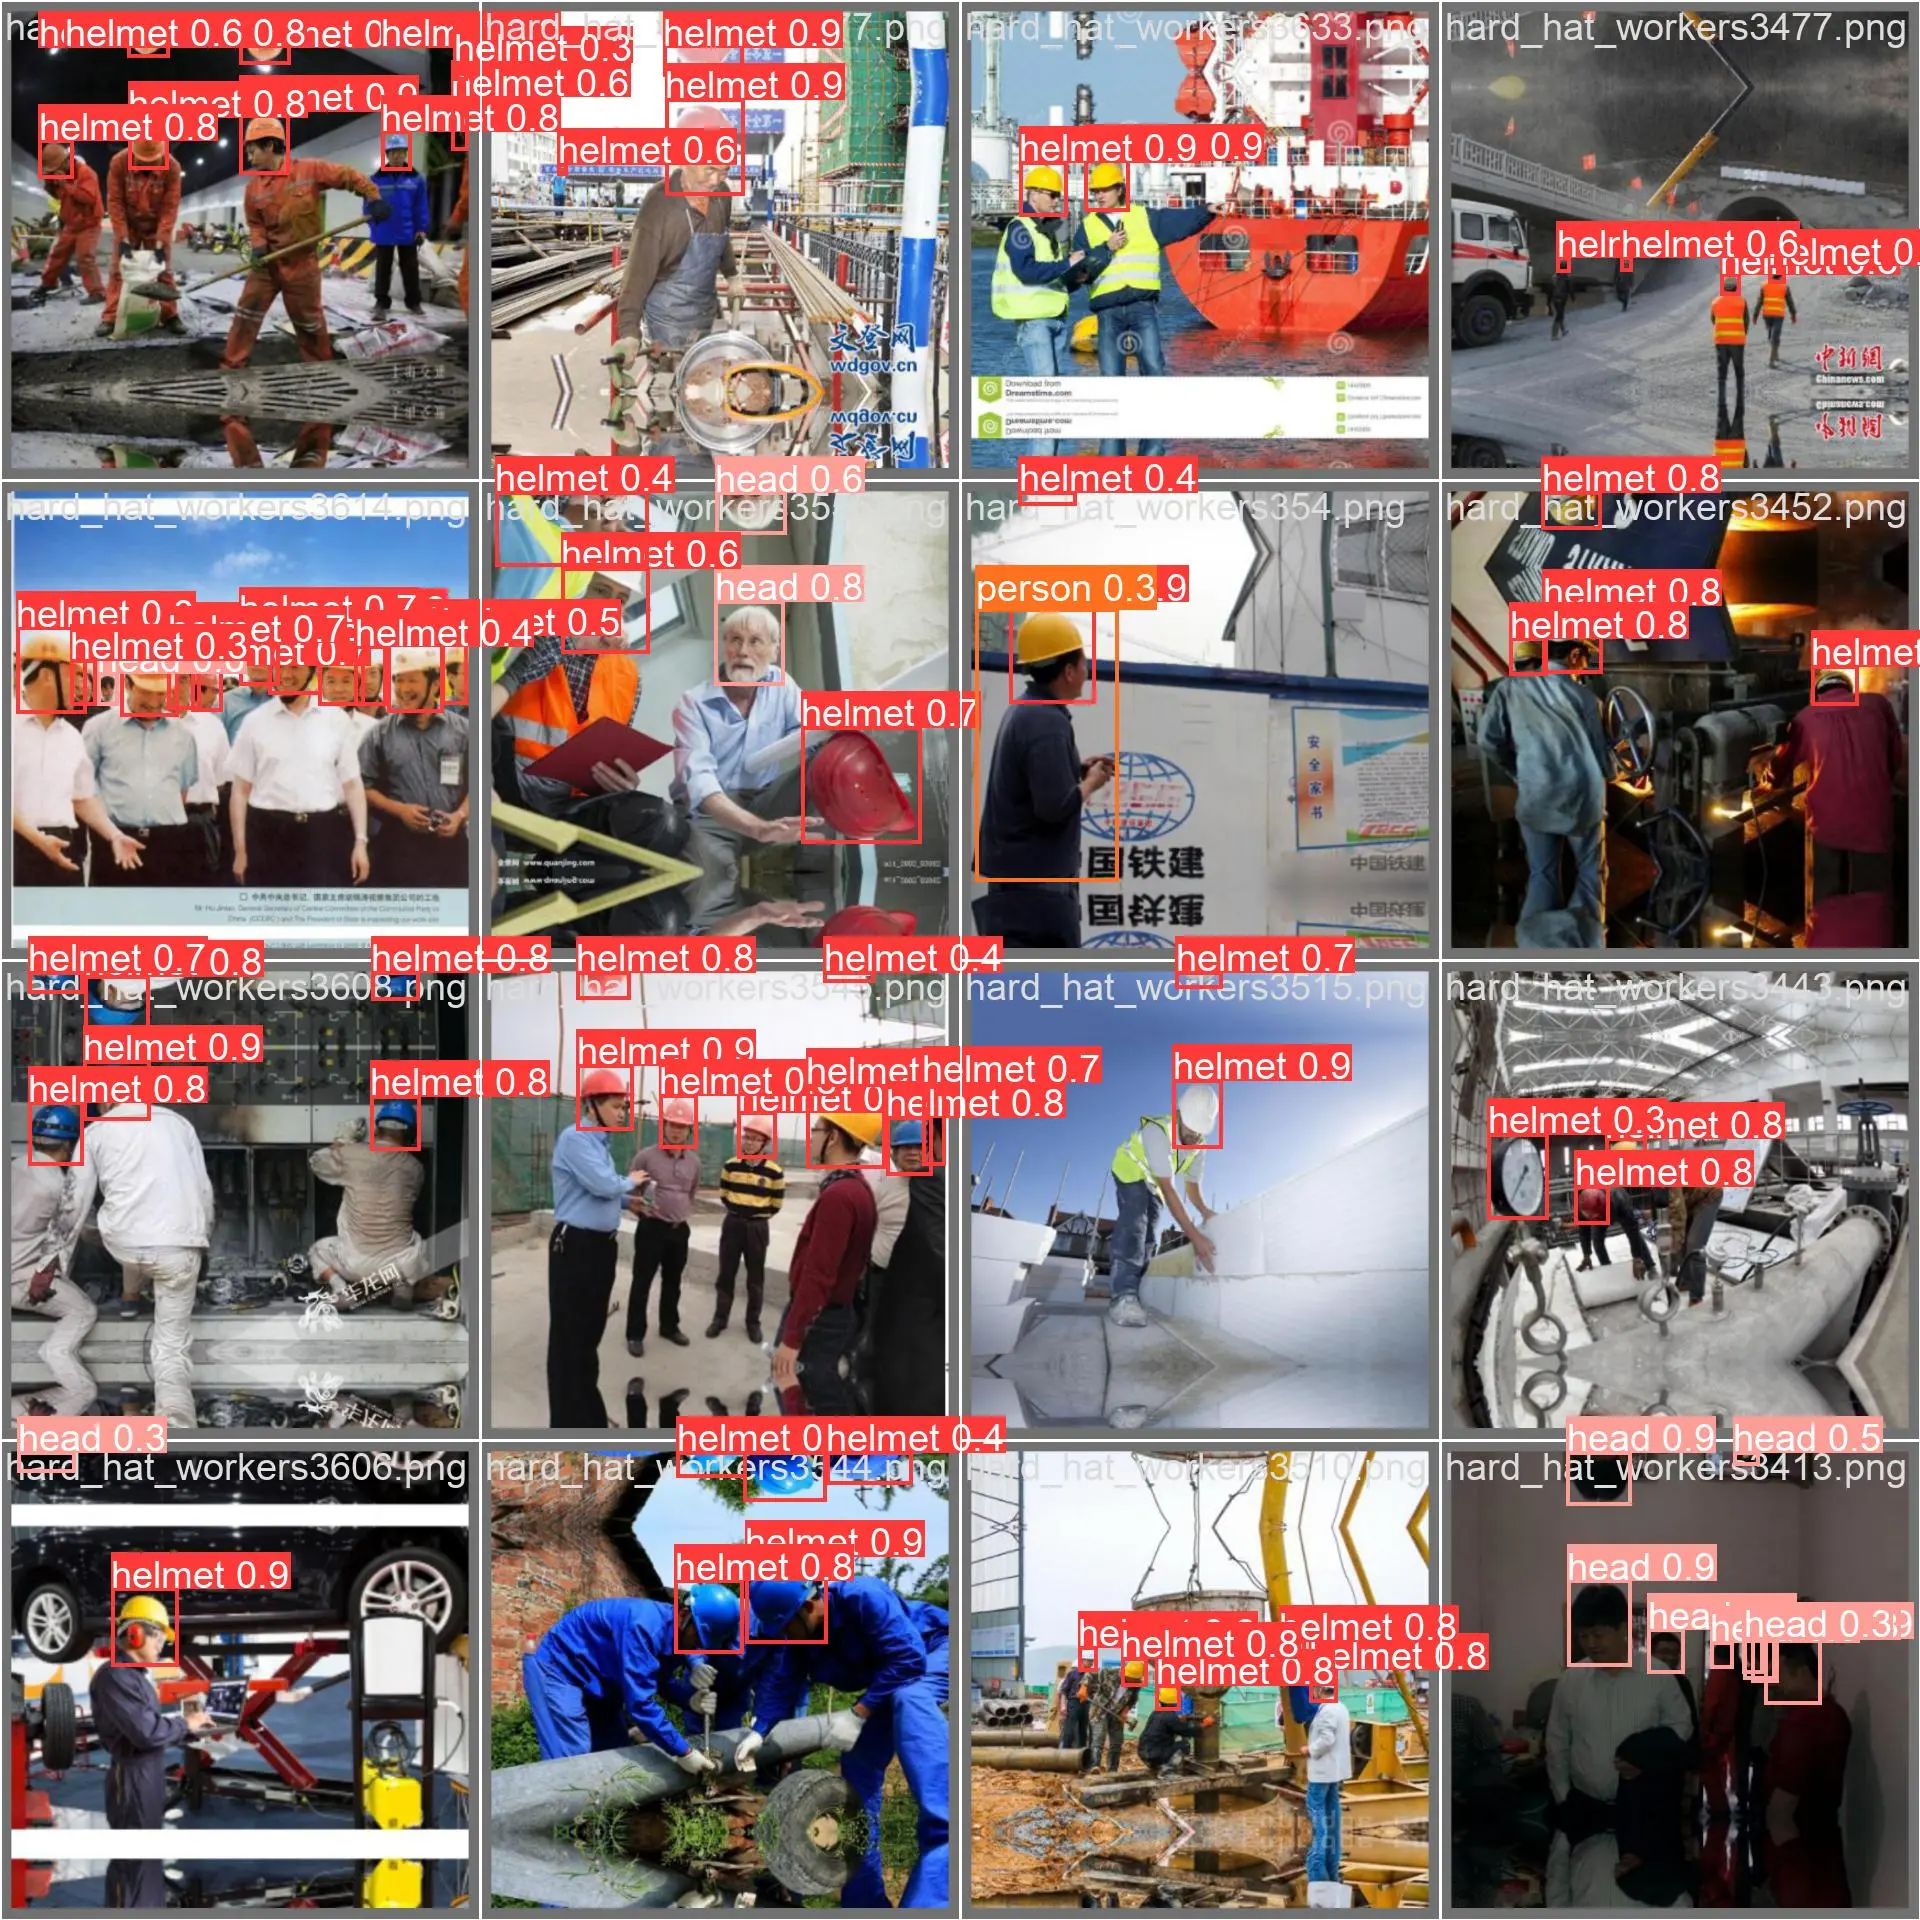
Also running this on validation dataset and save the result
!yolo task=detect mode=val model=/runs/detect/train/weights/best.pt data=data.yamlAfter running this we can see the result saved to val folder and will look like this
Model summary (fused): 168 layers, 11126745 parameters, 0 gradients, 28.4 GFLOPs
val: Scanning /Dataset/labels/val.cache... 500 images, 0 backgrou
                 Class     Images  Instances      Box(P          R      mAP50  m
                   all        500       2422      0.624      0.585       0.64      0.421
                helmet        500       1922      0.956       0.91      0.963      0.631
                  head        500        396      0.916      0.843      0.913      0.609
                person        500        104          0          0     0.0444     0.0228
Speed: 1.4ms preprocess, 9.4ms inference, 0.0ms loss, 1.4ms postprocess per image
Results saved to runs/detect/val
What we have done in this blog?
Algorithmic Exploration:
- Explored the versatile YOLO (You Only Look Once) algorithm for Helmet Detection in various scenarios.
- Navigated the complexities of object detection algorithms, emphasizing the real-world considerations that impact accuracy.
Crafting a Custom Model:
- Recognized the challenge for newcomers in training custom object detection models.
- Stressed the importance of a robust dataset, with a focus on real-life scenarios, to ensure practical accuracy.
Technical Choices:
- Selected the Ultralytics library, integrating the YOLOv8 model, for its exceptional speed and convenience.
- Highlighted YOLOv8's cutting-edge features, such as advanced architectures, anchor-free split Ultralytics head, and an optimal accuracy-speed tradeoff.
Practical Application:
- Demonstrated the application of YOLO V8 in Helmet Detection, specifically tailored for construction sites.
- Concluded with an invitation to explore the dynamic intersection of machine learning and real-world safety applications, hinting at ongoing exploration in the evolving landscape of technology and safety.
Looking for high quality training data to train your helmet detection model? Talk to our team to get a tool demo.

Simplify Your Data Annotation Workflow With Proven Strategies
.png)
