

Automated Fruit and Vegetable Identification Model: Hands-On Tutorial

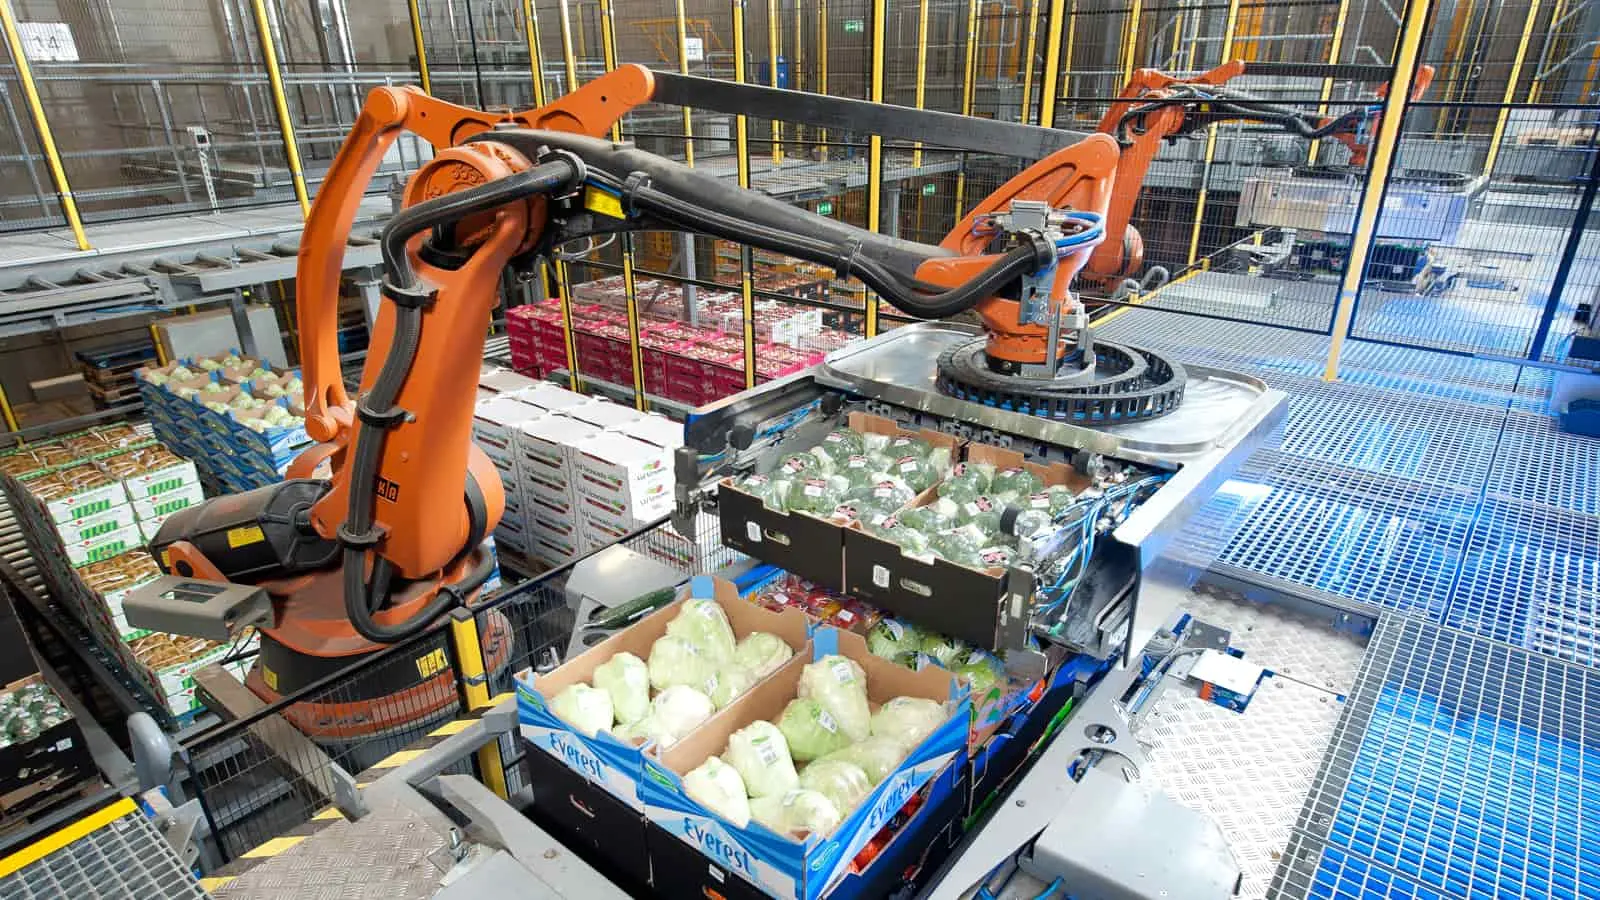
Advancements in technology have ushered in transformative changes across industries, and agriculture is embracing innovation through machine learning, particularly Convolutional Neural Networks (CNNs). This hands-on guide offers an immersive journey into constructing an automated fruit and vegetable picker using CNNs. By dissecting the code and explaining each step, this tutorial aims to equip enthusiasts with practical insights into leveraging CNNs for agricultural automation.
Throughout this guide, we'll explore data handling, model construction, training, and deployment. By providing a practical approach, this tutorial empowers readers to grasp the potential of CNNs in revolutionizing farming practices.
Table of Contents
- Data Loading and Preprocessing
- Exploring the Dataset
- Constructing the CNN Model
- Training the Model
- Evaluating Model Performance
- Saving and Loading the Model
- Conclusion
- Frequently Asked Questions
Understanding Dataset
1. Data Loading and Preprocessing
Import necessary libraries such as TensorFlow and ImageDataGenerator from Keras. The code uses image_dataset_from_directory to load the training and validation datasets from specified directories. The datasets consist of images grouped by their respective classes (fruits or vegetables).
import numpy as np # linear algebra
import pandas as pd # data processing, CSV file I/O (e.g. pd.read_csv)
import tensorflow as tf
from keras.preprocessing.image import ImageDataGenerator
import matplotlib.pyplot as plt
training_set = tf.keras.utils.image_dataset_from_directory(
'/kaggle/input/fruit-and-vegetable-image-recognition/train',
labels="inferred",
label_mode="categorical",
class_names=None,
color_mode="rgb",
batch_size=32,
image_size=(64, 64),
shuffle=True,
seed=None,
validation_split=None,
subset=None,
interpolation="bilinear",
follow_links=False,
crop_to_aspect_ratio=False
)validation_set = tf.keras.utils.image_dataset_from_directory(
'/kaggle/input/fruit-and-vegetable-image-recognition/validation',
labels="inferred",
label_mode="categorical",
class_names=None,
color_mode="rgb",
batch_size=32,
image_size=(64, 64),
shuffle=True,
seed=None,
validation_split=None,
subset=None,
interpolation="bilinear",
follow_links=False,
crop_to_aspect_ratio=False
)
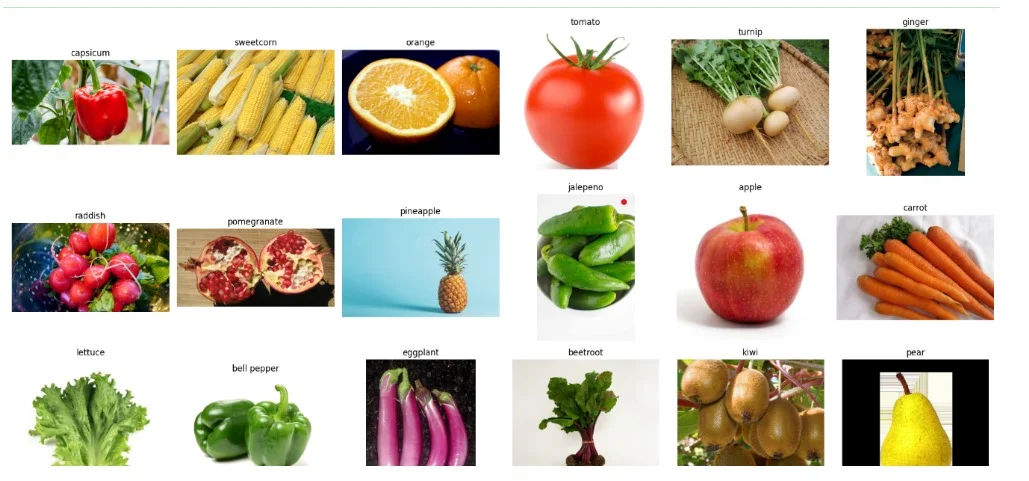
2. Exploring the Dataset
Here, the code uses functionalities from the OS, random, and OpenCV libraries to explore the dataset. It randomly selects and displays images from different classes (fruit or vegetable) for visualization purposes.
import os
import random
import matplotlib.pyplot as plt
import cv2

# Define the path to the dataset directory
dataset_path = '/kaggle/input/fruit-and-vegetable-image-recognition/train'

# Get the list of class names from the directory
class_names = os.listdir(dataset_path)

# Calculate the number of rows and columns for subplots
num_rows = 6
num_cols = (len(class_names) + num_rows - 1) // num_rows

# Create a figure and subplots to display the images
fig, axes = plt.subplots(num_rows, num_cols, figsize=(20, 20))

# Iterate over each class and randomly select one image to display
for i, class_name in enumerate(class_names):
    row = i // num_cols
    col = i % num_cols
    class_dir = os.path.join(dataset_path, class_name)
    image_files = os.listdir(class_dir)
    random_image = random.choice(image_files)
    image_path = os.path.join(class_dir, random_image)
    image = cv2.imread(image_path)
#     image = cv2.cvtColor(image, cv2.COLOR_BGR2RGB)
    axes[row, col].imshow(image)
    axes[row, col].set_title(class_name)
    axes[row, col].axis('off')

# Remove empty subplots if there are any
for i in range(len(class_names), num_rows * num_cols):
    row = i // num_cols
    col = i % num_cols
    fig.delaxes(axes[row, col])

# Adjust spacing between subplots
plt.tight_layout()

plt.show()
Plot Result:
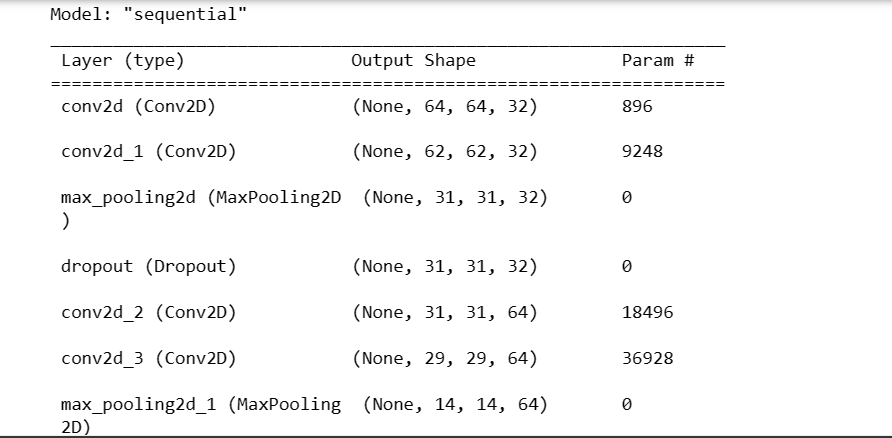
3. Constructing the CNN Model
This part defines the architecture of the Convolutional Neural Network (CNN) using Keras Sequential API. It stacks layers like Conv2D, MaxPooling2D, Dropout, Flatten, and Dense layers to create a neural network for image classification. The model is compiled using the Adam optimizer and categorical cross-entropy loss function.
cnn = tf.keras.models.Sequential()cnn.add(tf.keras.layers.Conv2D(filters=32,kernel_size=3,padding='same',
activation='relu',input_shape=[64,64,3]))
cnn.add(tf.keras.layers.Conv2D(filters=32,kernel_size=3,activation='relu'))
cnn.add(tf.keras.layers.MaxPool2D(pool_size=2,strides=2))
cnn.add(tf.keras.layers.Dropout(0.25))
cnn.add(tf.keras.layers.Conv2D(filters=64,kernel_size=3,padding='same',activation='relu'))
cnn.add(tf.keras.layers.Conv2D(filters=64,kernel_size=3,activation='relu'))
cnn.add(tf.keras.layers.MaxPool2D(pool_size=2,strides=2))
cnn.add(tf.keras.layers.Dropout(0.25))
cnn.add(tf.keras.layers.Flatten())
cnn.add(tf.keras.layers.Dense(units=512,activation='relu'))
cnn.add(tf.keras.layers.Dense(units=256,activation='relu'))
cnn.add(tf.keras.layers.Dropout(0.5)) #To avoid overfitting
#Output Layer
cnn.add(tf.keras.layers.Dense(units=36,activation='softmax'))cnn.compile(optimizer='adam',loss='categorical_crossentropy',metrics=['accuracy'])
cnn.summary()
Result:

4. Training the Model
This section trains the constructed CNN model using the fit() method on the training dataset. It also validates the model's performance on the validation dataset over 32 epochs.
training_history = cnn.fit(x=training_set,validation_data=validation_set,epochs=32)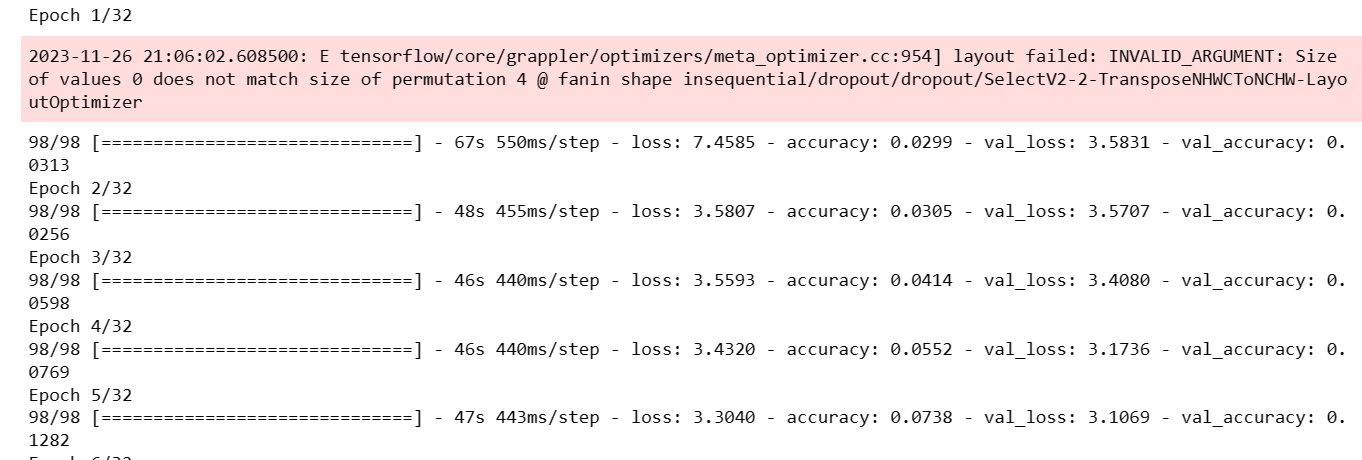
5. Evaluating Model Performance
Here, the model's performance is evaluated using the evaluate() method on the training, validation, and test sets to obtain accuracy scores.
#Training set Accuracy
train_loss, train_acc = cnn.evaluate(training_set)
print('Training accuracy:', train_acc)
#Validation set Accuracy
val_loss, val_acc = cnn.evaluate(validation_set)
print('Validation accuracy:', val_acc)
6. Saving and Loading the Model
This part saves the trained model to a file named 'trained_model.h5' and loads it back into memory using Keras load_model() function. This step ensures the trained model can be reused without retraining.
cnn.save('trained_model.h5')7. Visualizing the Model Performance
print("Validation set Accuracy: {} %".format(training_history.history['val_accuracy'][-1]*100))
epochs = [i for i in range(1,33)]
plt.plot(epochs,training_history.history['accuracy'],color='red')
plt.xlabel('No. of Epochs')
plt.ylabel('Traiining Accuracy')
plt.title('Visualization of Training Accuracy Result')
plt.show()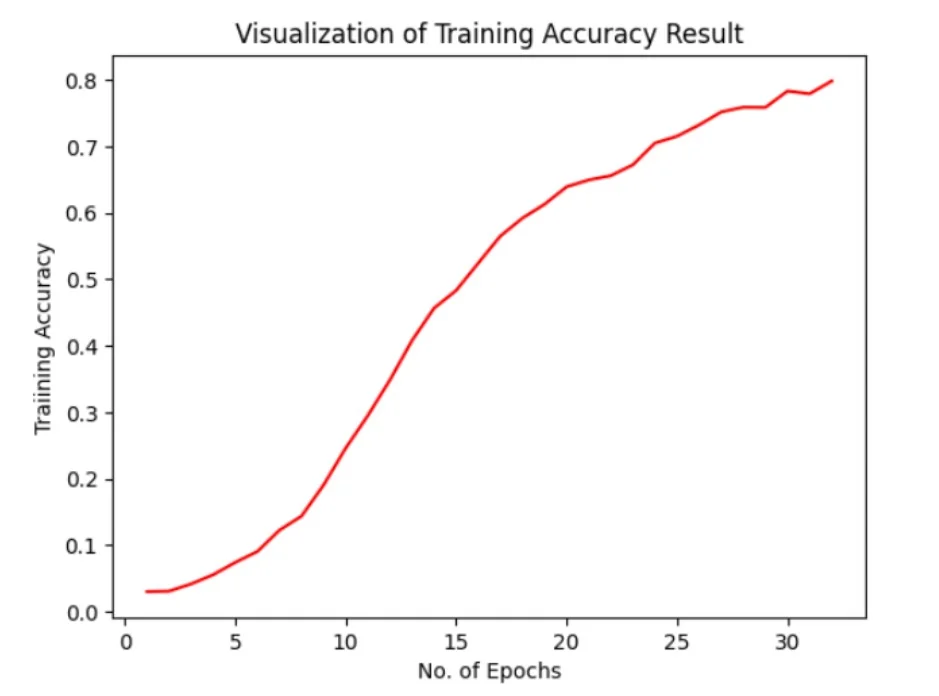
plt.plot(epochs,training_history.history['val_accuracy'],color='blue')
plt.xlabel('No. of Epochs')
plt.ylabel('Validation Accuracy')
plt.title('Visualization of Validation Accuracy Result')
plt.show()
8. Prediction on Test Image
In this section, a test image is loaded and preprocessed. The model makes predictions on the preprocessed image and displays the test image along with the predicted class.
test_loss,test_acc = cnn.evaluate(test_x)
print('Test accuracy:', test_acc)
test_set = tf.keras.utils.image_dataset_from_directory(
    '/kaggle/input/fruit-and-vegetable-image-recognition/test',
    labels="inferred",
    label_mode="categorical",
    class_names=None,
    color_mode="rgb",
    batch_size=32,
    image_size=(64, 64),
    shuffle=True,
    seed=None,
    validation_split=None,
    subset=None,
    interpolation="bilinear",
    follow_links=False,
    crop_to_aspect_ratio=False
)
cnn = tf.keras.models.load_model('/kaggle/working/trained_model.h5')#Test Image Visualization
import cv2
image_path = '/kaggle/input/fruit-and-vegetable-image-recognition/test/onion/Image_5.jpg'
# Reading an image in default mode
img = cv2.imread(image_path)
img = cv2.cvtColor(img,cv2.COLOR_BGR2RGB) #Converting BGR to RGB
# Displaying the image
plt.imshow(img)
plt.title('Test Image')
plt.xticks([])
plt.yticks([])
plt.show()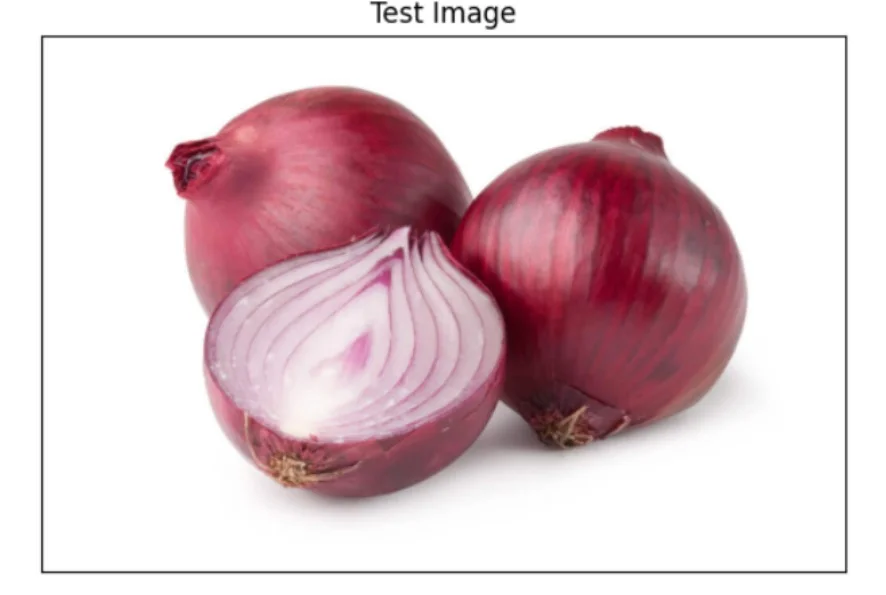
image = tf.keras.preprocessing.image.load_img(image_path,target_size=(64,64))
input_arr = tf.keras.preprocessing.image.img_to_array(image)
input_arr = np.array([input_arr])  # Convert single image to a batch.
predictions = cnn.predict(input_arr)
result_index = np.argmax(predictions) #Return index of max element
print(result_index)
#Single image Prediction
print("It's a {}".format(test_set.class_names[result_index]))Result on Test Image:

Conclusion
In this hands-on tutorial, we've explored the fusion of machine learning and agriculture, delving into the creation of an automated fruit and vegetable picker using Convolutional Neural Networks. By dissecting code segments and unraveling the process step-by-step, we've showcased the potential of CNNs in revolutionizing farming practices. This journey into agricultural automation highlights the transformative power of technology, offering a glimpse into a future where innovative solutions streamline processes, enhance productivity, and shape a sustainable agricultural landscape.
Frequently Asked Questions
1.What are the job skills of a fruit picker?
a)Gathering conditional knowledge.
b)Both irrigation and weeding.
c)knowledge about agricultural machinery.
d)Safety of farm equipment.
e)[Type] Utilization of equipment.
f)Safety and operation of tractors.
g)upkeep and fixing.
h)strong work ethic.
2.What does a fruit and vegetable picker do?
Pick fruit and vegetables based on their size and level of ripeness; throw away any that is rotten or overripe. Utilize agricultural equipment to gather fruits, vegetables, and nuts. Carefully load freshly harvested produce into containers to prevent deterioration.
3.How does a fruit picking robot work?
The robot arm is moved to the location of the target fruit after inverse kinematics has determined the angles of the joints at the detected position. Next, by rotating the hand axis, the robot gathers the fruit.
4.What are the duties of an apple picker?
Hand-cultivating, selecting rocks, raking, hoeing, weeding, pruning apple trees, hand-thinning apples off trees, fixing bins, and distributing bins in the orchard before harvest.

Simplify Your Data Annotation Workflow With Proven Strategies
.png)
