

Tutorial To Leverage Open AI's CLIP Model For Fashion Industry
Discover how fine-tuning CLIP model can revolutionize fashion image recognition. Learn to optimize OpenAI's CLIP with domain-specific data for the fashion industry.

Are you struggling with keeping your fashion catalog organized and up-to-date?
Finding it challenging to categorize new trends or connect your products with the right descriptions?
What if there was an advanced solution that could help you instantly connect images with the exact words that describe them, all while revolutionizing how you manage fashion data.
This isn't science fiction—it's the groundbreaking power of CLIP (Contrastive Language–Image Pretraining) model by OpenAI.
In a world where traditional image recognition systems fall short, often misclassifying or failing to understand nuanced fashion trends, CLIP stands out by seamlessly bridging text and images with unmatched accuracy.
Leveraging its multimodal capacity, CLIP is remarkably capable of understanding and establishing connections between text and images.
This model holds immense promise across a wide range of applications, with a particular highlight being its prowess in zero-shot classification.
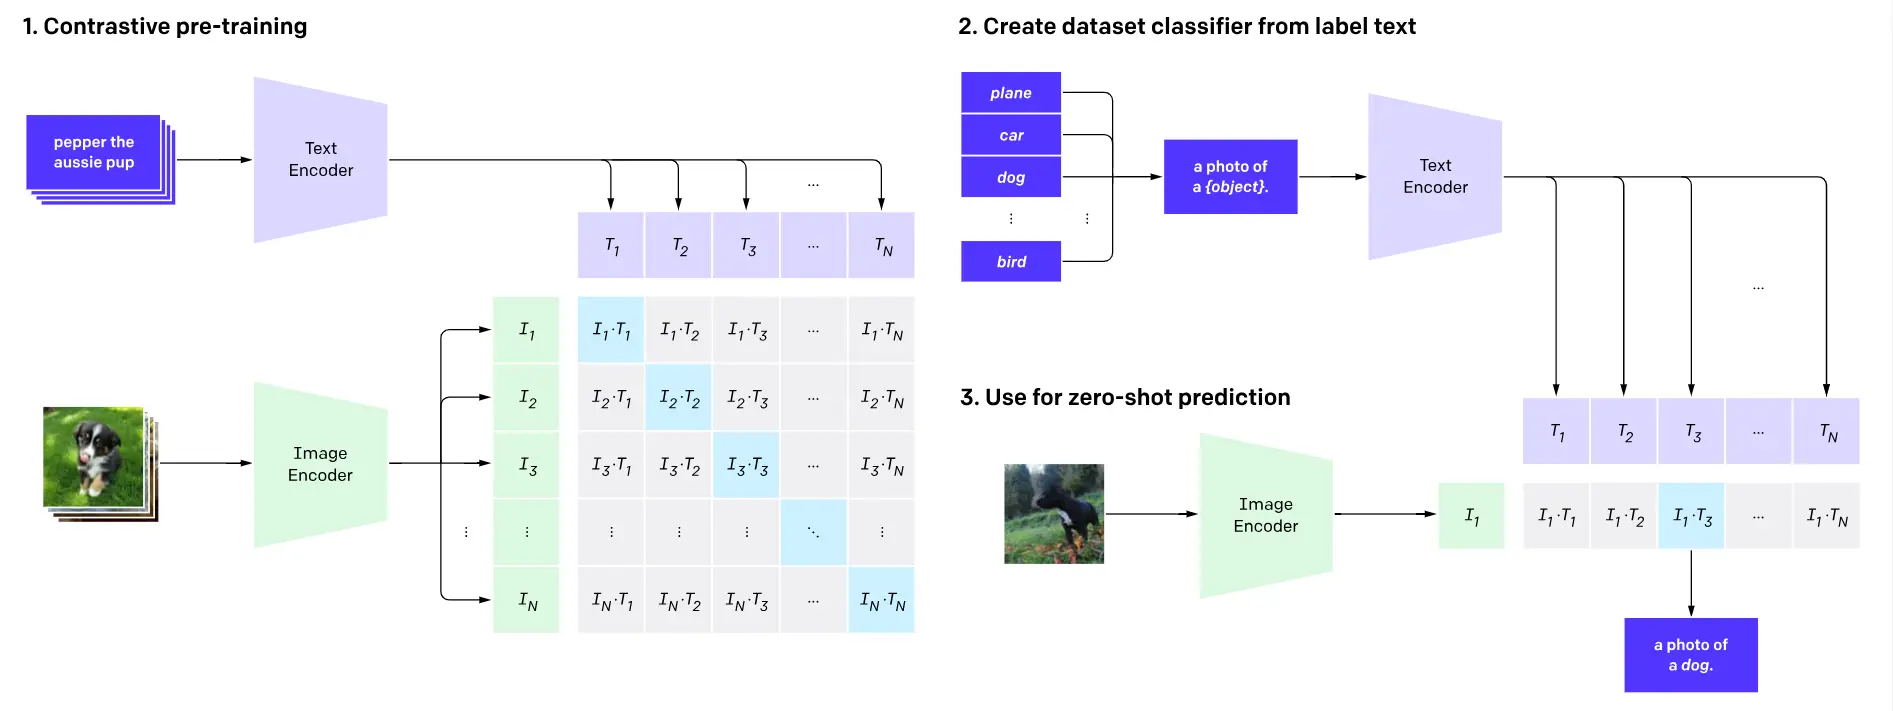
Figure: Working of CLIP Model
As we have already been through technical know-how for the CLIP Model in our previous blog on foundation models for image search, we aim to utilize the clip model and pre-train it over our custom Indo-fashion data to make it more domain-specific.
Table of Contents
Pre-Requisites
To proceed further, one should be familiar with:
- Python: All the below code will be written using python
- OpenCV (Open source Computer Vision): OpenCV provides a standard infrastructure for computer vision-based applications.
- Pytorch: PyTorch is a machine learning framework based on the Torch library, used for applications such as computer vision and natural language processing, originally developed by Meta AI and now part of the Linux Foundation umbrella.
- transformers: PyTorch-Transformers (formerly known as PyTorch-pre trained-bert) is a library of state-of-the-art pre-trained models for Natural Language Processing (NLP).
- Kaggle: Kaggle is a data science and artificial intelligence platform. On this platform, large companies and organizations publish contests with monetary prizes.
Methodology
This tutorial aims to fine-tune an OpenAI clip model with the Indo fashion Dataset available on Kaggle.
Dataset
The dataset under consideration consists of 106,000 images, encompassing 15 unique clothing categories.
To ensure equitable evaluation, the distribution of these categories is kept consistent in both the validation and test sets, with each category containing 500 samples.
Below is the list of the classes used:
- Saree
- Lehenga
- Women Kurta
- Dupatta
- Gown
- Nehru Jacket
- Sherwani
- Men Kurta
- Men Mojari
- Leggings and Salwar
- Blouse
- Palazzo
- Dhoti Pants
- Petticoat
- Women Mojari
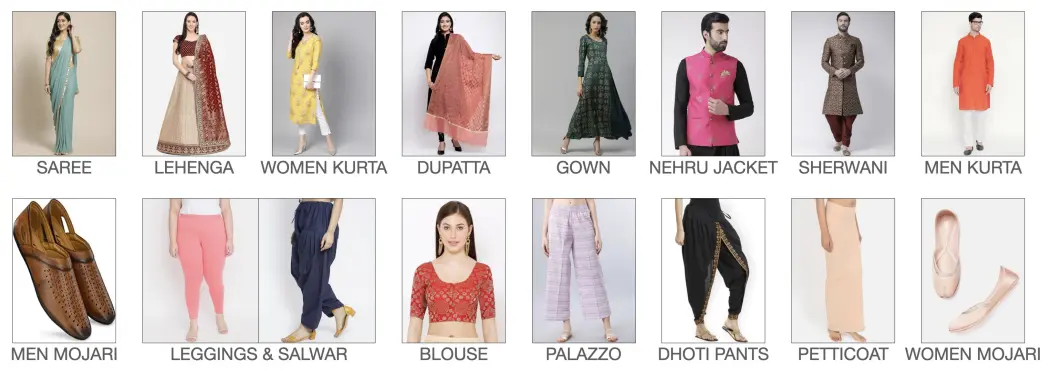
Figure: IndoFashion Dataset
The Indofashion dataset stands as the first extensive collection of Indian ethnic clothing images, totaling over 106,000 items and divided into 15 different categories for precise classification purposes.
To fine-tuning clip model, we know that the dataset required to train is in (Image, Text) format. So, for this, in our dataset, we have:
- Images Folder
- JSON File for each train, test with each JSON row containing attributes link Product Title, Class label, Image path, Image URL.
So, for text, we use the product title attribute, with a maximum length of 40 characters.
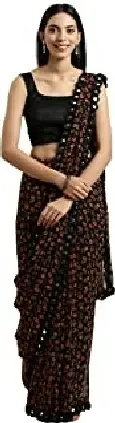

Figure: The above image corresponds to the Image sample, and the Below image corresponds to the JSON file associated.
Hands-On with Code
Before working on the code, you should have access to Kaggle. To do so, create an account on Kaggle. Visit here and create a new notebook.
Before we begin with tuning our clip model, we would require first to install the Openai-clip fine tuning model, which offers the following:
- Pre-trained model
- Optimizers states
The optimizer state refers to properties like the optimizer's momentum vector or historical tracking information.
For instance, in the case of the Adam optimizer, it keeps track of moving averages of the gradient and squared gradient. It helps in continuing the fine-tuning of the model from the checkpointed area.
For more information on how memory is consumed inside RAM when an LLM/Foundational Model is loaded for CLIP fine-tuning, refer here.
For this, add a new code block, and type:
!pip install openai-clipWe then begin by importing all the required libraries.
#For Parsing json data
import json

#For Loading Images
from PIL import Image

#For displaying loadbar
from tqdm import tqdm

#Importing pytorch to finetune our clip
import torch
import torch.nn as nn
from torch.utils.data import DataLoader

#Here, we import clip model developed by meta
import clip

#Constructs a CLIP processor which wraps a CLIP image processor and a CLIP
tokenizer into a single processor.
from transformers import CLIPProcessor, CLIPModel
Now, we load our input data and create a list of JSON data named input_data. This list will be used to create our text input and image.
# Respective Paths

json_path = '/kaggle/input/indo-fashion-dataset/train_data.json'
image_path = '/kaggle/input/indo-fashion-dataset/images/train/'

input_data = []
with open(json_path, 'r') as f:
	for line in f:
		obj = json.loads(line)
		input_data.append(obj)

# Load the CLIP model and processor
model = CLIPModel.from_pretrained("openai/clip-vit-base-patch32")
processor = CLIPProcessor.from_pretrained("openai/clip-vit-base-patch32")
Setting our device to GPU (Cuda) and loading the pre-trained CLIP model.
# Choose computation device
device = "cuda:0" if torch.cuda.is_available() else "cpu"

# Load pre-trained CLIP model
model, preprocess = clip.load("ViT-B/32", device=device, jit=False)
Now, we create a class for defining our Clothing Dataset.
# Define a custom dataset
class image_title_dataset():
	def __init__(self, list_image_path, list_txt):
		# Initialize image paths and corresponding texts
		self.image_path = list_image_path

		# Tokenize text using CLIP's tokenizer
		self.title = clip.tokenize(list_txt)

    def __len__(self):
		# Define the length of the dataset
		return len(self.title)

	def __getitem__(self, idx):

        # Get an item from the dataset
		# Preprocess image using CLIP's preprocessing function

        image = preprocess(Image.open(self.image_path[idx]))
		title = self.title[idx]
		return image, title
Now, we prepare our dataset using the pytorch Dataloader, which facilitates images in batches efficiently. Our Dataset is of the form (Image, text), where the text is extracted from the product title attribute of JSON file.
# use your own data
list_image_path = []
list_txt = []
for item in input_data:
  img_path = image_path + item['image_path'].split('/')[-1]

  #As we have image text pair, we use product title as description.
  caption = item['product_title'][:40]
  list_image_path.append(img_path)
  list_txt.append(caption)

dataset = image_title_dataset(list_image_path, list_txt)
train_dataloader = DataLoader(dataset, batch_size=100, shuffle=True)
#Define your own dataloader

# Function to convert model's parameters to FP32 format
#This is done so that our model loads in the provided memory.
def convert_models_to_fp32(model):
    for p in model.parameters():
        p.data = p.data.float()
        p.grad.data = p.grad.data.float()
Now, we set our Adam optimizer with certain parameters and set respective loss functions.
# Check if the device is set to CPU
if device == "cpu":
    model.float()  # Convert the model's parameters to float if using CPU

# Prepare the optimizer
optimizer = torch.optim.Adam(
    model.parameters(), lr=5e-5, betas=(0.9, 0.98), eps=1e-6 ,weight_decay=0.2)

# Adam optimizer is used with specific hyperparameters
# lr (learning rate) is set to 5e-5, which is considered safe for fine-tuning to a
new dataset
# betas are used for the optimization algorithm
# eps is a small value to prevent division by zero
# weight_decay adds L2 regularization to the optimizer

# Specify the loss function for images
loss_img = nn.CrossEntropyLoss()

# Specify the loss function for text
loss_txt = nn.CrossEntropyLoss()
Finally we train our model. Below is the code:
# Train the model
num_epochs = 4 # Number of training epochs
for epoch in range(num_epochs):
    pbar = tqdm(train_dataloader, total=len(train_dataloader))

    # Iterate through the batches in the training data
    for batch in pbar:
        optimizer.zero_grad()  # Zero out gradients for the optimizer

        # Extract images and texts from the batch
        images, texts = batch

        # Print the current device (CPU or GPU)
        print(device)

        # Move images and texts to the specified device (CPU or GPU)
        images = images.to(device)
        texts = texts.to(device)

        # Forward pass through the model
        logits_per_image, logits_per_text = model(images, texts)

        # Compute the loss
        ground_truth = torch.arange(len(images), dtype=torch.long, device=device)
        total_loss = (loss_img(logits_per_image, ground_truth) +
        loss_txt(logits_per_text, ground_truth)) / 2

        # Backward pass and update the model's parameters
        total_loss.backward()

        # If the device is CPU, directly update the model
        if device == "cpu":
            optimizer.step()
        else:
            # Convert model's parameters to FP32 format, update, and convert back
            convert_models_to_fp32(model)
            optimizer.step()
            clip.model.convert_weights(model)

        # Update the progress bar with the current epoch and loss
        pbar.set_description(f"Epoch {epoch}/{num_epochs}, Loss: {total_loss.item():.4f}")
Results
So, we have trained our model for 4 epochs, which took around 1.5-2 hours on a normal Kaggle notebook, which has around 13GB of RAM and 16GB of GPU. For inference, follow the below code:
import torch
import clip
from PIL import Image
import os
import matplotlib.pyplot as plt # Import the matplotlib library for image visualization
# Check if CUDA (GPU) is available, otherwise use CPU
device = "cuda" if torch.cuda.is_available() else "cpu"
# Load the CLIP model and preprocessing pipeline
model, preprocess = clip.load("ViT-B/32", device=device)
# List of clothing items for comparison
clothing_items = [
"Saree",
"Lehenga",
"Women Kurta",
"Dupatta",
"Gown",
"Nehru Jacket",
"Sherwani",
"Men Kurta",
"Men Mojari",
"Leggings and Salwar",
"Blouse",
"Palazzo",
"Dhoti Pants",
"Petticoat",
"Women Mojari"
]
# Index of the input data you want to analyze
index_ = 500
# Assuming 'input_data' is a list of JSON-like objects with image information
image_json = input_data[index_]
# Construct the full path to the image file using the given 'image_path'
image_path = os.path.join("/kaggle/input/indo-fashion-dataset", image_json['image_path'])
# Get the class label of the image
image_class = image_json['class_label']
# Preprocess the image and move it to the appropriate device (CPU or GPU)
image = preprocess(Image.open(image_path)).unsqueeze(0).to(device)
# Tokenize and move the clothing item names to the appropriate device
text = torch.cat([clip.tokenize(f"a photo of a {c}") for c in clothing_items]).to(device)
# Perform inference
with torch.no_grad():
# Encode image and text
image_features = model.encode_image(image)
text_features = model.encode_text(text)
# Calculate similarity scores between image and text
logits_per_image, logits_per_text = model(image, text)
probs = logits_per_image.softmax(dim=-1).cpu().numpy()
# Normalize image and text features
image_features /= image_features.norm(dim=-1, keepdim=True)
text_features /= text_features.norm(dim=-1, keepdim=True)
# Calculate similarity scores
similarity = (100.0 * image_features @ text_features.T).softmax(dim=-1)
values, indices = similarity[0].topk(5)
# Print the top predictions
print("\nTop predictions:\n")
for value, index in zip(values, indices):
print(f"{clothing_items[index]:>16s}: {100 * value.item():.2f}%")
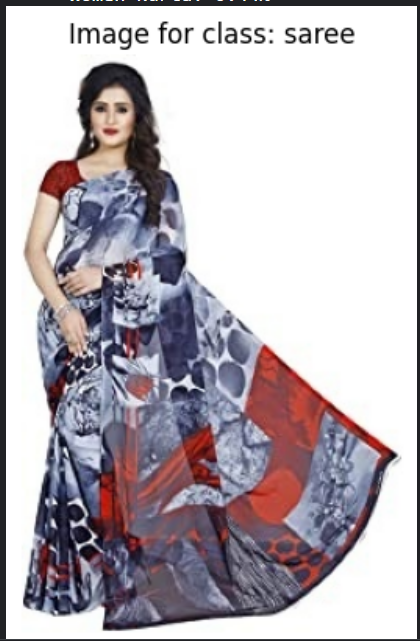
# Display the image with its class label
plt.imshow(plt.imread(image_path))
plt.title(f"Image for class: {image_class}")
plt.axis('off')
plt.show()
In the above code, we have analyzed an image with the following details:

Running this code gave the following output:

Similarly, we can try different image indices to try out how the model performs. The model may not always give correct output, which is due to the fact that we have fine-tuned only for 4 epochs.
Conclusion
Harnessing the power of OpenAI's CLIP model for the fashion industry can be a game changer, especially when it comes to sorting and organizing huge collections of images.
It is possible to make CLIP much better at finding and sorting fashion items by giving it domain-specific data, like our Indo-fashion dataset.
Our examples have shown that CLIP is a great tool for managing and growing your fashion catalog because it can combine images and text.
Getting your dataset ready, training the model, and then judging its performance are the three main steps in fine-tuning the model.
While the current implementation may require further refinement, especially with extended training, the potential for revolutionizing fashion data management is clear.
Our journey to fine-tune the CLIP model involved several steps:
- Data Preparation: We organized the dataset, consisting of images and corresponding textual attributes, in (Image and text) format.
The textual attribute we used was the product title, limited to a maximum of 40 characters. - Model and Library Setup: We imported essential libraries, including OpenCV, PyTorch, transformers, and the CLIP model itself.
We also created a custom dataset class for efficient data loading and preprocessing. - Data Loading: We loaded the input data, which included image paths, text descriptions, class labels, image URLs, and more, from JSON files.
- Model Initialization: We initialized the CLIP model and its associated processor, setting the device to either CPU or GPU as available.
- Dataset Creation: We prepared the data for training using our custom dataset class, tokenizing the text descriptions and preprocessing the images.
- Training Setup: We set up the training environment, including the optimizer with specific hyperparameters and defined loss functions for both images and text.
- Training Loop: We embark on the training process, iterating through the dataset for a predefined number of epochs.
We performed forward and backward passes for each batch, updating the model's parameters using the Adam optimizer. We also accounted for device-specific considerations when updating the model.
By following these steps, we fine-tuned the CLIP model to make it more domain-specific and specifically tailored for classifying Indian ethnic clothing images.
This process showcased the CLIP model's versatility and highlighted the potential for customizing AI models for specialized tasks.
In the ever-evolving landscape of AI and machine learning, CLIP, and similar models continue to open new avenues for innovation and problem-solving across various domains.
If you're looking to stay ahead of the curve and improve your fashion data processing capabilities, integrating CLIP into your workflow is a step in the right direction.
Dive into the hands-on tutorial, experiment with your own data, and see how this innovative technology can transform your approach to fashion analytics.
For more insights and updates on leveraging AI in your industry, don’t forget to reach out to us.
Frequently Asked Questions
1. What is CLIP Model?
Clip is a neural network that efficiently learns visual concepts from natural language supervision.
It can be applied to any visual classification benchmark by simply providing the names of the visual categories to be recognized, similar to the "zero-shot" capabilities of GPT-2 and GPT-3.
2. How does CLIP AI operate?
CLIP acquires visual concepts through natural language guidance. Traditional supervised computer vision systems are trained or fine-tuned with a predefined set of labels.
This restricts the model's adaptability whenever it encounters new labels. CLIP draws upon prior research such as VirTex and ConVIRT to address these limitations.

Simplify Your Data Annotation Workflow With Proven Strategies
.png)
