

Tutorial On Using Vision Transformers In Video Classification
Explore using Vision Transformers in video classification with this tutorial by Akshit Mehra. Learn to adapt image models to handle sequences of frames, utilizing ViViT and the OrganMNIST3D dataset for effective video analysis.

In our previous blogs, we have seen how we can use Vision Transformers for Image-related tasks, be it object detection for Vision transformers for Image classification.
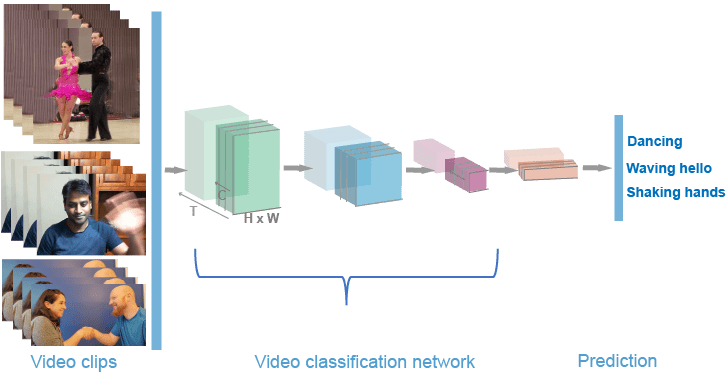
Videos consist of a sequence of images. Suppose you have access to an image representation model (such as CNN or ViT) and a sequence model (like RNN or LSTM).
We'd like you to adapt these models for video classification. The most straightforward approach involves applying the image model to individual frames, using the sequence model to understand sequences of image features, and finally employing a classification head on the learned sequence representation.
For a detailed explanation of this method, you can refer to the Keras example "Video Classification with a CNN-RNN Architecture." Alternatively, you can also create a hybrid Transformer-based model for video classification, as demonstrated in the Keras example "Video Classification with Transformers."
In this blog, we have used ViViT: A Video Vision Transformer based on the work of Arnab et al., which is a purely Transformer-based model designed for video classification.
Table of Contents
About Dataset
For this tutorial, we used the OrganMNIST3D dataset, a pre-processed dataset for image classification in Abdominal CT. So, originally, the data is in the form of gifs (short videos), which have been pre-processed and converted into a batch of frames.
The dataset "OrganMNIST3D" is a collection of 3D images primarily derived from abdominal CT scans. It is intended for a multi-class classification task with 11 distinct categories. The dataset comprises a total of 1,743 data samples.
Among these, there are 972 samples training samples, 161 validation, and 610 in the test set.
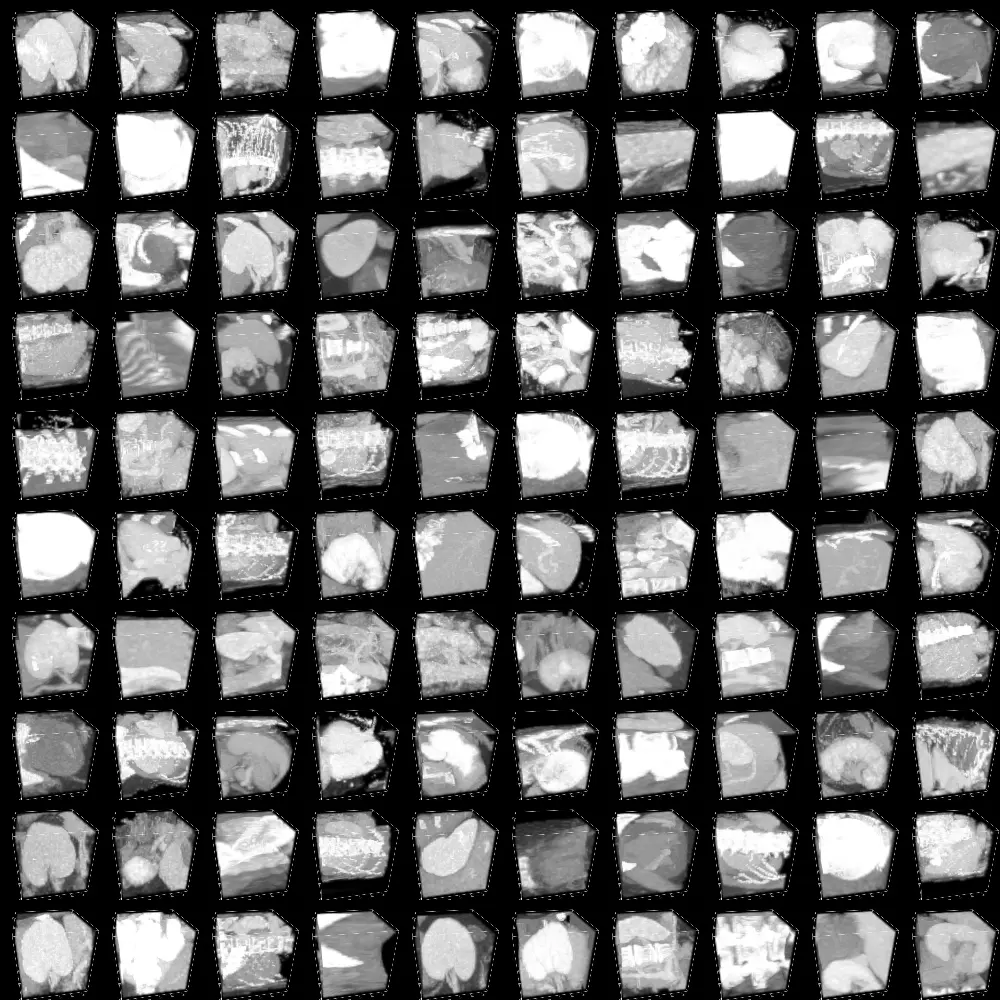
Figure: Images per frame for a sample dataset
Hands-on
Before proceeding to the code, we have first to be familiar with some concepts or prerequisites.
Pre-requisite
To proceed further, one should be familiar with:
- Python: All the below code will be written using Python.
- Pytorch: PyTorch, founded on the Torch library, is a machine learning framework utilized for tasks like computer vision and natural language processing.
- Kaggle: Kaggle is an online platform for data science competitions and collaborative data analysis.
How to use Kaggle?
- Visit Kaggle's website (www.kaggle.com).
- Click on the "Sign Up" button.
- Enter your email address and create a password.
- Accept the terms and conditions.
- Click "Create Account" to complete the registration process.
Tutorial
We begin by first installing the requirements. In this case, we are installing medmnist dataset, which contains our 3D OrganMNIST3D Abdominal CT Scan Dataset.
!pip install -qq medmnistNext, we import all our required libraries.
import os  # Import the os module for operating system functions
import io  # Import the io module for input and output operations
import imageio  # Import the imageio library for working with images
import medmnist  # Import the medmnist library, which is likely for medical image datasets
import ipywidgets  # Import the ipywidgets library for creating interactive widgets
import numpy as np  # Import the numpy library for numerical operations
import tensorflow as tf  # Import the TensorFlow library for machine learning
from tensorflow import keras  # Import the Keras library from TensorFlow for
neural network modeling
from tensorflow.keras import layers  # Import the layers module from Keras for
building neural network layers

# Setting seed for reproducibility
SEED = 42  # Set a seed value for random number generation for reproducibility
os.environ["TF_CUDNN_DETERMINISTIC"] = "1"  # Configure TensorFlow for deterministic behavior

keras.utils.set_random_seed(SEED)  # Set the random seed for Keras operations
We mention all the hyperparameters that will be used to simplify understanding.
# DATA
DATASET_NAME = "organmnist3d"
BATCH_SIZE = 32
AUTO = tf.data.AUTOTUNE
INPUT_SHAPE = (28, 28, 28, 1)
NUM_CLASSES = 11

# OPTIMIZER
LEARNING_RATE = 1e-4
WEIGHT_DECAY = 1e-5

# TRAINING
EPOCHS = 60

# TUBELET EMBEDDING
PATCH_SIZE = (8, 8, 8)
NUM_PATCHES = (INPUT_SHAPE[0] // PATCH_SIZE[0]) ** 2

# ViViT ARCHITECTURE
LAYER_NORM_EPS = 1e-6
PROJECTION_DIM = 128
NUM_HEADS = 8
NUM_LAYERS = 8
Next, we write a utility function to download and prepare dataset in the required format.
def download_and_prepare_dataset(data_info: dict):
    """Utility function to download the dataset.

    Arguments:
        data_info (dict): Dataset metadata.
    """
    data_path = keras.utils.get_file(origin=data_info["url"], md5_hash=data_info["MD5"])

    with np.load(data_path) as data:
        # Get videos
        train_videos = data["train_images"]
        valid_videos = data["val_images"]
        test_videos = data["test_images"]

        # Get labels
        train_labels = data["train_labels"].flatten()
        valid_labels = data["val_labels"].flatten()
        test_labels = data["test_labels"].flatten()

    return (
        (train_videos, train_labels),
        (valid_videos, valid_labels),
        (test_videos, test_labels),
    )


# Get the metadata of the dataset
info = medmnist.INFO[DATASET_NAME]

# Get the dataset
prepared_dataset = download_and_prepare_dataset(info)
(train_videos, train_labels) = prepared_dataset[0]
(valid_videos, valid_labels) = prepared_dataset[1]
(test_videos, test_labels) = prepared_dataset[2]
Next, we get the data loaders for training (trainloader), validation (validloader), and testing (testloader) by calling the prepare_dataloader function with the corresponding data and labels.
@tf.function
def preprocess(frames: tf.Tensor, label: tf.Tensor):
    """Preprocess the frames tensors and parse the labels."""
    # Preprocess images
    frames = tf.image.convert_image_dtype(
        frames[
            ..., tf.newaxis
        ],  # The new axis is to help for further processing with Conv3D layers
        tf.float32,
    )
    # Parse label
    label = tf.cast(label, tf.float32)
    return frames, label


def prepare_dataloader(
    videos: np.ndarray,
    labels: np.ndarray,
    loader_type: str = "train",
    batch_size: int = BATCH_SIZE,
):
    """Utility function to prepare the dataloader."""
    dataset = tf.data.Dataset.from_tensor_slices((videos, labels))

    if loader_type == "train":
        dataset = dataset.shuffle(BATCH_SIZE * 2)

    dataloader = (
        dataset.map(preprocess, num_parallel_calls=tf.data.AUTOTUNE)
        .batch(batch_size)
        .prefetch(tf.data.AUTOTUNE)
    )
    return dataloader


trainloader = prepare_dataloader(train_videos, train_labels, "train")
validloader = prepare_dataloader(valid_videos, valid_labels, "valid")
testloader = prepare_dataloader(test_videos, test_labels, "test")
We have already learned that in the Vision transformer, images are converted into patches and is then fed as input to the model.
In the case of video, where the image in each frame is temporally connected, we perform the Tubulet embedding to effectively feed the input so the VIT can also capture the temporal connections.
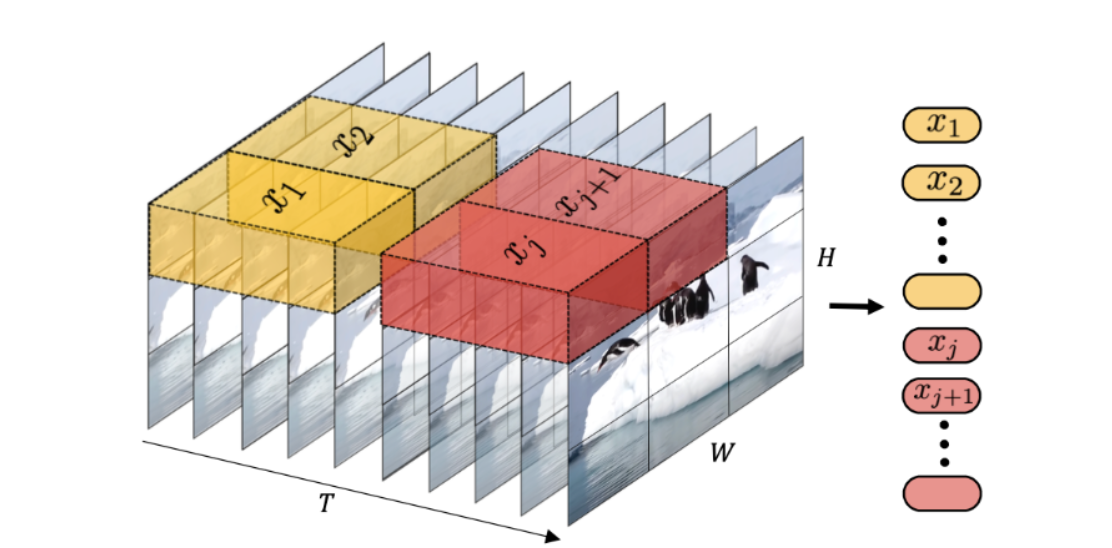
Figure: How input is fed in the Model
class TubeletEmbedding(layers.Layer):
    def __init__(self, embed_dim, patch_size, **kwargs):
        super().__init__(**kwargs)
        self.projection = layers.Conv3D(
            filters=embed_dim,
            kernel_size=patch_size,
            strides=patch_size,
            padding="VALID",
        )
        self.flatten = layers.Reshape(target_shape=(-1, embed_dim))

    def call(self, videos):
        projected_patches = self.projection(videos)
        flattened_patches = self.flatten(projected_patches)
        return flattened_patches
We also need to add the positional embedding to each input token.
class PositionalEncoder(layers.Layer):
    def __init__(self, embed_dim, **kwargs):
        super().__init__(**kwargs)
        self.embed_dim = embed_dim

    def build(self, input_shape):
        _, num_tokens, _ = input_shape
        self.position_embedding = layers.Embedding(
            input_dim=num_tokens, output_dim=self.embed_dim
        )
        self.positions = tf.range(start=0, limit=num_tokens, delta=1)

    def call(self, encoded_tokens):
        # Encode the positions and add it to the encoded tokens
        encoded_positions = self.position_embedding(self.positions)
        encoded_tokens = encoded_tokens + encoded_positions
        return encoded_tokens
Finally, we now move on to creating our ViT Model.
def create_vivit_classifier(
    tubelet_embedder,
    positional_encoder,
    input_shape=INPUT_SHAPE,
    transformer_layers=NUM_LAYERS,
    num_heads=NUM_HEADS,
    embed_dim=PROJECTION_DIM,
    layer_norm_eps=LAYER_NORM_EPS,
    num_classes=NUM_CLASSES,
):
    # Define the input layer for the model
    inputs = layers.Input(shape=input_shape)

    # Create patches from the input data using the tubelet_embedder
    patches = tubelet_embedder(inputs)

    # Encode the patches using positional_encoder
    encoded_patches = positional_encoder(patches)

    # Create multiple layers of the Transformer block
    for _ in range(transformer_layers):
        # Layer normalization and Multi-Head Self-Attention (MHSA)
        x1 = layers.LayerNormalization(epsilon=1e-6)(encoded_patches)
        attention_output = layers.MultiHeadAttention(
            num_heads=num_heads, key_dim=embed_dim // num_heads, dropout=0.1
        )(x1, x1)

        # Add a skip connection to the output of MHSA
        x2 = layers.Add()([attention_output, encoded_patches])

        # Layer Normalization and Multi-Layer Perceptron (MLP)
        x3 = layers.LayerNormalization(epsilon=1e-6)(x2)
        x3 = keras.Sequential(
            [
                layers.Dense(units=embed_dim * 4, activation=tf.nn.gelu),
                layers.Dense(units=embed_dim, activation=tf.nn.gelu),
            ]
        )(x3)

        # Add another skip connection, connecting to the output of the MLP
        encoded_patches = layers.Add()([x3, x2])

    # Layer normalization and Global average pooling
    representation = layers.LayerNormalization(epsilon=layer_norm_eps)(encoded_patches)
    representation = layers.GlobalAvgPool1D()(representation)

    # Classify the outputs using a dense layer with softmax activation
    outputs = layers.Dense(units=num_classes, activation="softmax")(representation)

    # Create the Keras model, connecting the input and output layers
    model = keras.Model(inputs=inputs, outputs=outputs)

    return model
Next, we train our model. The hyperparameters used are already specified at the beginning of the code.
def run_experiment():
    # Initialize model
    model = create_vivit_classifier(
        tubelet_embedder=TubeletEmbedding(
            embed_dim=PROJECTION_DIM, patch_size=PATCH_SIZE
        ),
        positional_encoder=PositionalEncoder(embed_dim=PROJECTION_DIM),
    )

    # Compile the model with the optimizer, loss function
    # and the metrics.
    optimizer = keras.optimizers.Adam(learning_rate=LEARNING_RATE)
    model.compile(
        optimizer=optimizer,
        loss="sparse_categorical_crossentropy",
        metrics=[
            keras.metrics.SparseCategoricalAccuracy(name="accuracy"),
            keras.metrics.SparseTopKCategoricalAccuracy(5, name="top-5-accuracy"),
        ],
    )

    # Train the model.
    _ = model.fit(trainloader, epochs=20, validation_data=validloader)

    _, accuracy, top_5_accuracy = model.evaluate(testloader)
    print(f"Test accuracy: {round(accuracy * 100, 2)}%")
    print(f"Test top 5 accuracy: {round(top_5_accuracy * 100, 2)}%")

    return model


model = run_experiment()
At last, we have some visualization of our model output over our test data.
NUM_SAMPLES_VIZ = 25
testsamples, labels = next(iter(testloader))
testsamples, labels = testsamples[:NUM_SAMPLES_VIZ], labels[:NUM_SAMPLES_VIZ]

ground_truths = []
preds = []
videos = []

for i, (testsample, label) in enumerate(zip(testsamples, labels)):
    # Generate gif
    kargs = { 'duration': 5 }
    with io.BytesIO() as gif:
        imageio.mimsave(gif, (testsample.numpy().squeeze(-1) * 255).astype("uint8"), "GIF")
        videos.append(gif.getvalue())

    # Get model prediction
    output = model.predict(tf.expand_dims(testsample, axis=0))[0]
    pred = np.argmax(output, axis=0)

    ground_truths.append(label.numpy().astype("int"))
    preds.append(pred)


def make_box_for_grid(image_widget, fit):
    """Make a VBox to hold caption/image for demonstrating option_fit values.

    Source: https://ipywidgets.readthedocs.io/en/latest/examples/Widget%20Styling.html
    """
    # Make the caption
    if fit is not None:
        fit_str = "'{}'".format(fit)
    else:
        fit_str = str(fit)

    h = ipywidgets.HTML(value="" + str(fit_str) + "")

    # Make the green box with the image widget inside it
    boxb = ipywidgets.widgets.Box()
    boxb.children = [image_widget]

    # Compose into a vertical box
    vb = ipywidgets.widgets.VBox()
    vb.layout.align_items = "center"
    vb.children = [h, boxb]
    return vb


boxes = []
for i in range(NUM_SAMPLES_VIZ):
    ib = ipywidgets.widgets.Image(value=videos[i], width=100, height=100)
    true_class = info["label"][str(ground_truths[i])]
    pred_class = info["label"][str(preds[i])]
    caption = f"T: {true_class} | P: {pred_class}"

    boxes.append(make_box_for_grid(ib, caption))

ipywidgets.widgets.GridBox(
    boxes, layout=ipywidgets.widgets.Layout(grid_template_columns="repeat(5, 200px)")
)
Output
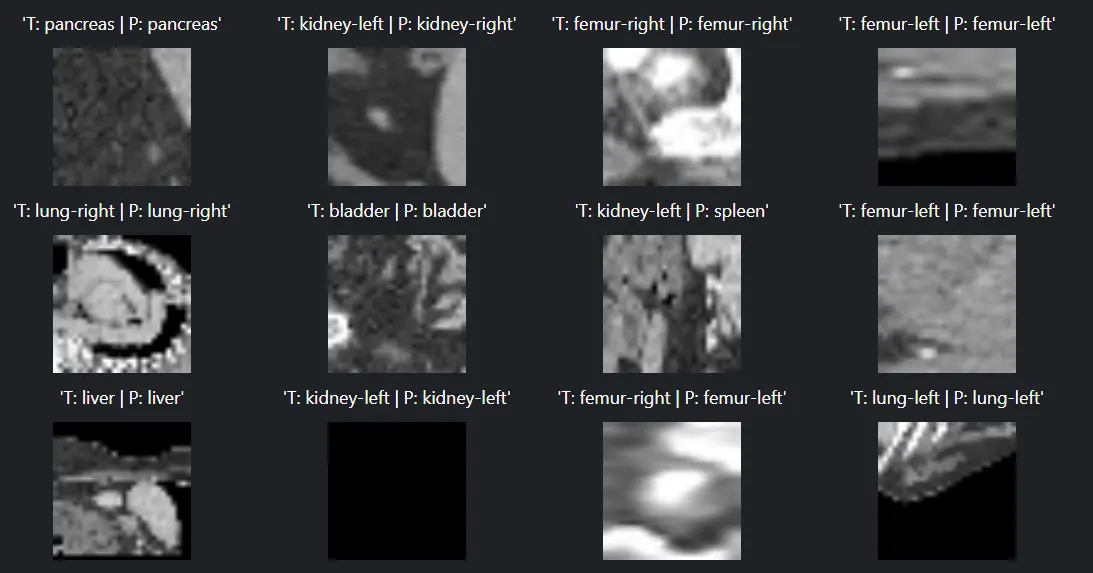
Figure: Model output
Above, we see that our model produces decent results over test data. These are basically gifs (Short) of 5 seconds, along with their outputs.
Conclusion
In our previous blog series, we've explored the capabilities of Vision Transformers (ViTs) in various image-related tasks, including object detection and image classification.
When it comes to handling videos, which are essentially sequences of images, we discussed different approaches to adapt models for video classification.
One straightforward approach involves leveraging both image representation models like CNN or ViT and sequence models like RNN or LSTM. This allows us to process individual frames, capture temporal relationships in image features, and apply a classification head to make predictions based on the learned sequence representation.
You can find detailed explanations in Keras examples like "Video Classification with a CNN-RNN Architecture" or by creating hybrid Transformer-based models, as shown in "Video Classification with Transformers."
In this particular blog, we've focused on ViViT, a Video Vision Transformer inspired by Arnab et al.'s work. ViViT is a pure Transformer-based model designed explicitly for video classification.
We used the OrganMNIST3D dataset for our hands-on tutorial, a pre-processed dataset originally containing 3D images from abdominal CT scans. We transformed the data, which was initially in the form of GIFs (short videos), into batches of frames.
The dataset comprises 1,743 data samples for a multi-class classification task with 11 categories, distributed as 972 training samples, 161 for validation, and 610 in the test set.
Before delving into the code, we emphasized some prerequisites, such as familiarity with Python, PyTorch, and using Kaggle, an online platform for data science competitions and collaborative data analysis. The tutorial covered the following steps:
- Installation of required libraries, including the medmnist dataset containing OrganMNIST3D.
- Importing essential libraries.
- Defining key hyperparameters for clarity.
- Preparing the dataset by downloading and formatting it.
- Obtaining data loaders for training, validation, and testing.
- Implementing Tubelet embedding to capture temporal relationships in video data.
- Adding positional embeddings to input tokens.
- Creating the ViT model.
- Training the model using specified hyperparameters.
- Visualizing the model's output over test data.
The output demonstrated that our model performed effectively on short 5-second GIFs, providing predictions for each frame.
In conclusion, Vision Transformers, such as ViViT, offer robust solutions for video classification tasks, showcasing their adaptability and efficiency in handling sequential image data.
Frequently Asked Questions (FAQ)
1. What are Vision Transformers for Image Classification?
Vision Transformers (ViTs) play a pivotal role in image classification, offering a comprehensive solution for a wide range of image-related tasks. Their applications extend to popular endeavors such as object detection, image segmentation, and image classification.
ViTs also prove their versatility in tasks like action recognition, where understanding the actions depicted in images or videos is essential.
Furthermore, Vision Transformers are employed in generative modeling, allowing the generation of new content, and they excel in multi-modal tasks like visual grounding, visual-question answering, and visual reasoning.
2. What is a Video Vision Transformer?
A video Vision Transformer, often abbreviated as ViT, is a model that resembles the structure of a transformer and is specifically designed for processing visual information.
This innovative technology is adept at performing various tasks related to vision processing. This article provides an in-depth exploration of how video Vision Transformers function, and it offers practical examples to enhance your understanding of this cutting-edge approach.

Simplify Your Data Annotation Workflow With Proven Strategies
.png)
