

Real-Time Lane Detection for Self-Driving Cars using OpenCV
Lane detection in self-driving cars uses OpenCV to identify road lanes, ensuring safe navigation. It involves steps like grayscale conversion, edge detection, and Hough Transform to detect lane lines, aiding in autonomous driving and driver assistance.

Lane detection is a critical aspect of self-driving cars and autonomous vehicles, crucial for understanding driving scenes. By identifying lane positions, vehicles gain guidance to stay within their lanes and avoid straying or entering other lanes, ensuring safe navigation.
This technology employs visual analysis of road images to detect lane markings, utilizing algorithms that encompass image processing, edge detection, and geometric analysis. Advanced techniques like machine learning and computer vision further improve accuracy, enabling systems to adapt to various road conditions and markings.
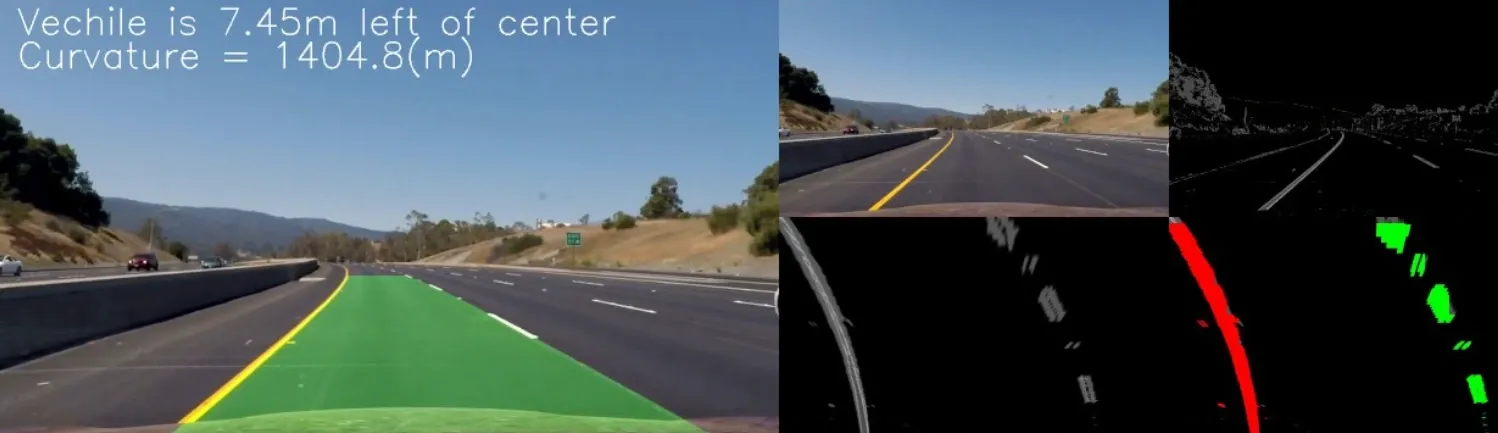
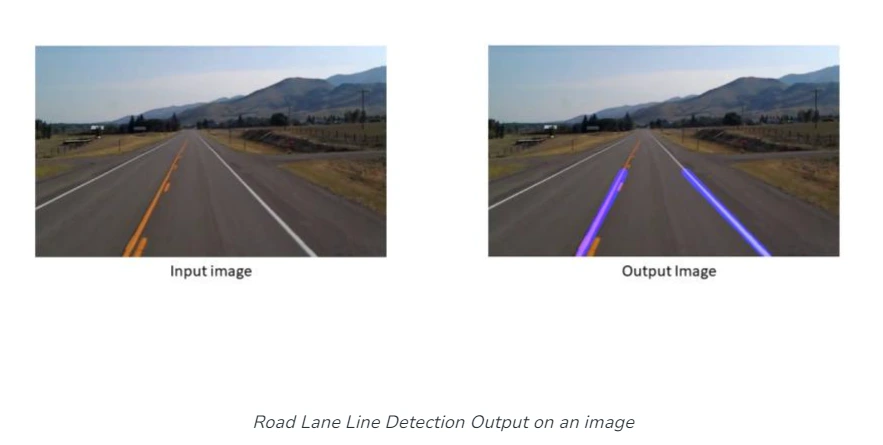
The display of detected lanes alongside original road images demonstrates the algorithm's effectiveness. This comparison showcases how these systems accurately identify and highlight lanes across diverse driving environments.
Real-time integration of lane detection into advanced driver assistance systems enhances overall safety by providing warnings or corrective actions if a vehicle deviates from its lane, reducing the risk of accidents caused by unintended lane departures.
Table of Contents
- Steps Involved In Road Lane Detection
- Implementation of Road Lane Detection
- Use Cases of Road Lane Detection Using Computer Vision Models
- Frequently Asked Questions
Steps Involved In Road Lane Detection
Road lane detection involves identifying the pathway for self-driving vehicles, ensuring they stay within their designated lanes and avoid straying into other lanes. Lane recognition algorithms play a crucial role in precisely determining lane locations and boundaries by analyzing visual input. Both advanced driver assistance systems (ADAS) and autonomous vehicle systems heavily depend on these algorithms. We will discuss one of these lane detection algorithms, outlining its key steps.
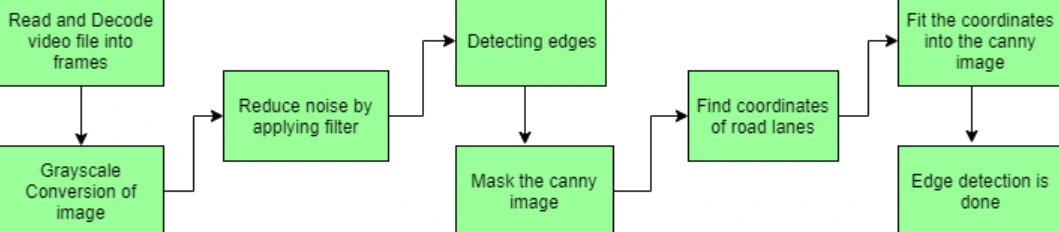
Capture and Decode Video: To begin lane detection, video footage is captured using a VideoFileClip object. Each frame of the video is decoded, converting it into a sequence of images for further analysis.
Grayscale Conversion: The RGB format of video frames is converted into grayscale. This conversion simplifies image processing since working with a single-channel grayscale image is computationally faster than dealing with three-channel color images.
Noise Reduction: Before proceeding with lane detection, it's crucial to reduce noise in the images. Gaussian blur, an image filtering technique, is employed. This technique uses a Gaussian distribution to calculate weights, applying a weighted average to each pixel based on its surrounding pixels. This process reduces high-frequency elements and enhances image quality, creating smoother images and minimizing false edges caused by noise.
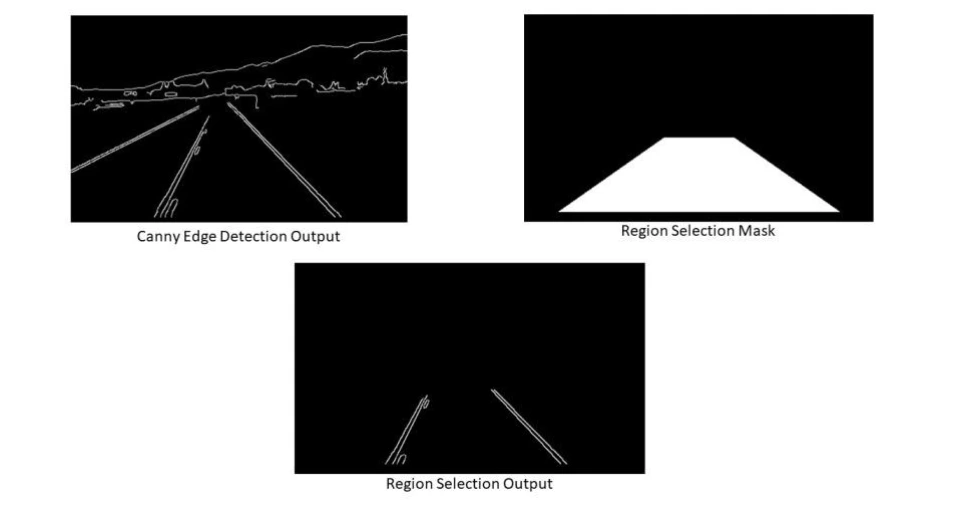
Canny Edge Detection: The Canny edge detector algorithm is applied to the blurred image. This algorithm computes gradients in all directions and identifies edges with significant changes in intensity. The result is an image outlining these detected edges, which represent potential lane markings.
Region of Interest (ROI): To focus only on the area relevant to road lanes, a mask is generated with dimensions matching the road image. This mask, shaped like a polygonal contour, isolates the region of interest. A bitwise AND operation is performed between the Canny edge-detected image and this mask, effectively highlighting only the detected edges within the region of interest.
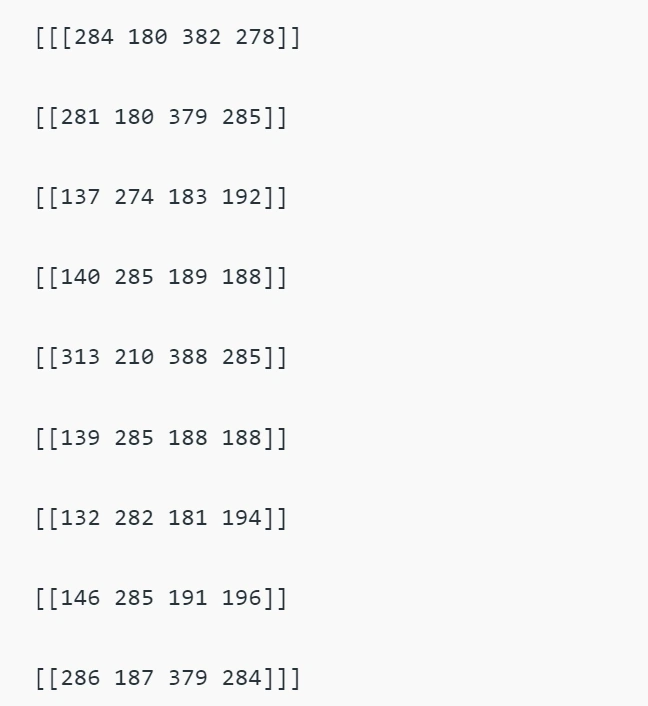
Hough Line Transform: The Hough transformation, a feature extraction technique, is utilized to identify basic geometric shapes such as lines. By transforming the image space into a parameter space, this method accumulates votes to recognize shapes. The algorithm employs the probabilistic Hough Line Transform to enhance computational efficiency while accurately detecting lines. It randomly selects image points and applies the transformation solely to those points, thereby speeding up processing without compromising accuracy.
Drawing Lane Lines: After identifying lane lines within the region of interest using the Hough Line Transform, these lines are overlaid onto the original visual input, such as the video stream or image. This final step visually indicates the detected lane markings on the road.
Implementation of Road Lane Detection
Step 1: Install the Python OpenCV library
!pip install -q opencv-python
Step 2: Import the required libraries
# Libraries for working with image processing
import numpy as np
import pandas as pd
import cv2
from google.colab.patches import cv2_imshow
# Libraries needed to edit/save/watch video clips
from moviepy import editor
import moviepy
Step 3: Create the driver function that powers our algorithm
def process_video(test_video, output_video):
	"""
	Read input video stream and produce a video file with detected lane lines.
	Parameters:
		test_video: location of input video file
		output_video: location where output video file is to be saved
	"""
	# read the video file using VideoFileClip without audio
	input_video = editor.VideoFileClip(test_video, audio=False)
	# apply the function "frame_processor" to each frame of the video
	# will give more detail about "frame_processor" in further steps
	# "processed" stores the output video
	processed = input_video.fl_image(frame_processor)
	# save the output video stream to an mp4 file
	processed.write_videofile(output_video, audio=False)
Step 4: Define the "frame_processor" function, which handles all of the processing for lane line detection on a single frame
def frame_processor(image):
	"""
	Process the input frame to detect lane lines.
	Parameters:
		image: image of a road where one wants to detect lane lines
		(we will be passing frames of video to this function)
	"""
	# convert the RGB image to Gray scale
	grayscale = cv2.cvtColor(image, cv2.COLOR_BGR2GRAY)
	# applying gaussian Blur which removes noise from the image
	# and focuses on our region of interest
	# size of gaussian kernel
	kernel_size = 5
	# Applying gaussian blur to remove noise from the frames
	blur = cv2.GaussianBlur(grayscale, (kernel_size, kernel_size), 0)
	# first threshold for the hysteresis procedure
	low_t = 50
	# second threshold for the hysteresis procedure
	high_t = 150
	# applying canny edge detection and save edges in a variable
	edges = cv2.Canny(blur, low_t, high_t)
	# since we are getting too many edges from our image, we apply
	# a mask polygon to only focus on the road
	# Will explain Region selection in detail in further steps
	region = region_selection(edges)
	# Applying hough transform to get straight lines from our image
	# and find the lane lines
	# Will explain Hough Transform in detail in further steps
	hough = hough_transform(region)
	#lastly we draw the lines on our resulting frame and return it as output
	result = draw_lane_lines(image, lane_lines(image, hough))
	return result
Step 5: Region Selection
Up till now, we have utilised clever edge detection, applied Gaussian Blur to minimise noise, and transformed RGB frames to grayscale. Next, we will choose the area in which we wish to find driving lanes.
def region_selection(image):
	"""
	Determine and cut the region of interest in the input image.
	Parameters:
		image: we pass here the output from canny where we have
		identified edges in the frame
	"""
	# create an array of the same size as of the input image
	mask = np.zeros_like(image)
	# if you pass an image with more then one channel
	if len(image.shape) > 2:
		channel_count = image.shape[2]
		ignore_mask_color = (255,) * channel_count
	# our image only has one channel so it will go under "else"
	else:
		# color of the mask polygon (white)
		ignore_mask_color = 255
	# creating a polygon to focus only on the road in the picture
	# we have created this polygon in accordance to how the camera was placed
	rows, cols = image.shape[:2]
	bottom_left = [cols * 0.1, rows * 0.95]
	top_left	 = [cols * 0.4, rows * 0.6]
	bottom_right = [cols * 0.9, rows * 0.95]
	top_right = [cols * 0.6, rows * 0.6]
	vertices = np.array([[bottom_left, top_left, top_right, bottom_right]], dtype=np.int32)
	# filling the polygon with white color and generating the final mask
	cv2.fillPoly(mask, vertices, ignore_mask_color)
	# performing Bitwise AND on the input image and mask to get only the edges on the road
	masked_image = cv2.bitwise_and(image, mask)
	return masked_image
Step 6: Using the Probabilistic Hough Transform, we will now be able to recognise straight lines in the output image from the previous function.
def hough_transform(image):
	"""
	Determine and cut the region of interest in the input image.
	Parameter:
		image: grayscale image which should be an output from the edge detector
	"""
	# Distance resolution of the accumulator in pixels.
	rho = 1
	# Angle resolution of the accumulator in radians.
	theta = np.pi/180
	# Only lines that are greater than threshold will be returned.
	threshold = 20
	# Line segments shorter than that are rejected.
	minLineLength = 20
	# Maximum allowed gap between points on the same line to link them
	maxLineGap = 500
	# function returns an array containing dimensions of straight lines
	# appearing in the input image
	return cv2.HoughLinesP(image, rho = rho, theta = theta, threshold = threshold,
        minLineLength = minLineLength, maxLineGap = maxLineGap)
Step 7: Plotting Lines on video frames
After obtaining the coordinates via the Hough Transform, we will plot them on the original image (frame). However, since we are obtaining coordinates for more than two lines, we must first determine the slope of the left and right lanes before superimposing the coordinates on the original image.
Four functions have been defined to assist in drawing the left and right lanes on our input frame:
Average_Slope_Intercept: This function computes the slope and intercept of the hough transform lines. A queue belongs in the left lane if its slope is negative; otherwise, it belongs in the right lane. The weighted average slope and intercept of the left and right lanes are then determined.
Pixel_Points: The x values for the line are found using the slope, intercept, and y-values of the line; this yields the x and y coordinates of the lanes as integers.
Lane_Lines: The function that computes the coordinates for the left and right lanes and calls Average_Slope_Intercept and Pixel Points.
Draw_Lane_Lines: This function uses the input frame to draw the road's left and right lanes. gives back the output frame, which is then kept in our driver function "process_video"'s "processed" variable.
def average_slope_intercept(lines):
	"""
	Find the slope and intercept of the left and right lanes of each image.
	Parameters:
		lines: output from Hough Transform
	"""
	left_lines = [] #(slope, intercept)
	left_weights = [] #(length,)
	right_lines = [] #(slope, intercept)
	right_weights = [] #(length,)

	for line in lines:
		for x1, y1, x2, y2 in line:
			if x1 == x2:
				continue
			# calculating slope of a line
			slope = (y2 - y1) / (x2 - x1)
			# calculating intercept of a line
			intercept = y1 - (slope * x1)
			# calculating length of a line
			length = np.sqrt(((y2 - y1) ** 2) + ((x2 - x1) ** 2))
			# slope of left lane is negative and for right lane slope is positive
			if slope < 0:
				left_lines.append((slope, intercept))
				left_weights.append((length))
			else:
				right_lines.append((slope, intercept))
				right_weights.append((length))
	#
	left_lane = np.dot(left_weights, left_lines) / np.sum(left_weights) if
    len(left_weights) > 0 else None
	right_lane = np.dot(right_weights, right_lines) / np.sum(right_weights) if
    len(right_weights) > 0 else None
	return left_lane, right_lane

def pixel_points(y1, y2, line):
	"""
	Converts the slope and intercept of each line into pixel points.
		Parameters:
			y1: y-value of the line's starting point.
			y2: y-value of the line's end point.
			line: The slope and intercept of the line.
	"""
	if line is None:
		return None
	slope, intercept = line
	x1 = int((y1 - intercept)/slope)
	x2 = int((y2 - intercept)/slope)
	y1 = int(y1)
	y2 = int(y2)
	return ((x1, y1), (x2, y2))

def lane_lines(image, lines):
	"""
	Create full lenght lines from pixel points.
		Parameters:
			image: The input test image.
			lines: The output lines from Hough Transform.
	"""
	left_lane, right_lane = average_slope_intercept(lines)
	y1 = image.shape[0]
	y2 = y1 * 0.6
	left_line = pixel_points(y1, y2, left_lane)
	right_line = pixel_points(y1, y2, right_lane)
	return left_line, right_line


def draw_lane_lines(image, lines, color=[255, 0, 0], thickness=12):
	"""
	Draw lines onto the input image.
		Parameters:
			image: The input test image (video frame in our case).
			lines: The output lines from Hough Transform.
			color (Default = red): Line color.
			thickness (Default = 12): Line thickness.
	"""
	line_image = np.zeros_like(image)
	for line in lines:
		if line is not None:
			cv2.line(line_image, *line, color, thickness)
	return cv2.addWeighted(image, 1.0, line_image, 1.0, 0.0)
Use Cases of Road Lane Detection Using Computer Vision Models
(i) Autonomous Vehicles: Lane detection is fundamental for self-driving cars to navigate and maintain their position within lanes, ensuring safe and reliable autonomous driving.
(ii) Advanced Driver Assistance Systems (ADAS): Lane detection in ADAS provides real-time assistance to drivers, offering warnings or corrective actions when the vehicle deviates from its lane, contributing to improved safety.
(iii) Traffic Monitoring and Management: Implementing lane detection helps in monitoring traffic flow, identifying lane violations, and optimizing traffic management strategies.
(iv) Lane-keeping Assistance: Lane detection systems assist human drivers by providing visual or audible alerts if the vehicle drifts out of its lane, helping prevent accidents due to driver distraction or drowsiness.
(v) Enhanced Safety: Accurate lane detection systems reduce the risk of accidents by ensuring vehicles remain within their designated lanes, minimizing collisions due to lane deviation.
(vi) Improved Navigation: Autonomous vehicles rely on lane detection for precise navigation, leading to more efficient and safe transportation.
(vii) Infrastructure Maintenance: Lane detection contributes to monitoring road conditions, ensuring proper maintenance of lane markings and road safety standards.
Overall, road lane detection using computer vision models serves a multitude of purposes, ranging from improving road safety to enabling advancements in autonomous transportation systems, thereby revolutionizing the way we travel and enhancing overall road infrastructure.
Frequently Asked Questions
1. Can OpenCV detect real-time lane detection?
OpenCV is equipped with powerful tools for real-time lane detection using computer vision. By employing techniques like edge detection, color manipulation, and the Hough Transform, OpenCV enables the processing of live video streams to detect and highlight lane markings in real-time. This involves converting video frames, reducing noise, detecting edges, defining relevant regions, and applying the Hough Transform to identify and display the detected lanes.
These functionalities empower developers to create algorithms that continuously analyze live video inputs, identifying lane markings and providing visual overlays of lanes in real-time. This capability is essential for applications such as autonomous vehicles and driver assistance systems, facilitating immediate responses based on extracted lane information from the visual data.
2. What is computer vision in autonomous self-driving cars?
Computer vision in autonomous self-driving cars encompasses the utilization of visual data obtained from onboard cameras, Lidar, radar, and sensors to interpret and understand the vehicle's environment. This technology relies on sophisticated algorithms to detect objects, identify road markings, recognize traffic signs, and navigate surroundings in real time. It enables the vehicle to recognize pedestrians, vehicles, obstacles, and road infrastructure, crucial for making driving decisions and ensuring safe navigation.
By leveraging techniques like object detection, semantic segmentation, and depth estimation, computer vision aids in tasks such as lane detection, obstacle avoidance, traffic sign recognition, and precise localization within maps. This information is pivotal for the vehicle's decision-making systems, allowing it to plan routes, make driving decisions, and navigate routes effectively.
Overall, computer vision plays a vital role in enhancing the perception capabilities of autonomous vehicles, enabling them to perceive and understand the environment, thus ensuring safe and reliable autonomous driving.
3. What is lane detection & object detection?
Lane detection involves identifying and delineating lane markings on a road, enabling vehicles to understand and stay within their designated lanes. It typically utilizes computer vision techniques to detect lane boundaries, such as edge detection algorithms, Hough transforms, and region-of-interest selection, providing crucial information for autonomous navigation and driver assistance systems.
On the other hand, object detection refers to the process of identifying and categorizing various objects within a visual scene, such as pedestrians, vehicles, traffic signs, and obstacles. This involves using algorithms and models, like convolutional neural networks (CNNs) or other machine learning techniques, to recognize and locate objects in images or video frames, essential for tasks like collision avoidance, navigation, and situational awareness in autonomous driving systems.

Simplify Your Data Annotation Workflow With Proven Strategies
.png)
