

A Quick Guide For Object Detection Using Yolov8

YOLO (You Only Look Once) is a family of real-time object detection models for computer vision introduced in 2016 by Joseph Redmon et al.
YOLO is known for its speed and accuracy in object detection, as it can detect objects in images or video frames in a single forward pass through the neural network.
YOLO works by dividing an image into a grid and predicting bounding boxes & class probabilities for each grid cell.
This approach allows YOLO to make detections with high accuracy and speed, even in cases where objects are partially obscured or small.
YOLOv8 is the latest version of the YOLO family of object detection models. It was released in 2021 by Alexey Bochkovskiy et al. YOLOv8 builds upon the success of its predecessors, YOLOv7 and YOLOv6, & incorporates several advancements in computer vision.
One of the key features of YOLOv8 is its improved accuracy and speed compared to previous versions. It achieves this using a larger and deeper neural network architecture trained on a large-scale dataset.
Additionally, YOLOv8 utilizes a technique called "swish activation," which is known to improve the convergence of the network during training.
Another major improvement in YOLOv8 is using a novel backbone architecture called CSPDarknet. This architecture is designed to improve the flow of information through the network by reducing the number of convolutional layers while maintaining the same level of accuracy.
YOLOv8 also incorporates features like data augmentation, learning rate schedules, and improved training strategies to enhance performance.
Overall, YOLOv8 is a state-of-the-art object detection algorithm that significantly improves accuracy and speed compared to previous versions, making it a popular choice for various computer vision applications.
Table of Contents
Prerequisites
To proceed further and understand CNN based approach for detecting casting defects, one should be familiar with:
To proceed further, one should be familiar with:
- Python: All the below code will be written using python
- OpenCV (Open source Computer Vision): OpenCV provides a standard infrastructure for computer vision-based applications.
- Tensorflow: TensorFlow is a free, open-source machine learning and artificial intelligence software library. It can be utilized for various tasks, but it is most commonly employed for deep neural network training and inference.
- Keras: Keras is a Python interface for artificial neural networks and is open-source software. Keras serves as an interface for the TensorFlow library
- Jupyter Notebook: Jupyter notebooks are web-based platforms built for mathematical and scientific computations.
Implementation
Environment Setup
Below are points that need to be done before running the code:
- The code below is written in my local jupyter notebook. Therefore, install jupyter. You can refer to this https://www.anaconda.com/products/distribution. You can install Anaconda and use jupyter from there.
- For using the yolov8 model, we first need to install certain libraries and packages, which include: Ultralytics and Supervision.
Hands-on with Code
This tutorial aims to get the reader a basic understanding of how we would implement yolov8 for real-life tasks.
We begin by importing the required libraries.
import cv2
import supervision as sv
from ultralytics import YOLO
Next, we set up our environment. For this, we:
- Set up a video writer class
- Define the configurations of the bounding box
- Load the yolov8 model.
def main():

    # to save the video
    writer= cv2.VideoWriter('webcam_yolo.mp4',
                            cv2.VideoWriter_fourcc(*'DIVX'),
                            7,
                            (1280, 720))

    # define resolution
    cap = cv2.VideoCapture(0)
    cap.set(cv2.CAP_PROP_FRAME_WIDTH, 1280)
    cap.set(cv2.CAP_PROP_FRAME_HEIGHT, 720)

    # specify the model
    model = YOLO("yolov8n.pt")

    # customize the bounding box
    box_annotator = sv.BoxAnnotator(
        thickness=2,
        text_thickness=2,
        text_scale=1
    )
Next, we read input from the camera and perform predictions using our yolov8 model.
    while True:
        ret, frame = cap.read()
        result = model(frame, agnostic_nms=True)[0]
        detections = sv.Detections.from_yolov8(result)
        labels = [
        f"{model.names[confidence]} {class_id: 0.2f}"
        for _, _, class_id,confidence, _
        in detections
        ]


        frame = box_annotator.annotate(
        scene=frame,
        detections=detections,
        labels=labels
        )

        writer.write(frame)

        cv2.imshow("yolov8", frame)

        if (cv2.waitKey(30) == 27): # break with escape key
        break

    cap.release()
    writer.release()
    cv2.destroyAllWindows()

if __name__ == "__main__":
    main()
Output

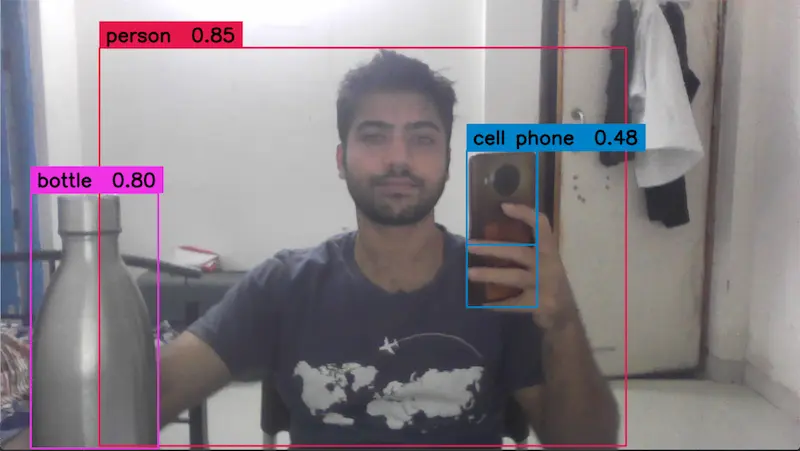
Figure: Object Detection using Yolov8 (Image by author)
Conclusion
In this hands-on tutorial, we have learned about YOLOv8, the latest version of the YOLO family of object detection models, and its key features.
We have also reviewed the prerequisites required to implement YOLOv8 and the environment setup required to run the cod
We then implemented a simple real-life application of YOLOv8 to detect objects in a video stream from a webcam.
We have seen how to use the Ultralytics and Supervision libraries to load the YOLOv8 model and perform object detection on each video frame.
Overall, this tutorial provides a basic understanding of implementing YOLOv8 for real-life tasks, and readers can build upon this foundation to create more complex and sophisticated applications.
Book a demo with Labellerr's sales team to see how ML teams can leverage the benefits of YOLOV8 in their computer vision development workflow using Labellerr.

Simplify Your Data Annotation Workflow With Proven Strategies
.png)
