

A Detailed Guide On Building PCOS Detection Model For ML Experts

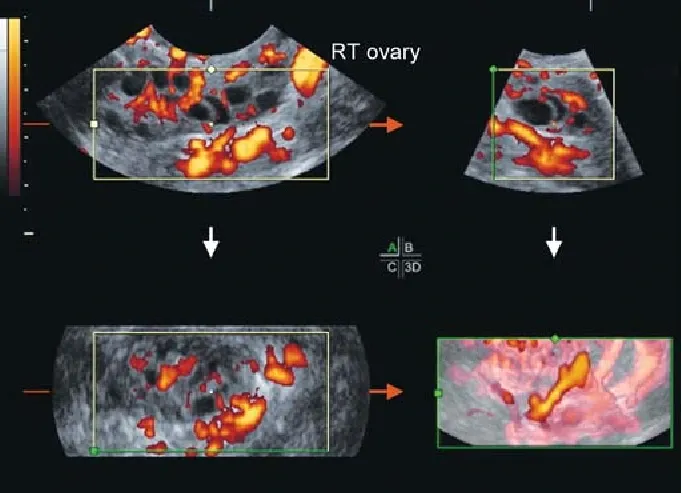
Table of Contents
- Introduction
- Prerequisites
- Dataset Understanding
- Hands-On Tutorial
- Use Cases in the Medical and Healthcare Industry
- Conclusion
- Frequently Asked Questions
Introduction
Polycystic Ovary Syndrome (PCOS) is a common hormonal disorder affecting women, characterized by various symptoms such as irregular periods, excessive hair growth, and cysts on the ovaries.
The detection of PCOS often involves analyzing ultrasound images of ovaries for cysts and irregularities. In this tutorial, we'll explore how deep learning can be utilized to automate the process of identifying PCOS-related anomalies in ultrasound images.
Prerequisites
Before diving into the tutorial, ensure you have the necessary environment set up:
Python Installation: Make sure Python is installed on your system.
Libraries: Install required libraries such as NumPy, Matplotlib, TensorFlow, and Keras.
Jupyter Notebook or Python IDE: Choose a preferred environment for coding and executing Python scripts.
Dataset Understanding
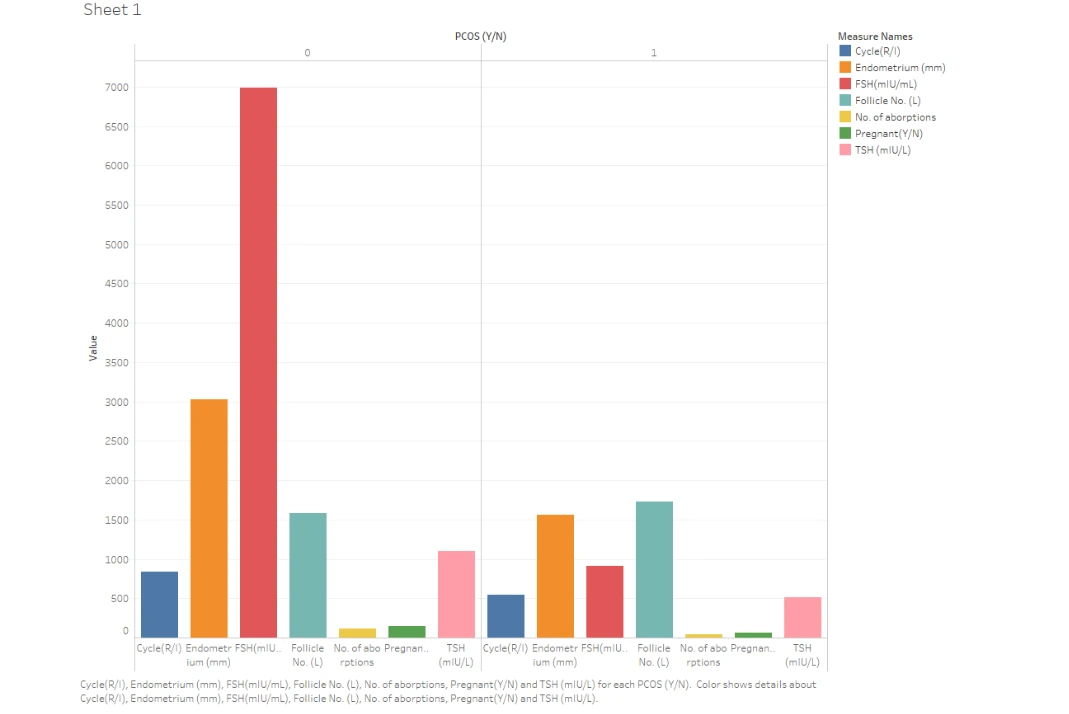
The dataset utilized in this tutorial focuses on Polycystic Ovary Syndrome (PCOS), a prevalent hormonal disorder characterized by irregular menstrual cycles, elevated levels of androgens (male hormones), and the development of multiple fluid-filled sacs called follicles within the ovaries, often resulting in irregular ovulation.
This dataset serves as a comprehensive repository containing various physical and clinical parameters crucial in determining PCOS and infertility-related issues. It includes ultrasound images categorized into two classes: 'infected' denoting the presence of PCOS, and 'notinfected' indicating the absence of PCOS.
A noteworthy aspect of this dataset is its extensive coverage, encompassing data collected from ten different hospitals across Kerala, India. This diversity in data sources enhances the dataset's robustness and represents a broader spectrum of patients, ensuring a more comprehensive and varied dataset for training and testing.
The inclusion of physical and clinical parameters alongside ultrasound images contributes to a holistic understanding of PCOS-related conditions. Such a multidimensional dataset can aid in building more accurate and reliable models for the automated detection of PCOS and associated fertility issues.
Hands-On Tutorial
Outline
(iv) Preprocessing and Data Augmentation
(v) Building the Convolutional Neural Network (CNN) Model
(vi) Compiling the Model
(vii) Training the Model
(viii) Model Evaluation
(ix) Visualizing Training History
(x) Saving the Model
1. Importing Libraries
The initial part of the code involves importing the necessary libraries and modules required for data handling, visualization, and model building. Here's an explanation of the libraries imported:
import numpy as np
import os
import matplotlib.pyplot as plt

import tensorflow as tf
from keras.layers import Input, Dense, Flatten
from keras.preprocessing.image import ImageDataGenerator
from keras.callbacks import ModelCheckpoint, EarlyStopping
from keras.optimizers import Adam
from tensorflow.keras.models import Sequential
from tensorflow.keras.layers import Dense, Flatten, Conv2D, MaxPooling2D, Dropout
from tensorflow.keras.callbacks import ModelCheckpoint, EarlyStopping

from tensorflow.keras.losses import BinaryCrossentropy, CategoricalCrossentropy
from sklearn.metrics import classification_report, confusion_matrix
from sklearn.metrics import roc_curve
from sklearn.metrics import auc
NumPy: For numerical operations and handling arrays.
OS: For interacting with the operating system (used for file paths).
Matplotlib: For data visualization.
TensorFlow and Keras: For building and training deep learning models.
ImageDataGenerator: To perform data augmentation on images.
ModelCheckpoint, EarlyStopping: Callbacks used during model training.
Adam, BinaryCrossentropy, CategoricalCrossentropy: Optimizer and loss functions for the neural network.
sklearn: Used for metrics like classification_report, confusion_matrix, ROC curve, etc.
2. Loading the Dataset
Loading Images Using image_dataset_from_directory:
tf.keras.utils.set_random_seed(12)

batch_size = 32
img_height = img_width =224

directory = "/kaggle/input/pcos-detection-using-ultrasound-images/data/train"
test = "/kaggle/input/pcos-detection-using-ultrasound-images/data/test"

train_ds = tf.keras.preprocessing.image_dataset_from_directory(
    directory,
    labels="inferred",
    label_mode="binary",
    #class_names=None,
    shuffle=True,
    seed=12,
    validation_split= 0.15,
    subset="training",
    image_size=(img_height, img_width),
    batch_size=batch_size)
directory: Path to the directory containing the dataset.
image_dataset_from_directory: Function to load images and labels from the specified directory.
labels: "inferred" indicates the labels are derived from the directory structure.
label_mode: Specifies the type of labels (in this case, "binary" for two classes).
shuffle: Randomizes the order of data during loading.
seed: Sets the seed for reproducibility.
validation_split: Splits the data into training and validation subsets.
image_size: Specifies the dimensions of the images.
batch_size: Number of samples per batch.
3. Visualizing/EDA of Dataset
Visualizing Sample Images:
import matplotlib.pyplot as plt
plt.figure(figsize=(10, 10))
class_names = train_ds.class_names
for images, labels in train_ds.take(2):
    for i in range(32):
        ax = plt.subplot(6, 6, i + 1)
        plt.imshow(images[i].numpy().astype("uint8"))
        plt.title(class_names[int(labels[i])])
        plt.axis("off")
plt. figure(): Sets up the figure for plotting.
train_ds.class_names: Retrieves the class names from the dataset.
train_ds.take(2): Fetches two batches of data.
plt. imshow(): Displays the images.
plt. title(): Sets the title of each image with its corresponding label.
plt.axis(): Turns off the axis for cleaner visualization.
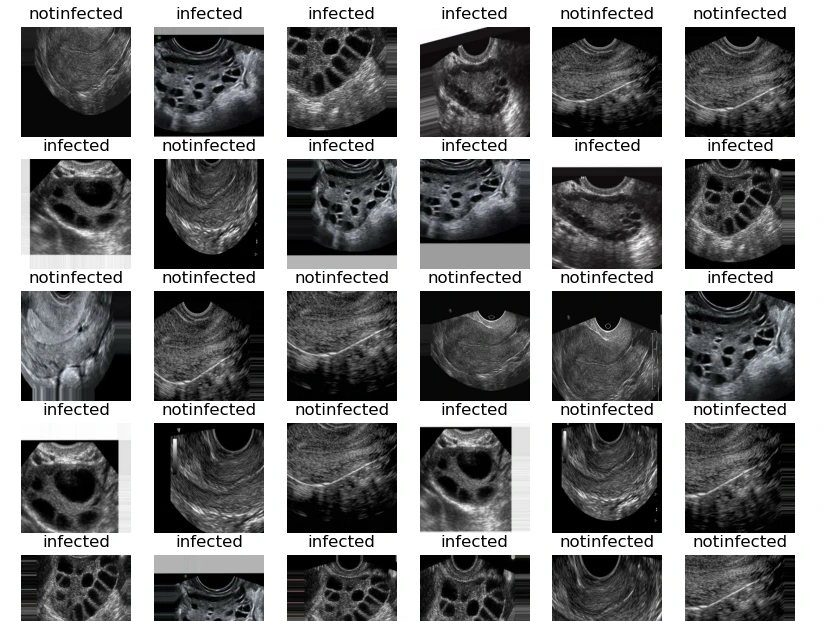
This code snippet visualizes a grid of sample images from the training dataset with their respective labels, providing an overview of the data and ensuring proper loading and labeling.
4. Preprocessing and Data Augmentation
This step involves loading and augmenting the dataset. Data augmentation techniques are applied to increase the diversity and size of the dataset. Techniques such as rotation, flipping, zooming, and shearing create variations in the images, helping the model generalize better.
# data augmentation
from tensorflow.keras.preprocessing.image import ImageDataGenerator

datagen = ImageDataGenerator(rescale = 1./255,
                             shear_range = 0.2,
                             zoom_range = 0.2,
                             #width_shift_range=0.2,
                             #height_shift_range=0.2,
                             horizontal_flip = True,
                             vertical_flip=True,
                             rotation_range=20,
                             validation_split=0.2,
                             fill_mode='nearest'
                             )
# prepare an iterators for each dataset
train_ds = datagen.flow_from_directory(directory,
                                       class_mode='categorical',
                                       classes=['infected', 'notinfected'],
                                       target_size=(224, 224),
                                       batch_size=batch_size,
                                       subset='training',
                                       seed=12)
# prepare an iterators for each dataset
val_ds = datagen.flow_from_directory( directory,
                                       class_mode='categorical',
                                       classes=['infected', 'notinfected'],
                                       target_size=(224, 224),
                                       batch_size=batch_size,
                                       subset='validation',
                                       seed=12)
test_ds = tf.keras.preprocessing.image_dataset_from_directory(
test,
seed=12,
image_size=(img_height, img_width),
batch_size=batch_size)5. Building the Convolutional Neural Network (CNN) Model
Construct a CNN architecture using Keras' Sequential API. The CNN model comprises several layers:
--> Convolutional layers to extract features from images
--> Max-pooling layers to downsample feature maps
--> Flattening layer to convert 2D feature maps into a 1D vector
--> Dense (fully connected) layers for classification
This architecture is designed to learn intricate patterns and features from the ultrasound images related to PCOS.
model = Sequential()

model.add(Conv2D(12, (5,5),padding='SAME',activation='relu'))
model.add(MaxPooling2D(pool_size=(2,2)))
#model.add(Dropout(0.1))

model.add(Conv2D(8, (5,5),padding='SAME',activation='relu'))
model.add(MaxPooling2D(pool_size=(2,2)))
#model.add(Dropout(0.1))

model.add(Conv2D(4, (5,5),padding='SAME',activation='relu'))
model.add(MaxPooling2D(pool_size=(2,2)))
model.add(Flatten())

model.add(Dense(2,activation='softmax'))
6. Compiling the Model
Compile the model using an optimizer (e.g., Adam), a loss function (Binary Cross Entropy for binary classification), and accuracy as the metric for evaluation. Compiling the model prepares it for the training phase.
opt=Adam(learning_rate=0.01)
model.compile(optimizer=opt, loss=BinaryCrossentropy(), metrics=['accuracy'])
7. Training the Model
Train the model using the prepared training and validation datasets. Utilize early stopping as a callback mechanism to prevent overfitting and monitor validation loss. The training process involves iteratively adjusting model parameters to minimize the loss function.
earlyStopping = EarlyStopping(monitor="val_loss", mode="min", verbose=1,patience=15)
history = model.fit(
    train_ds,
    validation_data=val_ds,
    callbacks=[earlyStopping],
    batch_size=batch_size,
    verbose=1,
    epochs=20)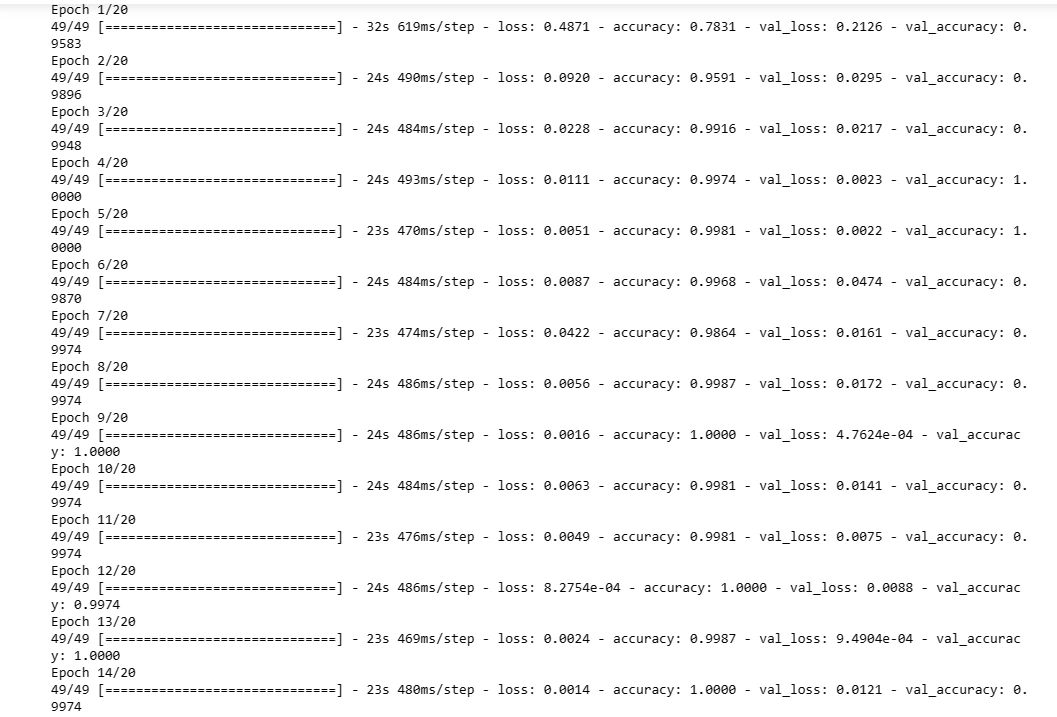
model.summary()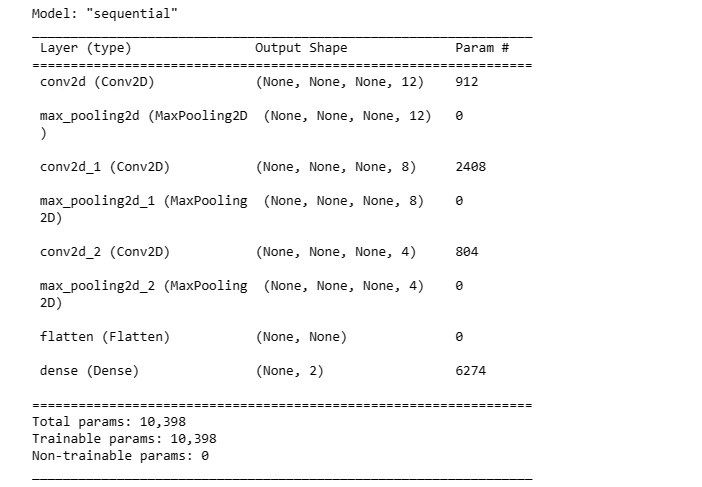
8. Model Evaluation
Evaluate the model's performance using the validation dataset. Calculate metrics such as loss and accuracy to assess its effectiveness in detecting PCOS-related anomalies in ultrasound images.
model.evaluate(val_ds)
9. Visualizing Training History
Plot the training, validation loss, and accuracy across epochs to analyze the model's learning trends. These visualizations help understand the model's behavior during training and potential issues like overfitting or underfitting.
plt.plot(history.history['loss'])
plt.plot(history.history['val_loss'])
plt.title('Loss vs. epochs')
plt.ylabel('Loss')
plt.xlabel('Epoch')
plt.legend(['Training', 'Validation'], loc='upper right')
plt.show()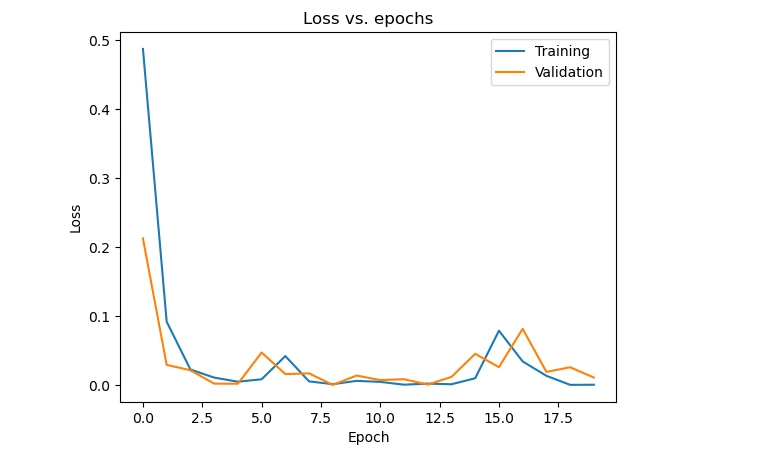
plt.plot(history.history['accuracy'])
plt.plot(history.history['val_accuracy'])
plt.title('Accuracy vs. epochs')
plt.ylabel('Accuracy')
plt.xlabel('Epoch')
plt.legend(['Training', 'Validation'], loc='upper right')
plt.show()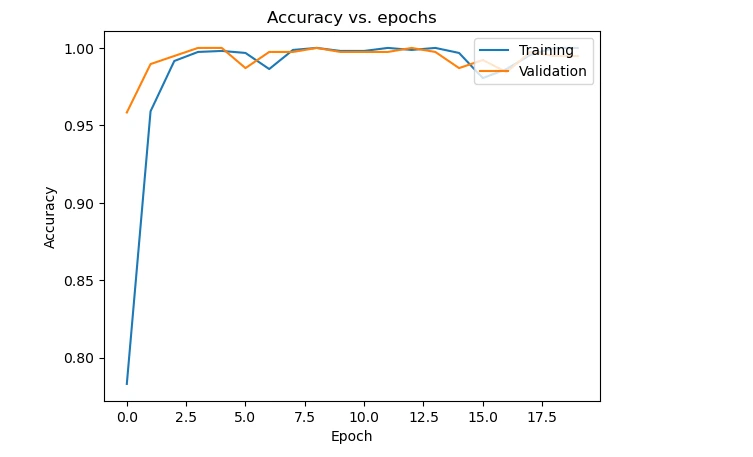
10. Saving the Model
Finally, save the trained model for future use or deployment in healthcare applications.
model.save('model.h5')Use Cases in the Medical and Healthcare Industry
The application of deep learning models for PCOS detection in ultrasound images holds immense potential in the medical and healthcare industry:
(i) Quicker and more accurate diagnoses: Automation reduces human error and speeds up the diagnostic process.
(ii) Early detection of PCOS-related symptoms: Timely identification allows for early intervention and management.
(iii) Reduced manual effort: Automated analysis reduces the manual workload for healthcare professionals.
(iv) Standardized diagnostic procedures: Consistent and standardized analysis aids in providing more uniform healthcare services.
Conclusion
In this detailed tutorial, we've covered the entire process of leveraging deep learning for PCOS ovary detection using ultrasound images. Understanding the dataset, preprocessing, model building, training, evaluation, and potential applications in the medical field were explored comprehensively.
This tutorial serves as a foundational guide for utilizing deep learning techniques in medical imaging applications, potentially revolutionizing diagnostic procedures for PCOS and similar conditions.
Labellerr’s SaaS data annotation platform streamlines the process, delivering precise, scalable, and efficient labeling for ultrasound images. Book a demo today.
Frequently Asked Questions
1. Can deep learning improve Auxiliary Detection of PCOS?
Deep learning can potentially enhance auxiliary detection of PCOS by exploring scleral changes in full-eye images. The utilization of a deep learning algorithm applied to a dataset comprising full-eye images of 721 Chinese women, particularly 388 PCOS patients, suggests a promising avenue for improving auxiliary detection of PCOS through automated methods.
2. How to detect PCOS using ultrasound images?
Detecting Polycystic Ovary Syndrome (PCOS) via ultrasound images involves a multistep process. Initially, segmentation techniques are utilized to isolate and identify the specific areas of interest within the images, typically focusing on the ovaries or any cysts present.
Following segmentation, features such as shape, texture, and other relevant characteristics are extracted from these segmented regions. These extracted features serve as vital information fed into classification algorithms, enabling the categorization of ultrasound images into distinct classes, notably distinguishing between PCOS-affected and non-PCOS cases.
The continuous exploration and enhancement of various segmentation, feature extraction, and classification methodologies aim to refine the accuracy and efficacy of PCOS detection using ultrasound imaging techniques.
3. Can machine learning predict PCOS using ovary USG images?
Yes, machine learning techniques can predict PCOS using ovary Ultrasound (USG) images. By integrating or extending machine learning-based approaches, the research aims to enhance prediction performance while simultaneously reducing computational complexity.
These techniques involve utilizing algorithms that can learn from the features extracted from ovary USG images to classify whether an individual may have PCOS or not. Therefore, through the analysis and classification of features extracted from these images, machine learning methods serve as a promising tool for PCOS prediction based on ovary USG images.
Looking for high quality training data to train PCOS detection model? Talk to our team to get a tool demo.

Simplify Your Data Annotation Workflow With Proven Strategies
.png)
