

ML Beginner's Guide To Build Cyclist Pose Detection Model

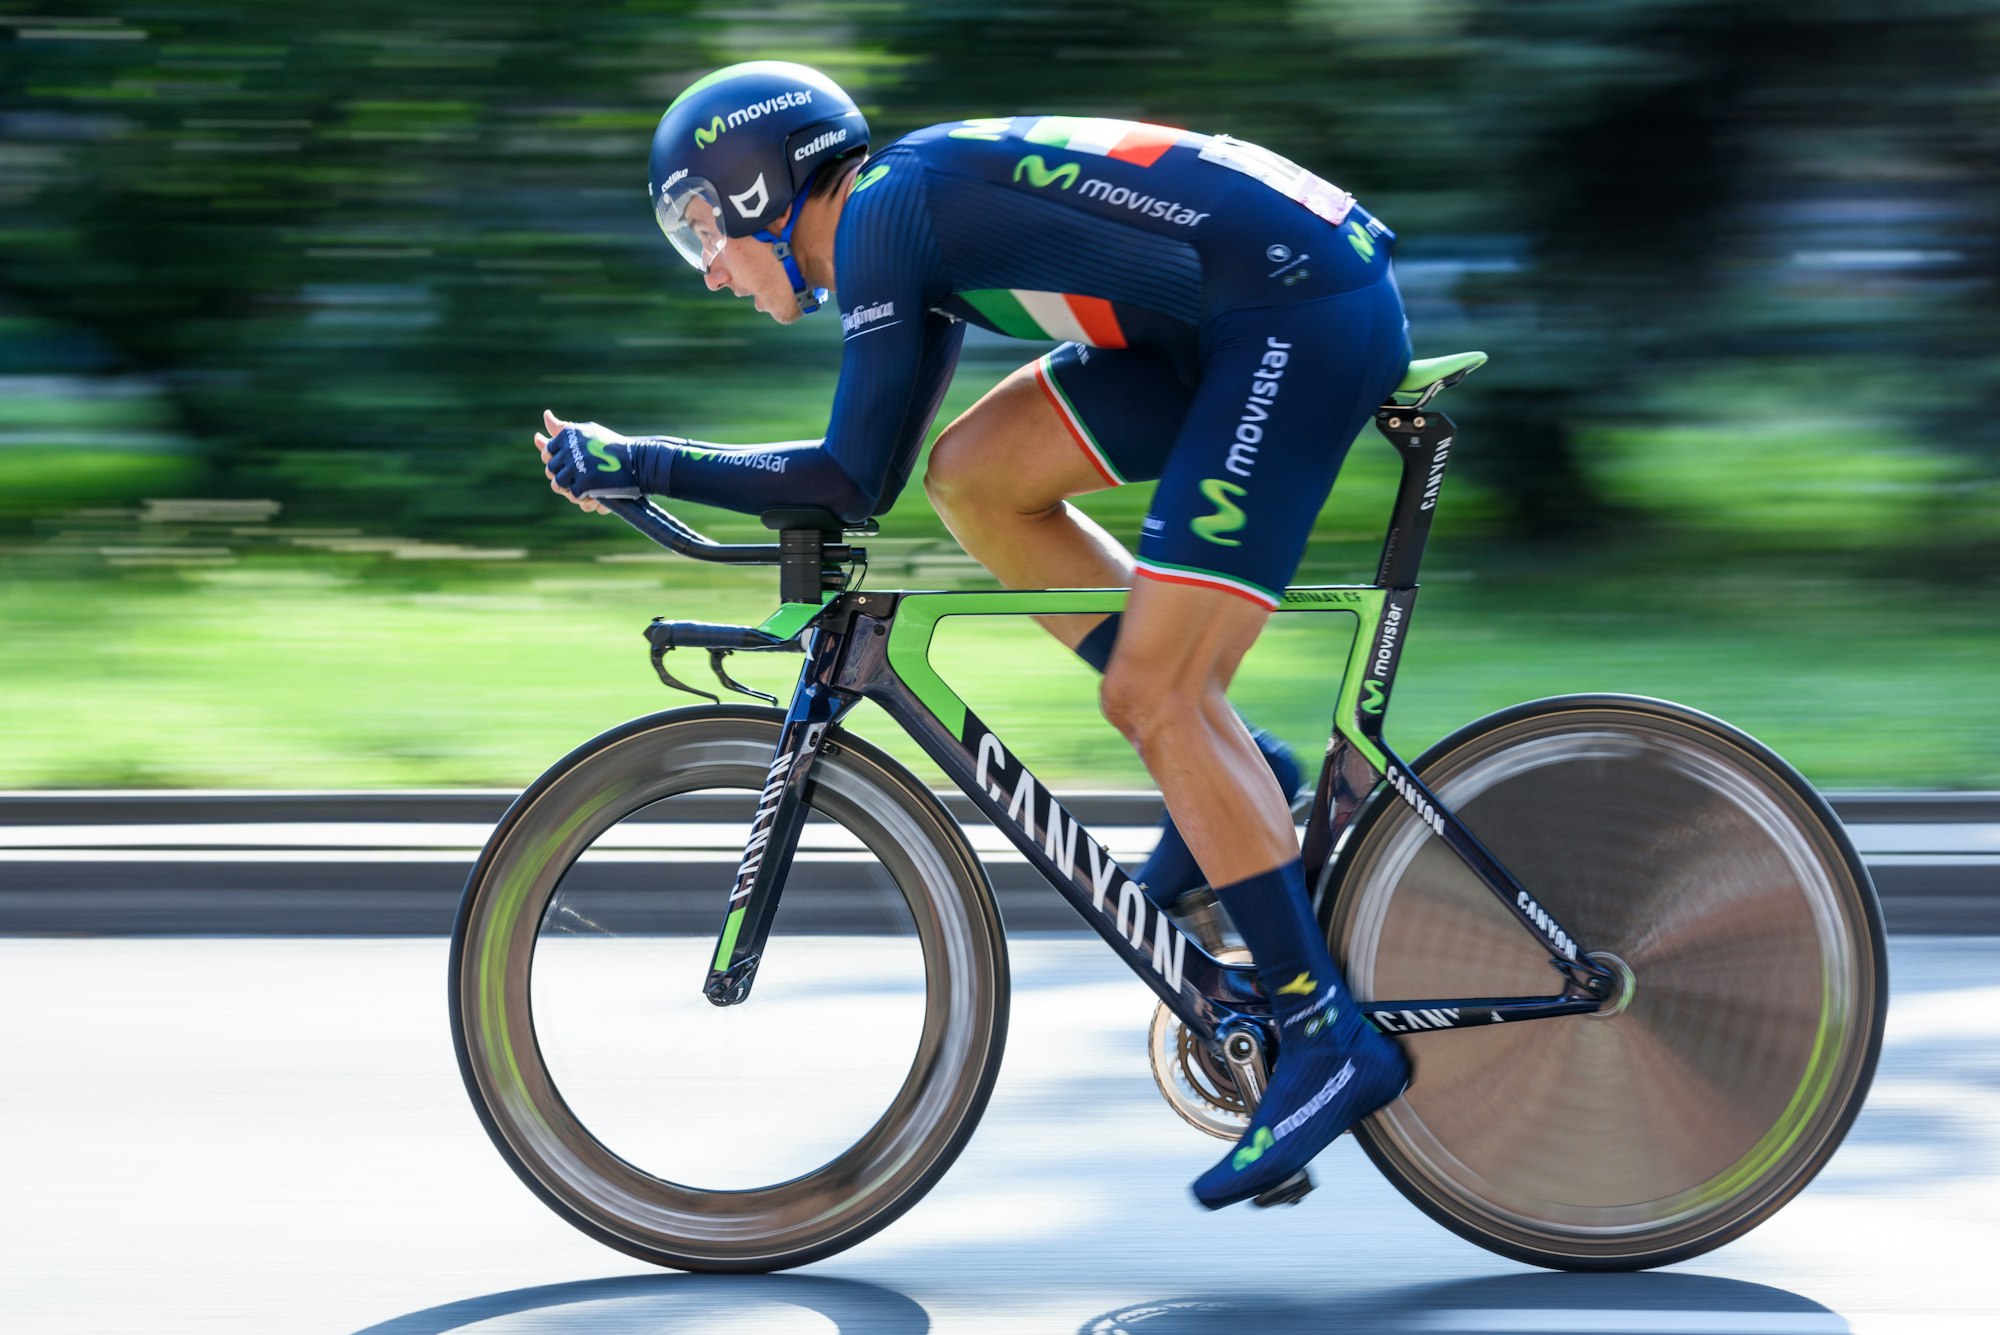
Get ready to dive into the thrilling world of cyclist pose detection! In this blog post, we're taking a journey using the MediaPipe Pose Solution API in Python. Why does cyclist pose detection matter so much? Well, it's not just about sports analytics; it's about making our cities safer and smarter. We'll uncover the secrets behind this technology and see how the MediaPipe Pose Solution API becomes our superhero in making it all happen! Buckle up for a ride into the future of safety and precision.
Table of Contents
- The Imperative Need for Cyclist Pose Detection
- Implementation Facilitated by MediaPipe Pose Solution
- Creating the Project
- Accelerating Annotation with Labellerr
- Conclusion
The Imperative Need for Cyclist Pose Detection
1. Sports Performance Analysis:
Cyclist pose detection emerges as a linchpin in sports performance analysis. By meticulously tracking the body movements of cyclists, coaches and athletes can glean insights into biomechanics, body posture, and cycling techniques. This wealth of information becomes instrumental in tailoring training regimens, fostering continual improvement in athletic prowess.
2. Health Monitoring:
Cyclist pose detection assumes a pivotal role in health monitoring, offering a proactive approach to overall well-being. Identifying suboptimal body postures during cycling is instrumental in averting injuries and discomfort, contributing to a more health-conscious cycling experience. Additionally, it facilitates the assessment of repetitive motions, aiding in the early identification of potential health concerns.
3. Smart Cities and Traffic Safety:
In the context of smart cities, cyclist pose detection becomes a linchpin in enhancing traffic safety. A comprehensive understanding of cyclist positions and movements contributes to the development of intelligent transportation systems. This, in turn, fosters safer cycling environments, curbing the risk of accidents and optimizing traffic flow.
4. Gesture-Based Control:
The applications of cyclist pose detection extend to the realm of gesture-based control systems. Cyclists can interact with devices or smart accessories through predefined gestures, ushering in a new dimension of user experience and convenience during cycling.
Implementation Facilitated by MediaPipe Pose Solution
Now, transitioning from the why to the how, let's dissect how the MediaPipe Pose Solution API serves as an instrumental ally in the pursuit of cyclist pose detection.
1. MediaPipe Pose Solution:
The MediaPipe Pose Solution API provides a robust framework for the accurate detection and analysis of human poses. Leveraging this solution empowers developers to pinpoint key body landmarks of cyclists, encompassing crucial elements such as the nose, shoulders, and limbs.
2. Customizable Parameters:
Flexibility is at the forefront, as the API allows for the customization of various parameters during initialization. Parameters like static_image_mode and min_detection_confidence offer developers the latitude to strike a balance between accuracy and real-time performance, aligning with the unique demands of each use case.
3. 3D Pose World Landmarks:
The ability to derive real-world 3D coordinates of pose landmarks injects an additional layer of sophistication into the analysis. This feature proves invaluable for applications necessitating spatial awareness, such as understanding the cyclist's position relative to the bike or other environmental elements.
4. Pose Segmentation:
Pose segmentation amplifies the visual representation of detected poses, affording a clearer comprehension of the cyclist's body within the broader scene. This feature finds application in augmented reality scenarios or scenarios requiring the accentuation of specific regions of interest.
Setting up the Environment
Firstly, let's make sure we have the necessary packages installed:
!pip install mediapipeNow, we can proceed with our code. We'll use two example images from the web for this demonstration.
Step1: Lets make an Image loader for us to test out In this we can put cyclist images
from google.colab import files
uploaded = files.upload()
Step2: Read the images and resized them
import cv2
from google.colab.patches import cv2_imshow
import math
import numpy as np

DESIRED_HEIGHT = 480
DESIRED_WIDTH = 480
def resize_and_show(image):
  h, w = image.shape[:2]
  if h < w:
    img = cv2.resize(image, (DESIRED_WIDTH, math.floor(h/(w/DESIRED_WIDTH))))
  else:
    img = cv2.resize(image, (math.floor(w/(h/DESIRED_HEIGHT)), DESIRED_HEIGHT))
  cv2_imshow(img)

# Read images with OpenCV.
images = {name: cv2.imread(name) for name in uploaded.keys()}
# Preview the images.
for name, image in images.items():
  print(name)
  resize_and_show(image)
Step3: MediaPipe Pose Solution
The MediaPipe Pose solution can be accessed through the mp.solutions.pose module. Before we start, let's take a look at some of the parameters we can customize during initialization.
import mediapipe as mp
mp_pose = mp.solutions.pose
mp_drawing = mp.solutions.drawing_utils
mp_drawing_styles = mp.solutions.drawing_styles
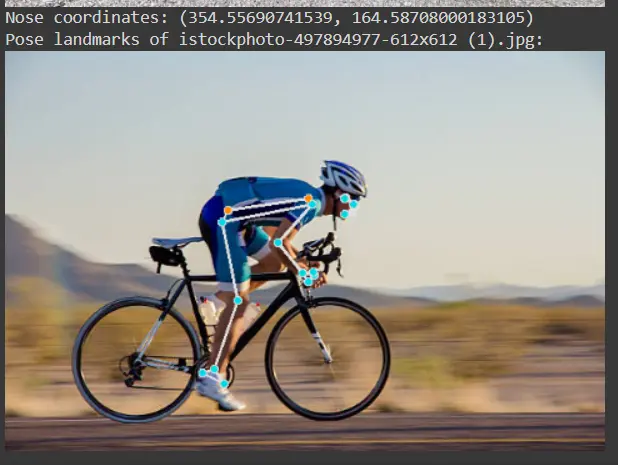
help(mp_pose.Pose)Step4: Run mediapipe pose and draw Pose landmarks
with mp_pose.Pose(
    static_image_mode=True, min_detection_confidence=0.5, model_complexity=2) as pose:
  for name, image in images.items():
    # Convert the BGR image to RGB and process it with MediaPipe Pose.
    results = pose.process(cv2.cvtColor(image, cv2.COLOR_BGR2RGB))

    # Print nose landmark.
    image_hight, image_width, _ = image.shape
    if not results.pose_landmarks:
      continue
    print(
      f'Nose coordinates: ('
      f'{results.pose_landmarks.landmark[mp_pose.PoseLandmark.NOSE].x * image_width}, '
      f'{results.pose_landmarks.landmark[mp_pose.PoseLandmark.NOSE].y * image_hight})'
    )

    # Draw pose landmarks.
    print(f'Pose landmarks of {name}:')
    annotated_image = image.copy()
    mp_drawing.draw_landmarks(
        annotated_image,
        results.pose_landmarks,
        mp_pose.POSE_CONNECTIONS,
        landmark_drawing_spec=mp_drawing_styles.get_default_pose_landmarks_style())
    resize_and_show(annotated_image)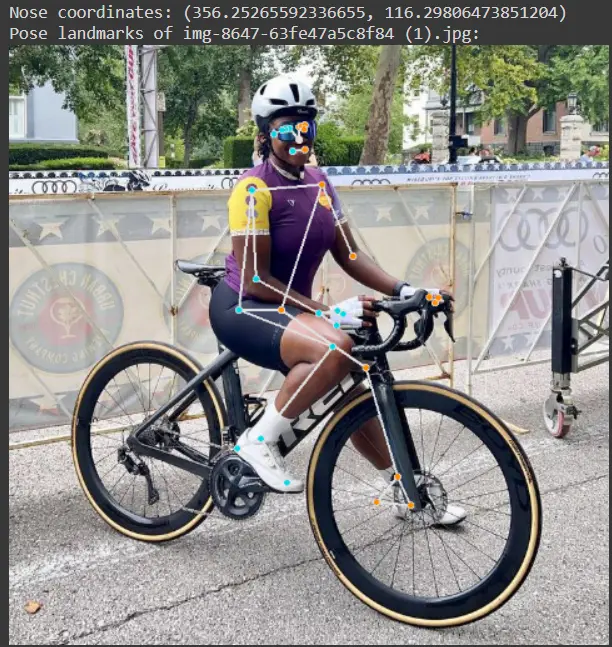
2nd test Image
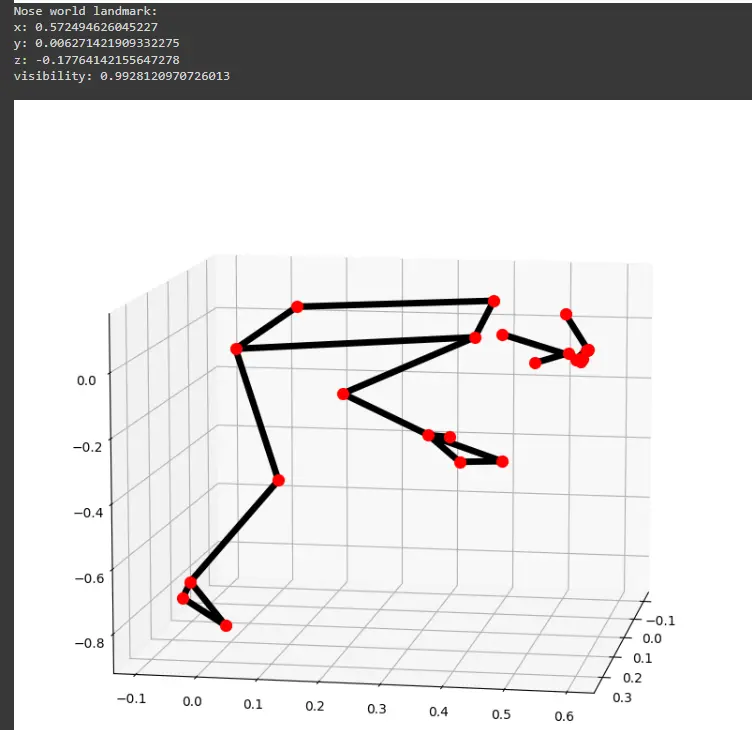
Step 5: 3D Pose World Landmarks
Let's extend our exploration to 3D pose world landmarks and understand how to obtain real-world coordinates.
with mp_pose.Pose(
    static_image_mode=True, min_detection_confidence=0.5, model_complexity=2) as pose:
  for name, image in images.items():
    results = pose.process(cv2.cvtColor(image, cv2.COLOR_BGR2RGB))

    # Print the real-world 3D coordinates of nose in meters with the origin at
    # the center between hips.
    print('Nose world landmark:'),
    print(results.pose_world_landmarks.landmark[mp_pose.PoseLandmark.NOSE])

    # Plot pose world landmarks.
    mp_drawing.plot_landmarks(
        results.pose_world_landmarks, mp_pose.POSE_CONNECTIONS)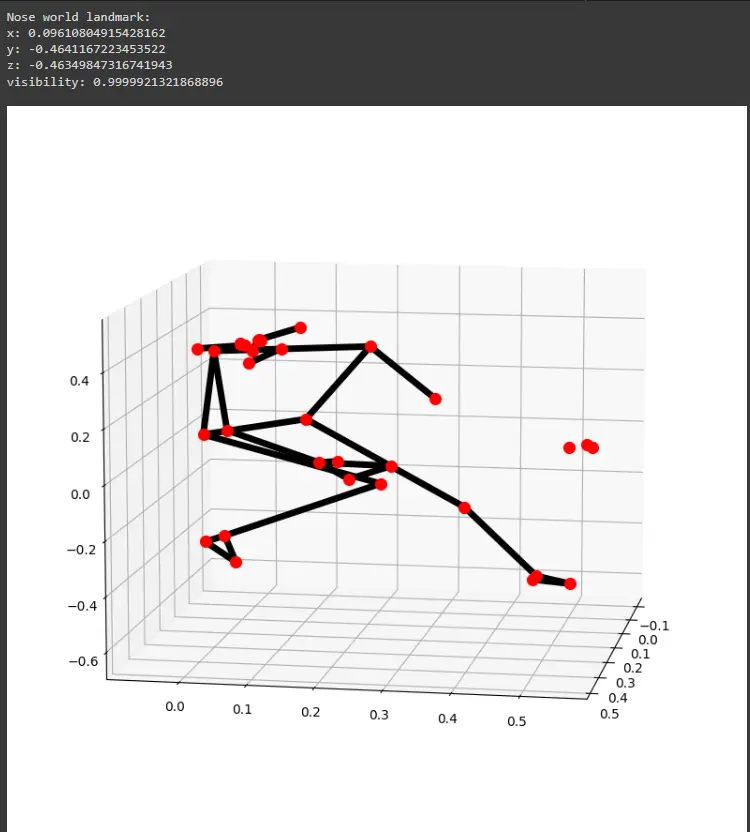
2nd image 3d plot
Step 6: Pose Segmentation
Lastly, let's experiment with pose segmentation, which involves segmenting the pose from the image. It segments the cyclist only which helps us to determine the exact area to detect pose.
with mp_pose.Pose(
    static_image_mode=True, min_detection_confidence=0.5,
    model_complexity=2, enable_segmentation=True) as pose:
  for name, image in images.items():
    results = pose.process(cv2.cvtColor(image, cv2.COLOR_BGR2RGB))

    # Draw pose segmentation.
    print(f'Pose segmentation of {name}:')
    annotated_image = image.copy()
    red_img = np.zeros_like(annotated_image, dtype=np.uint8)
    red_img[:, :] = (255,255,255)
    segm_2class = 0.2 + 0.8 * results.segmentation_mask
    segm_2class = np.repeat(segm_2class[..., np.newaxis], 3, axis=2)
    annotated_image = annotated_image * segm_2class + red_img * (1 - segm_2class)
    resize_and_show(annotated_image)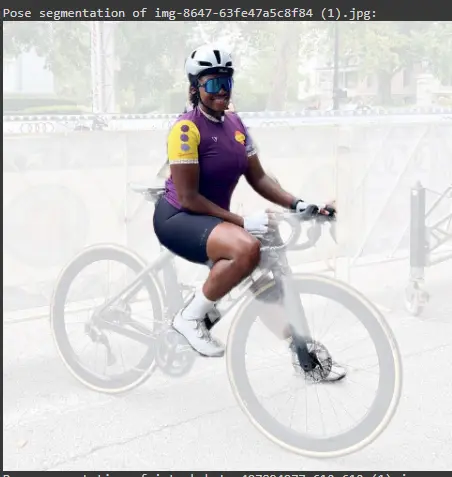
Accelerating Annotation with Labellerr
While the power of cyclist pose detection is evident, it's crucial to acknowledge the time-intensive nature of annotating images and subsequent training. For a faster and more efficient annotation process, consider exploring the Labellerr tool. Labellerr streamlines the image annotation workflow, providing a quicker and more user-friendly solution for generating annotated datasets.
Conclusion
In this blog post, we explored the capabilities of the MediaPipe Pose Solution API for cyclist pose detection. We covered basic pose detection, 3D world landmarks, and pose segmentation. This is just the tip of the iceberg, and there's much more to discover in the fascinating world of computer vision and pose estimation.
Feel free to experiment with different images and tweak the parameters to see how the results vary. Pose detection opens up a myriad of possibilities for applications ranging from sports analysis to health monitoring.
Looking for high quality training data to train your cyclist pose detection model? Talk to our team to get a tool demo.

Simplify Your Data Annotation Workflow With Proven Strategies
.png)
